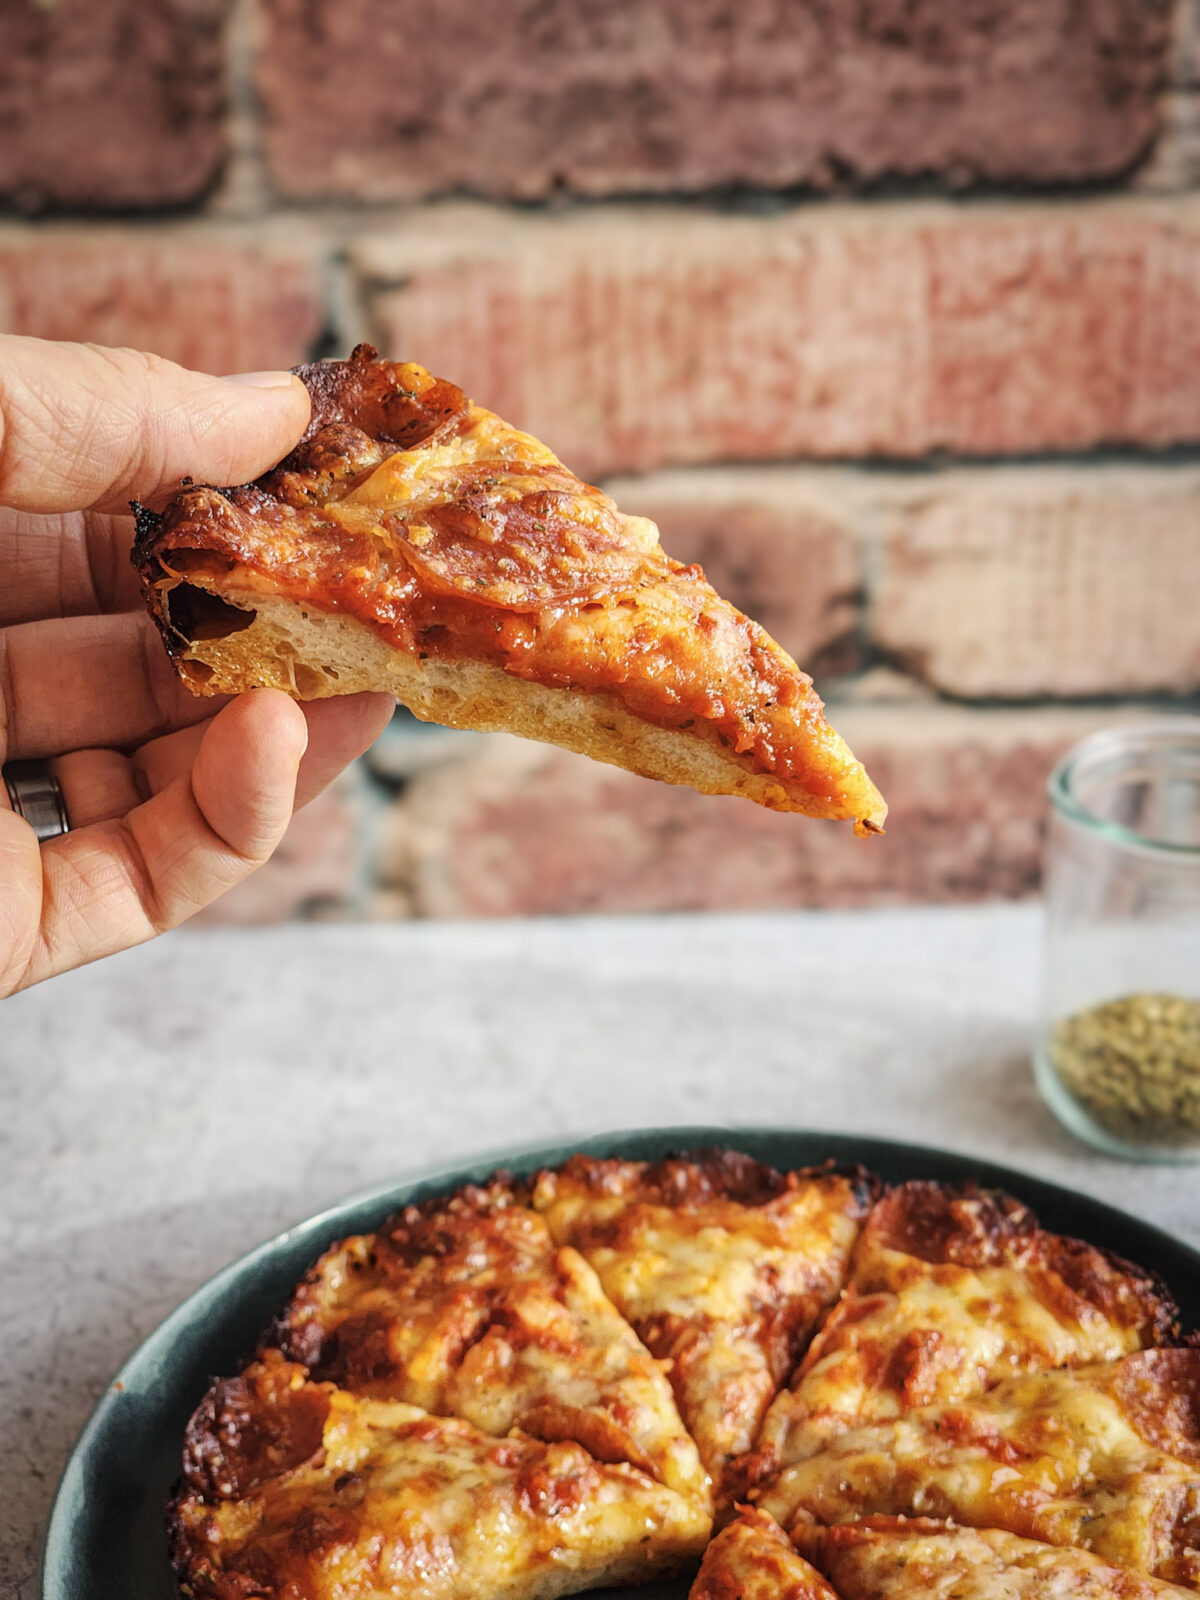
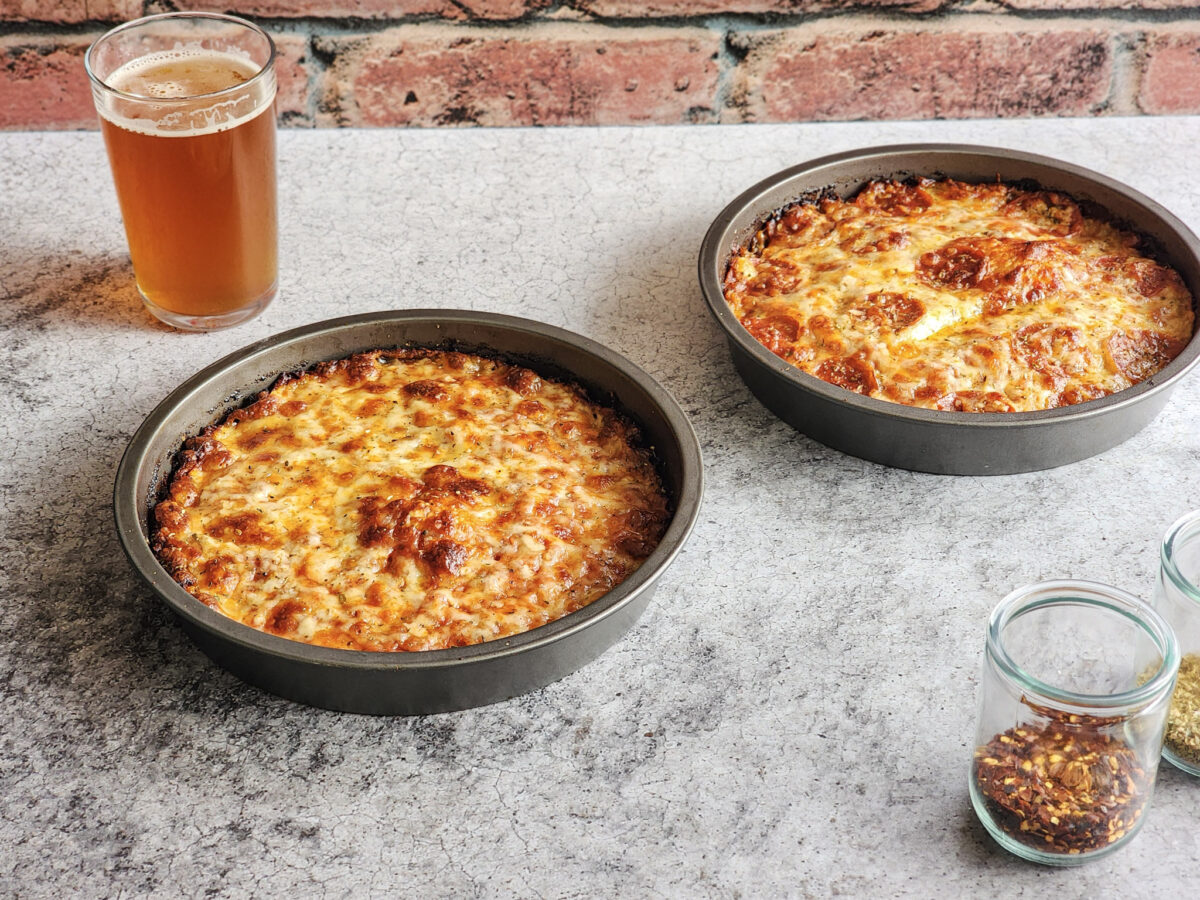
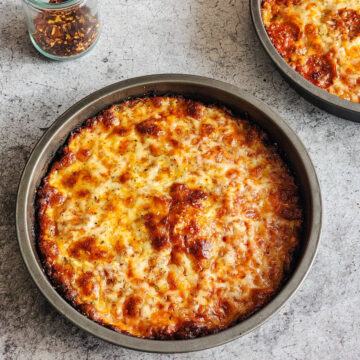
Amp up your next family pizza night with this recipe for the Ultimate Homemade Pan Pizza! The crust is irresistibly pillowy-soft and perfectly golden brown. The pizza sauce is deeply flavorful, and a combination of three cheeses makes the perfect ooey-gooey delivery device for all of your favorite toppings. (Don't even get me started on those ultra-crispy, caramelized edges!)

In this post, we'll explore all of the steps to making this iconic dish at home. This is an easy recipe that doesn't require a whole slew of kitchen gadgets to achieve pan pizza perfection. With a little hands-on time (and some patience), you'll be well on your way to turning your kitchen into a pizzeria!
Looking for thin crust? I've got you covered with my do-it-all Cold Ferment Pizza Dough recipe. This has tons of flavor, browns up awesome, and has the perfect chewy, airy texture.
Jump to:
Ultimate Homemade Pan Pizza Components & Ingredients
In this section, we're going to cover all of the components and ingredients you need for the Ultimate Homemade Pan Pizza. Starting with the dough, the sauce, the cheeses, and finally the toppings!
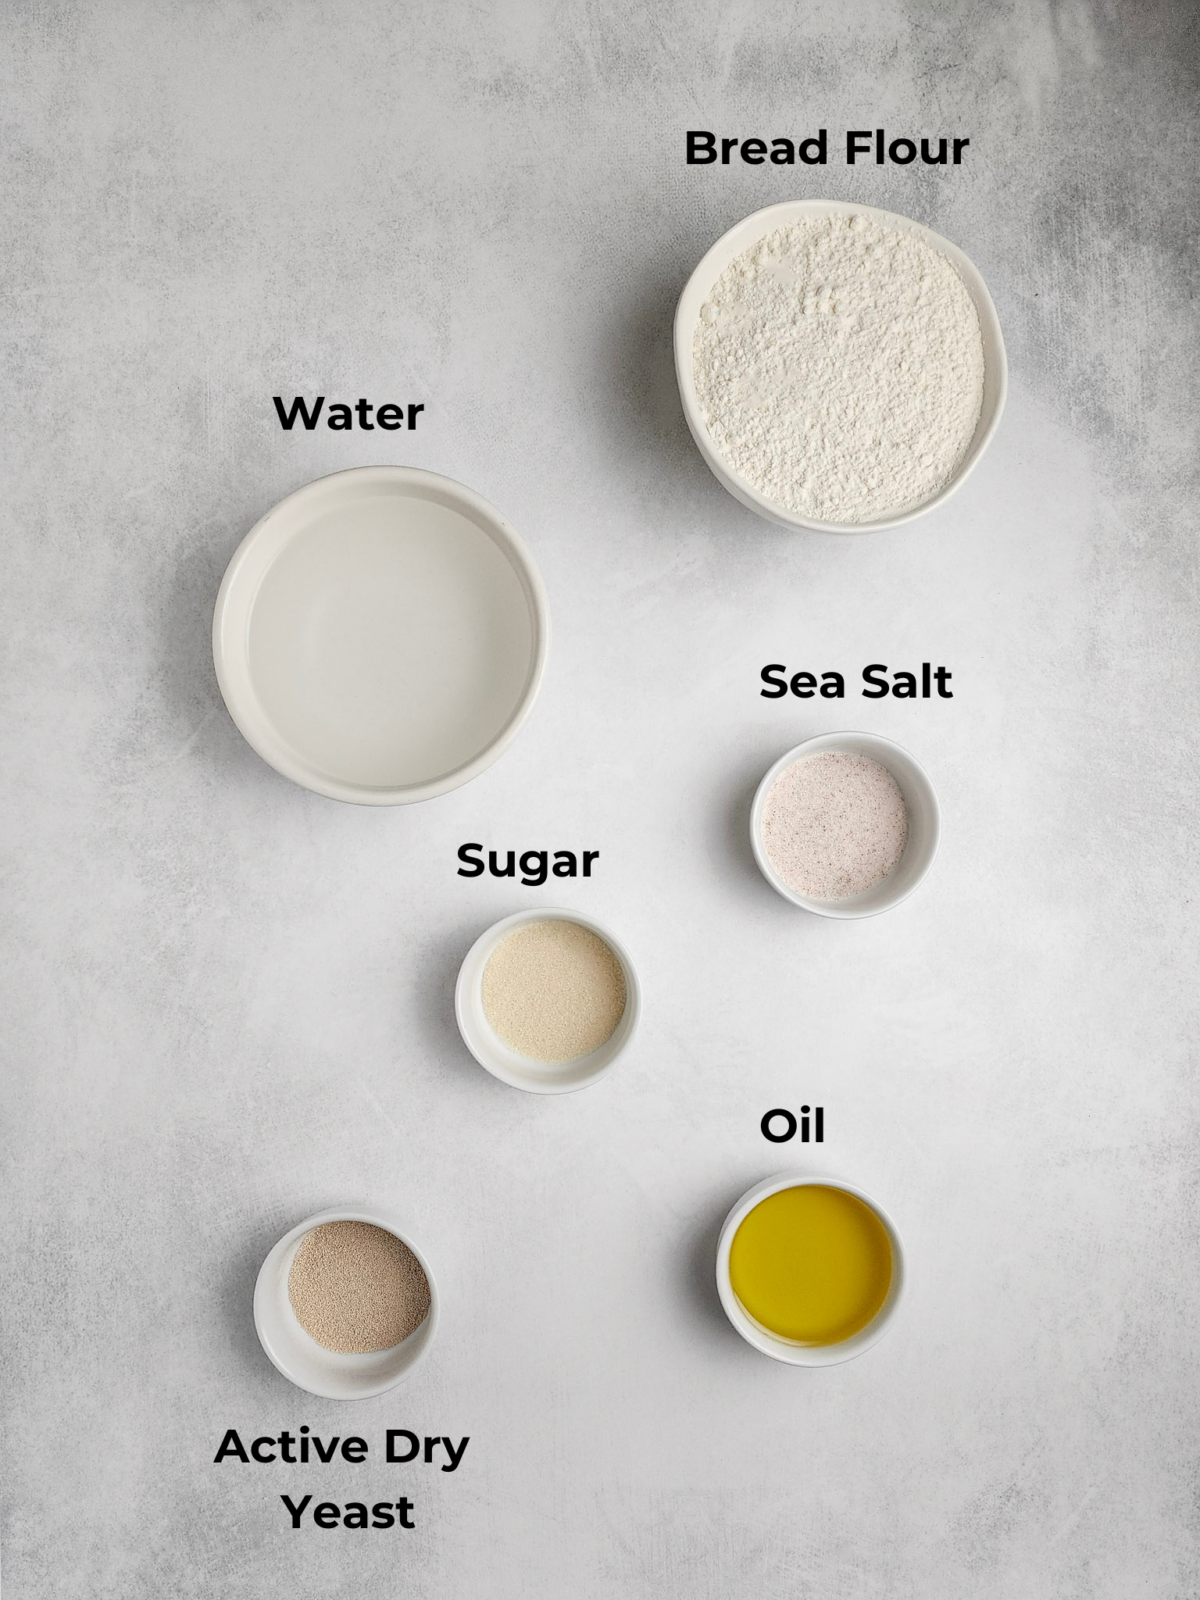
Pan Pizza Dough Ingredients
While I wouldn't call this a "no-knead" pizza dough, the hands-on time is pretty minimal. An overnight ferment in the refrigerator adds flavor, and long proofing times give us the pillowy-soft texture that is crucial to achieving pan nirvana. More information on the assembly process is below. Right now, it's all about the ingredients:
- Bread Flour - This provides slightly more gluten than regular all-purpose flour. This, in turn, provides a slightly chewier crust and bigger air bubbles. (All-Purpose flour can be substituted.)
- Water - Warm water helps activate the fermentation process and makes the dough easier to work with. Aim for 90 to 100°F.
- Sea Salt - Using fine sea salt instead of larger kosher salt makes it easier to incorporate evenly into the dough.
- Sugar - Granulated sugar lends just a hint of sweetness and helps the bottom of the crust caramelize lightly. This also helps the yeast get the fermentation kicked off.
- Oil - Any neutral-tasting oil can be used (olive, canola, avocado, etc.) This also helps the crust brown while baking.
- Active Dry Yeast - This is where the magic happens, as these little guys do the heavy lifting of the fermentation process. Active dry yeast requires an initial bloom to activate it. (Do this by mixing with the warm water and sugar for 5 to 10 minutes.) An equal amount of instant yeast can be substituted and can be added directly to flour without the initial blooming stage.
Here is a breakdown of the amounts and baker's percentages. This is for all of my bread/pizza geeks out there (don't worry....you're in good company!)
| Ingredients | Metric | Imperial | Baker's Percentage |
|---|---|---|---|
| Bread Flour | 450 grams | 3 ½ Cups | 100.0% |
| Water | 300 milliliters | 1 ¼ Cups | 66.7% |
| Fine Sea Salt | 20 grams | 1 Tbsp | 4.4% |
| Olive Oil | 72 grams | ⅓ Cup | 16.0% |
| Active Dry Yeast | 7 grams | 2 ¼ tsp | 1.6% |
| Granulated Sugar | 10 grams | 2 ¼ tsp | 2.2% |
Pizza Sauce
I feel that pizza sauce is the unsung hero of all pizzas. A good sauce can really make or break the whole experience, and this sauce doesn't disappoint! This is a cooked sauce, which dulls some of the brighter, fresher tomato flavors that you get from an uncooked pizza sauce, like my recipe for Go-To Homemade Pizza Sauce. The tradeoff is a depth of flavor that gets pretty intense from the slow simmer. I also opted for dried herbs in this sauce as well, which is crucial in giving us that classic "pizzeria" pizza sauce flavor.
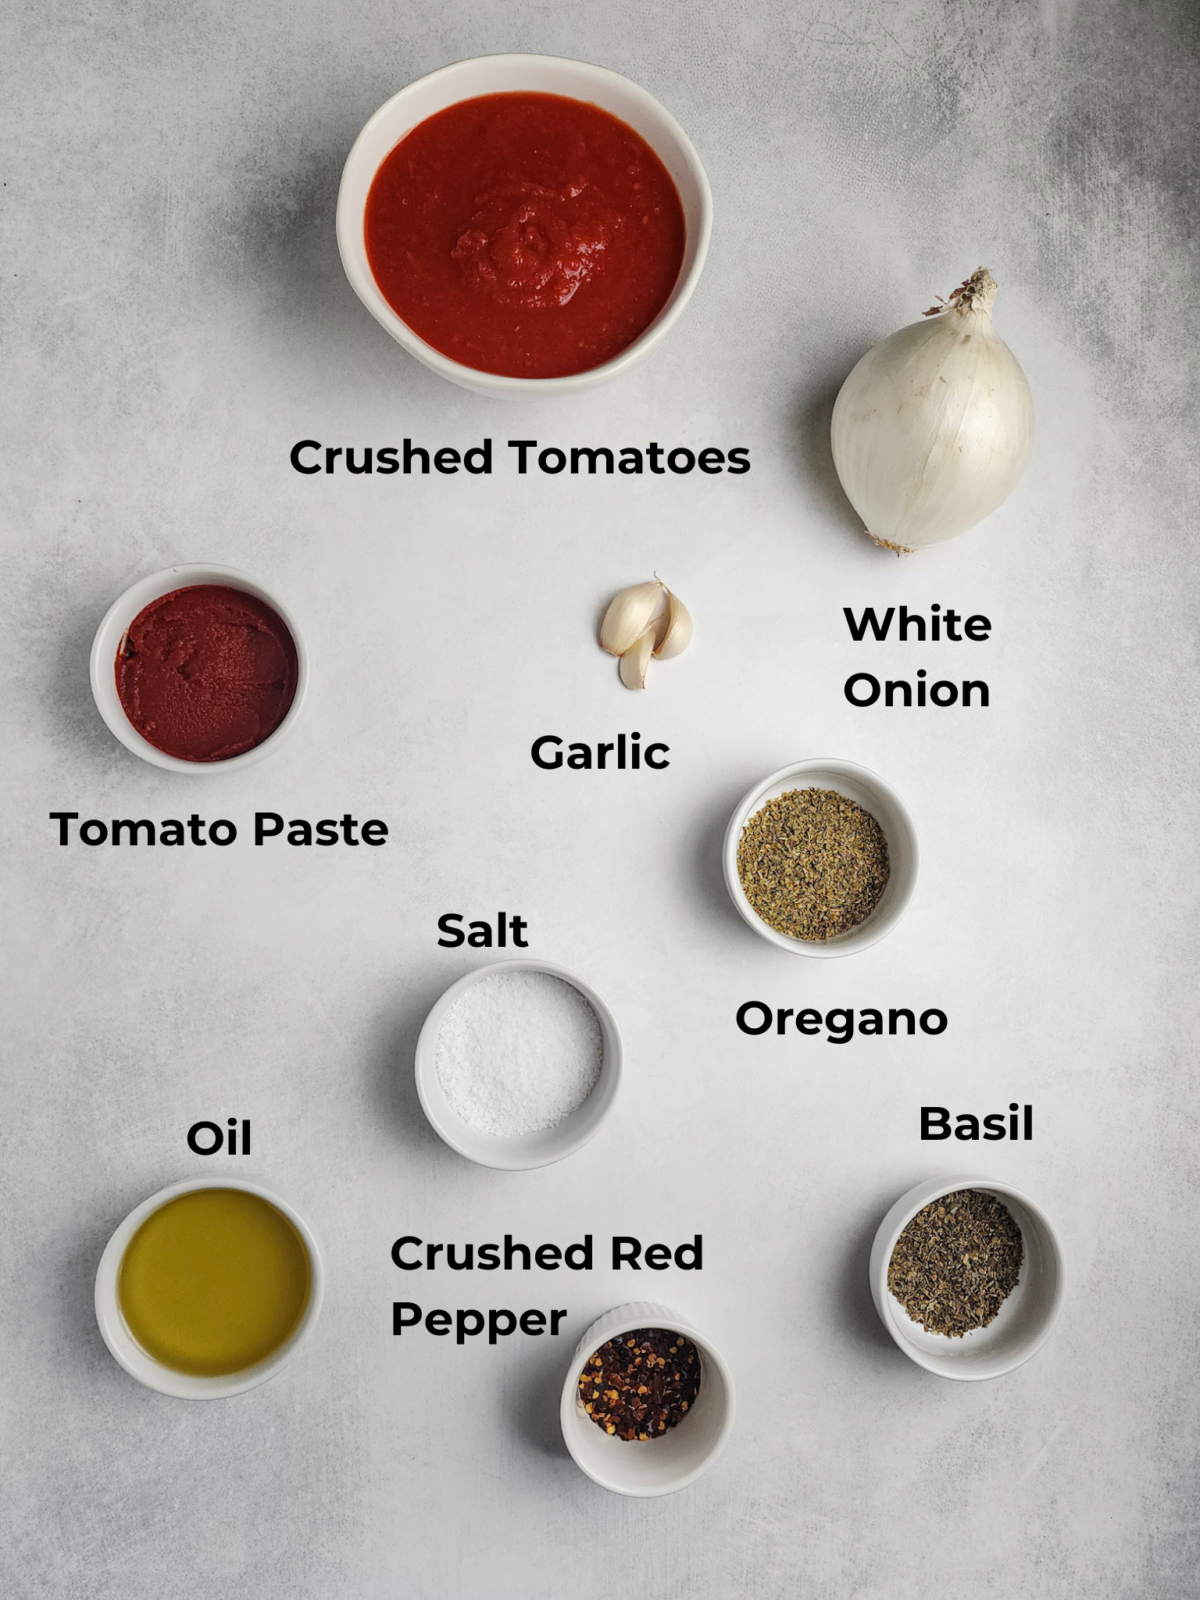
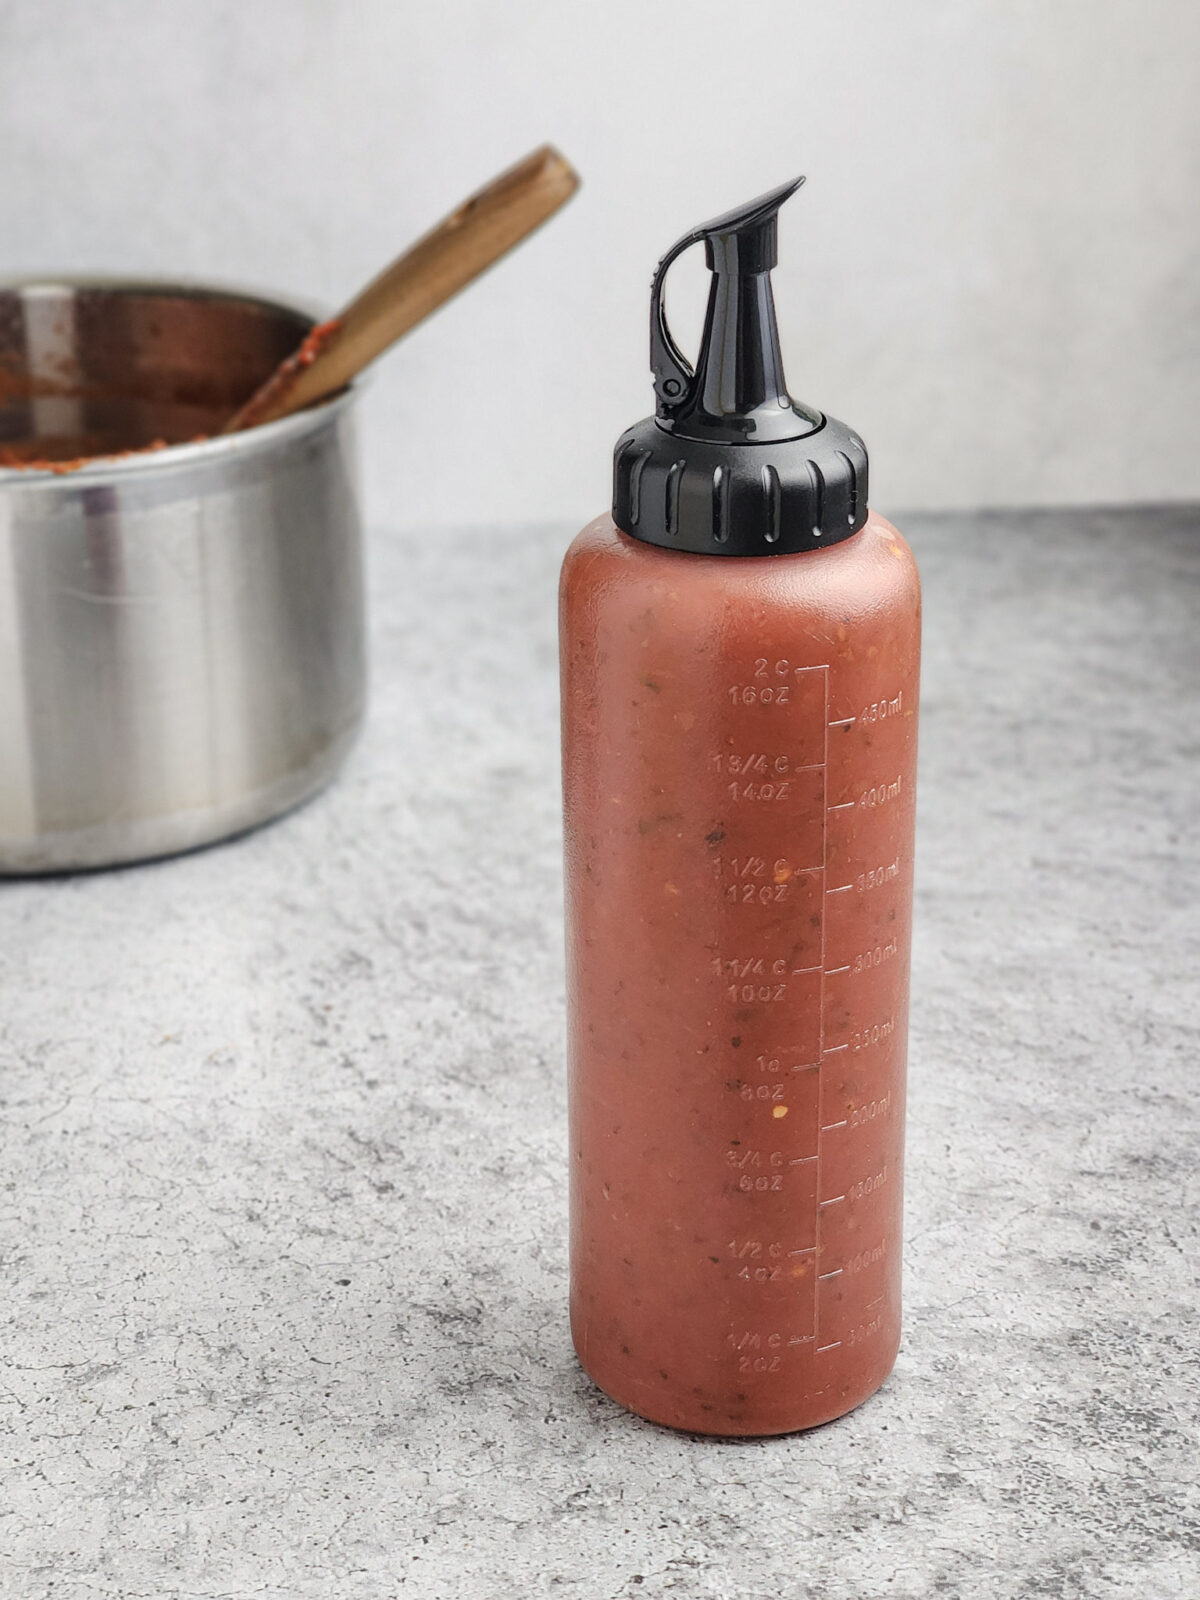
After cooling for a bit, I like to transfer my sauce into these OXO brand Squeeze Bottles. This set comes with two tip sizes, the larger version of which works really well for this sauce. They're super easy to clean and are really useful for all sorts of things around the kitchen!
Cheeses
In my many years of pizza-making experience, I've found that a simple combination of cheeses really helps things pop. If there's one takeaway from this section, it's to make sure that you shred your own cheese as well. Pre-shredded cheeses typically have anti-caking agents/coatings applied to them that inhibit melting and can prevent the cheese from melting or browning properly. Honestly, this was one of the biggest tips that helped elevate my homemade pizza-making!
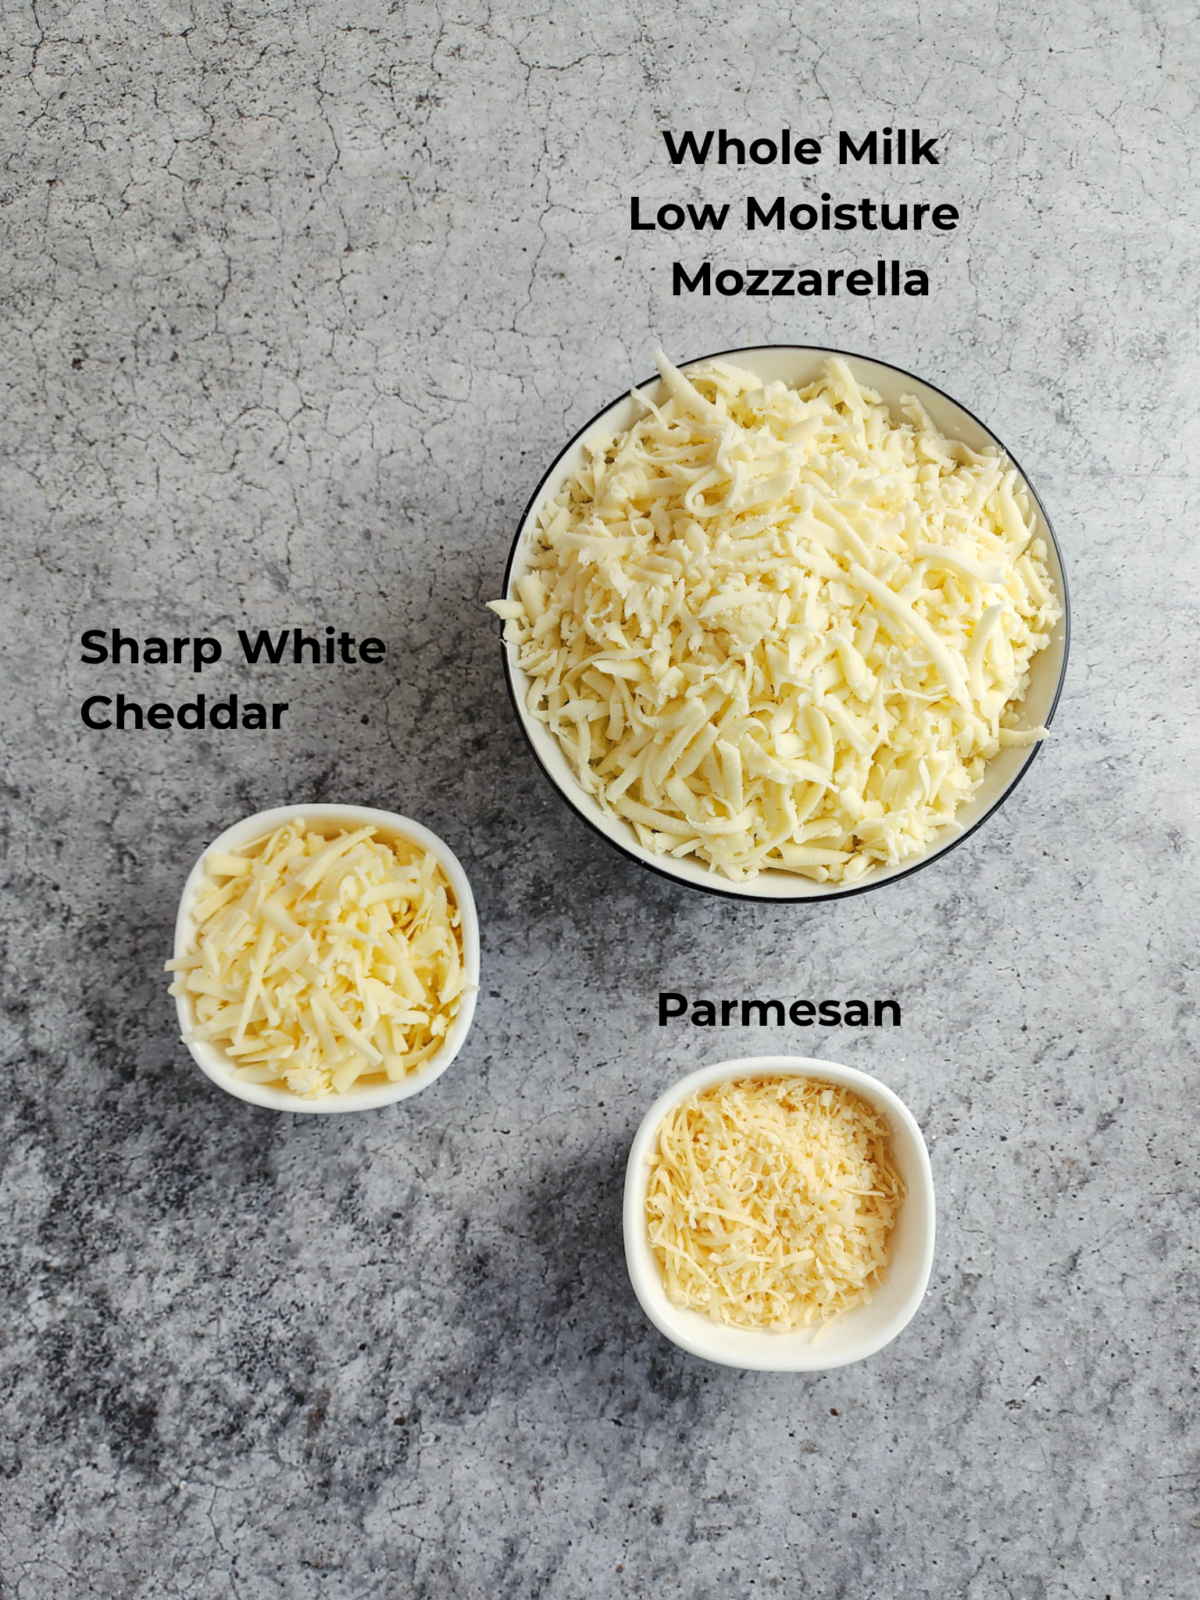
- Whole Milk Low-Moisture Mozzarella - Using whole milk (or part skim if you can't find whole), low-moisture mozzarella will give you the best bubbly and melty results. Fresh mozzarella works on some pizza styles, but it has far too much water content for this style and will give you soggy pizza.
- Sharp White Cheddar - This brings just a touch of bite to the party.
- Parmesan - Parmesan lends a really subtle nuttiness and a good level of saltiness.
Toppings
Toppings are where you can really make these pizzas your own! My preference is to stick to one or two classics, like pepperoni or Italian sausage and mushroom. Of course, you can't go wrong with just cheese!
This recipe makes three 9-inch pizzas and is a great way to let the whole family decide exactly what they want! Anything more than two or three toppings can easily overload the dough, so if you do choose to use more, use them sparingly.
How to Make the Ultimate Homemade Pan Pizza
Dough Shaping and Proofing
After mixing the dough together as outlined in the recipe, making these pizzas begins with several steps to properly shape, proof, and ferment the dough, which are outlined in detail below. Keep in mind, this does need to rest in the fridge at least overnight for optimal flavor and texture.
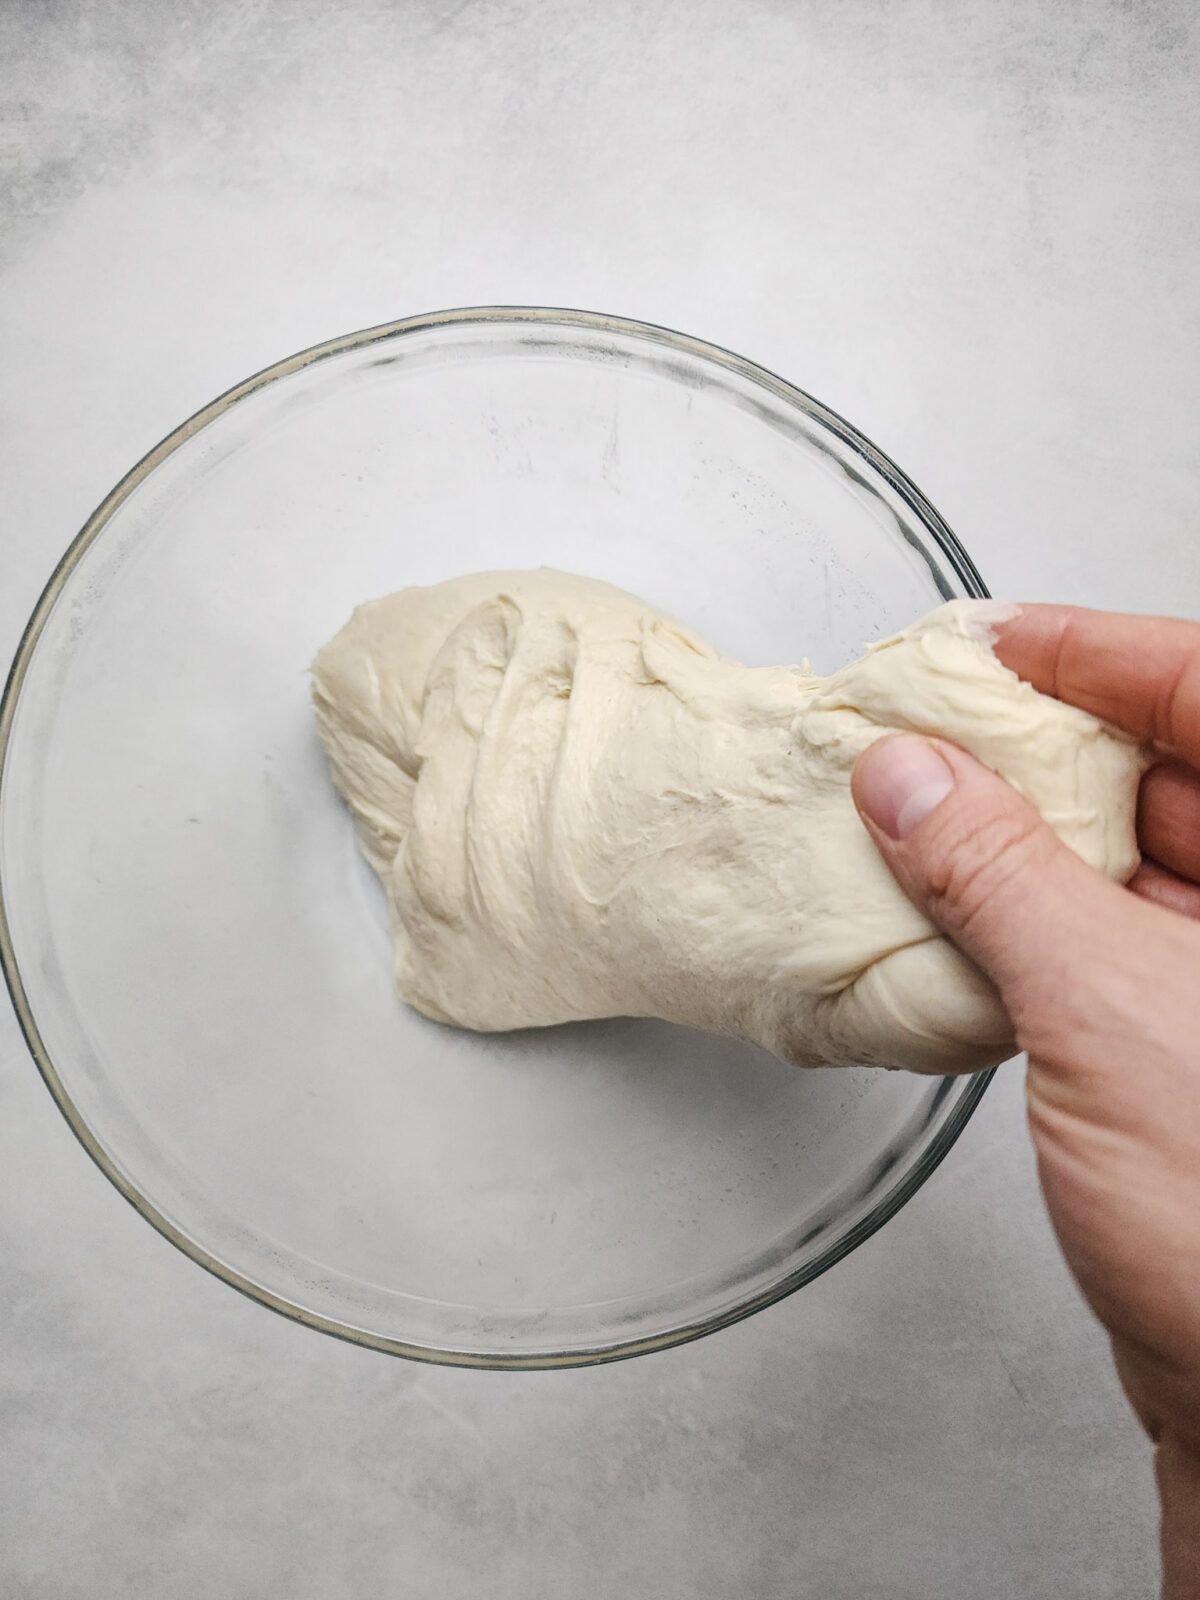
Slap and folds
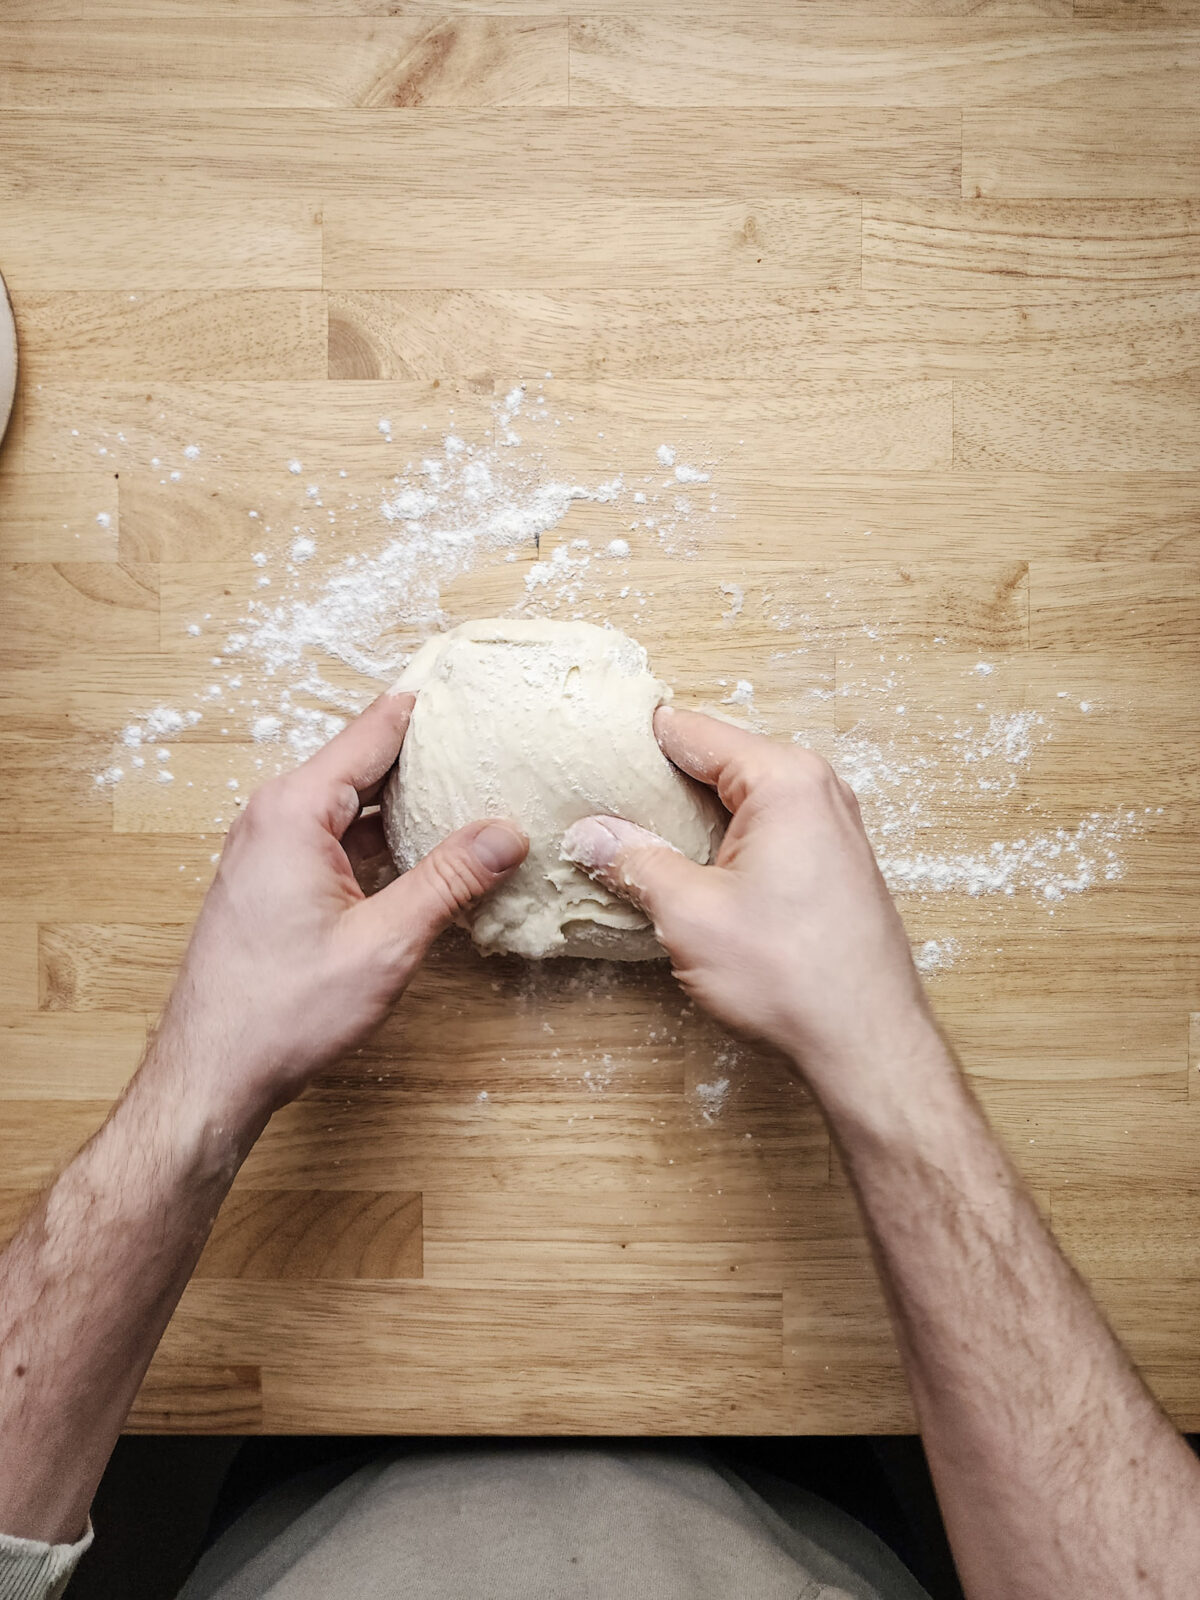
After mixing the dough, I like to add some strength and structure to the dough by performing a few sets of "slap and folds". This process is basically picking up the dough, letting it stretch out some, slapping the hanging end onto the counter, then folding the dough over onto itself. This is a quick process and should only take about a minute or so. This step aids in gluten development and also helps the dough keep its shape while proofing. More details are below!

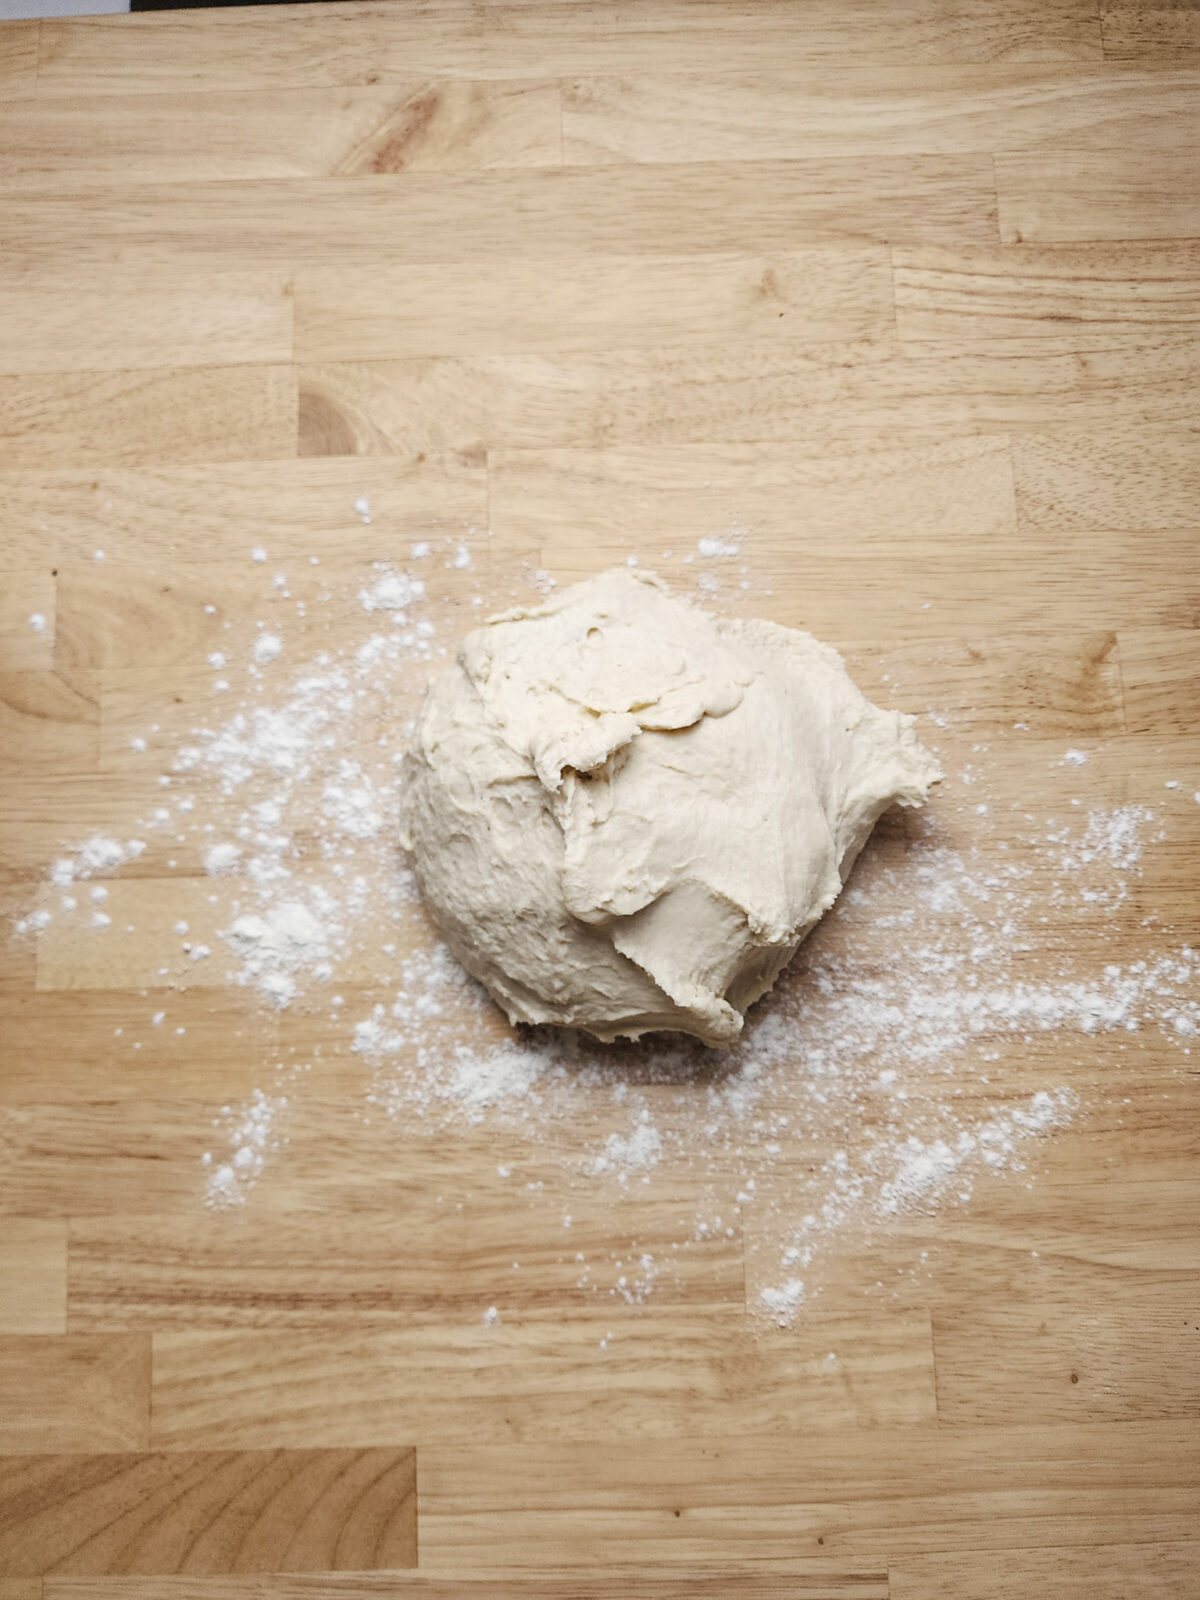
1. After mixing the dough together, turn it out onto a lightly floured work surface. -
2. Pick up the dough by grabbing both sides and allowing it to stretch some. -
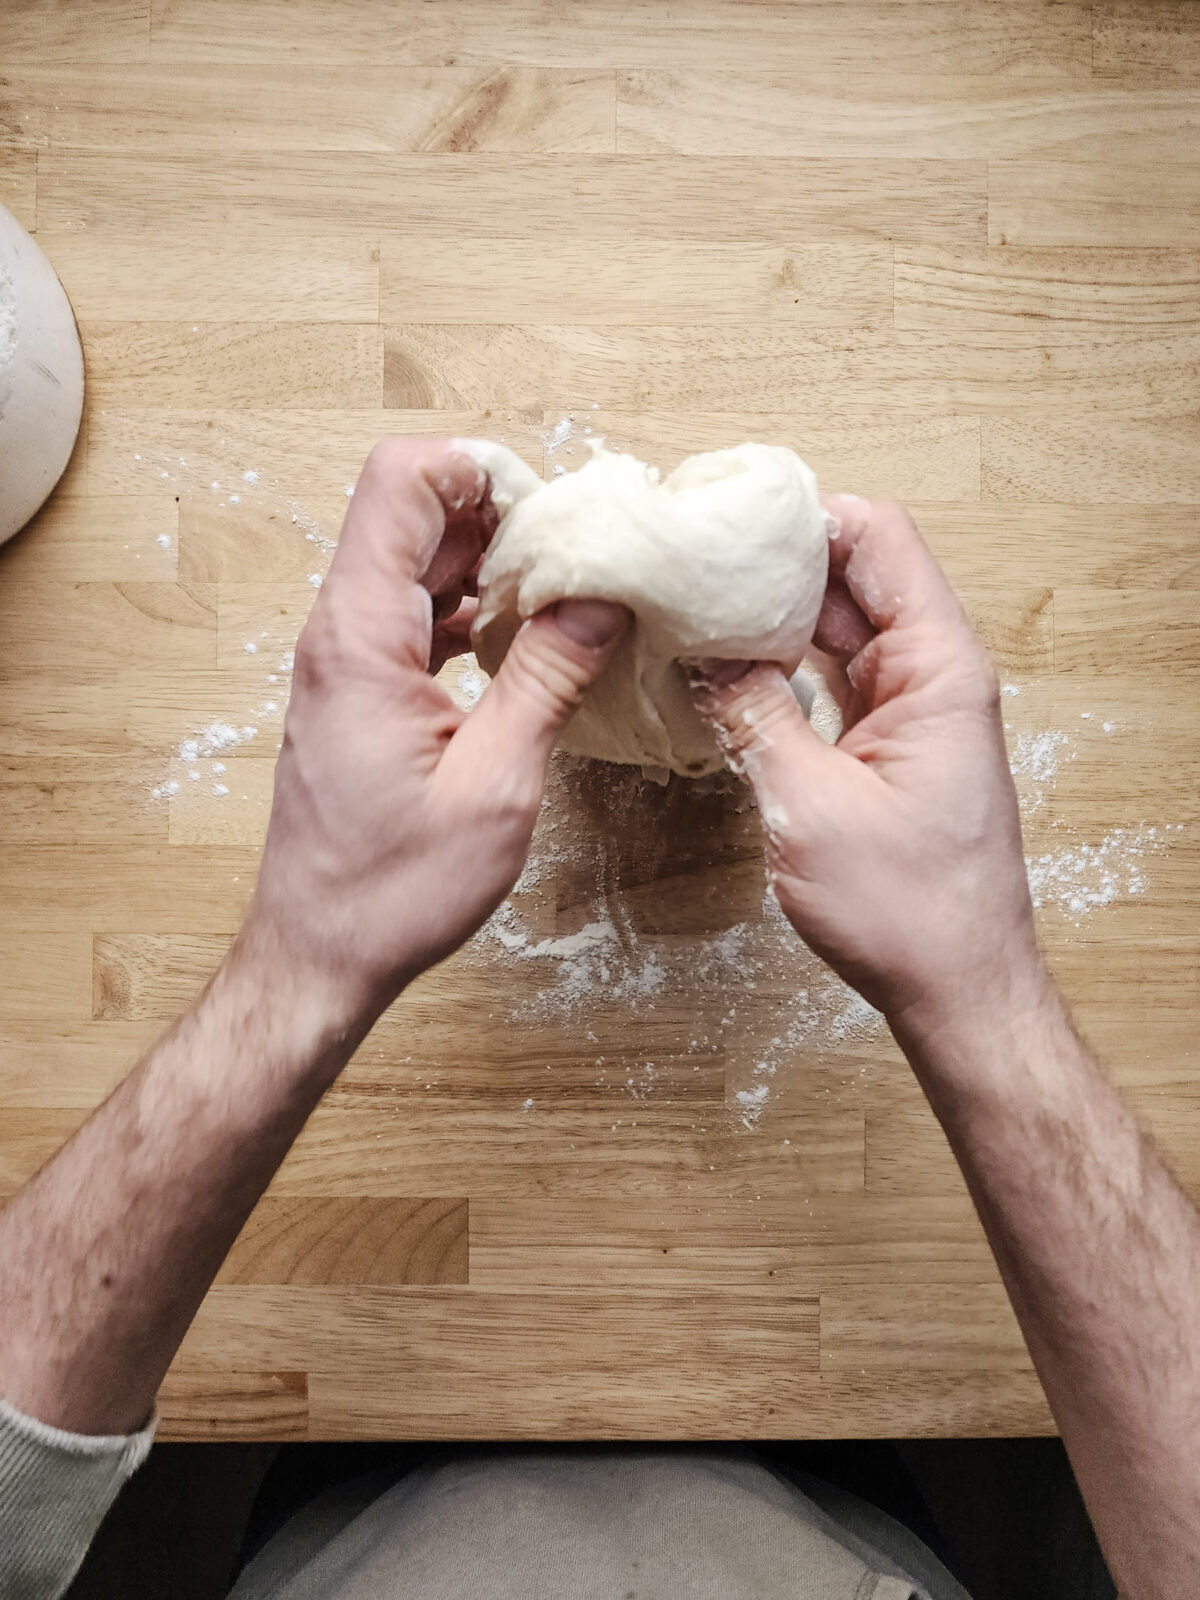
3. Quickly slap the bottom of the dough onto the work surface. -
4. As you slap the dough onto the counter, stretch the top half of the dough over itself. -
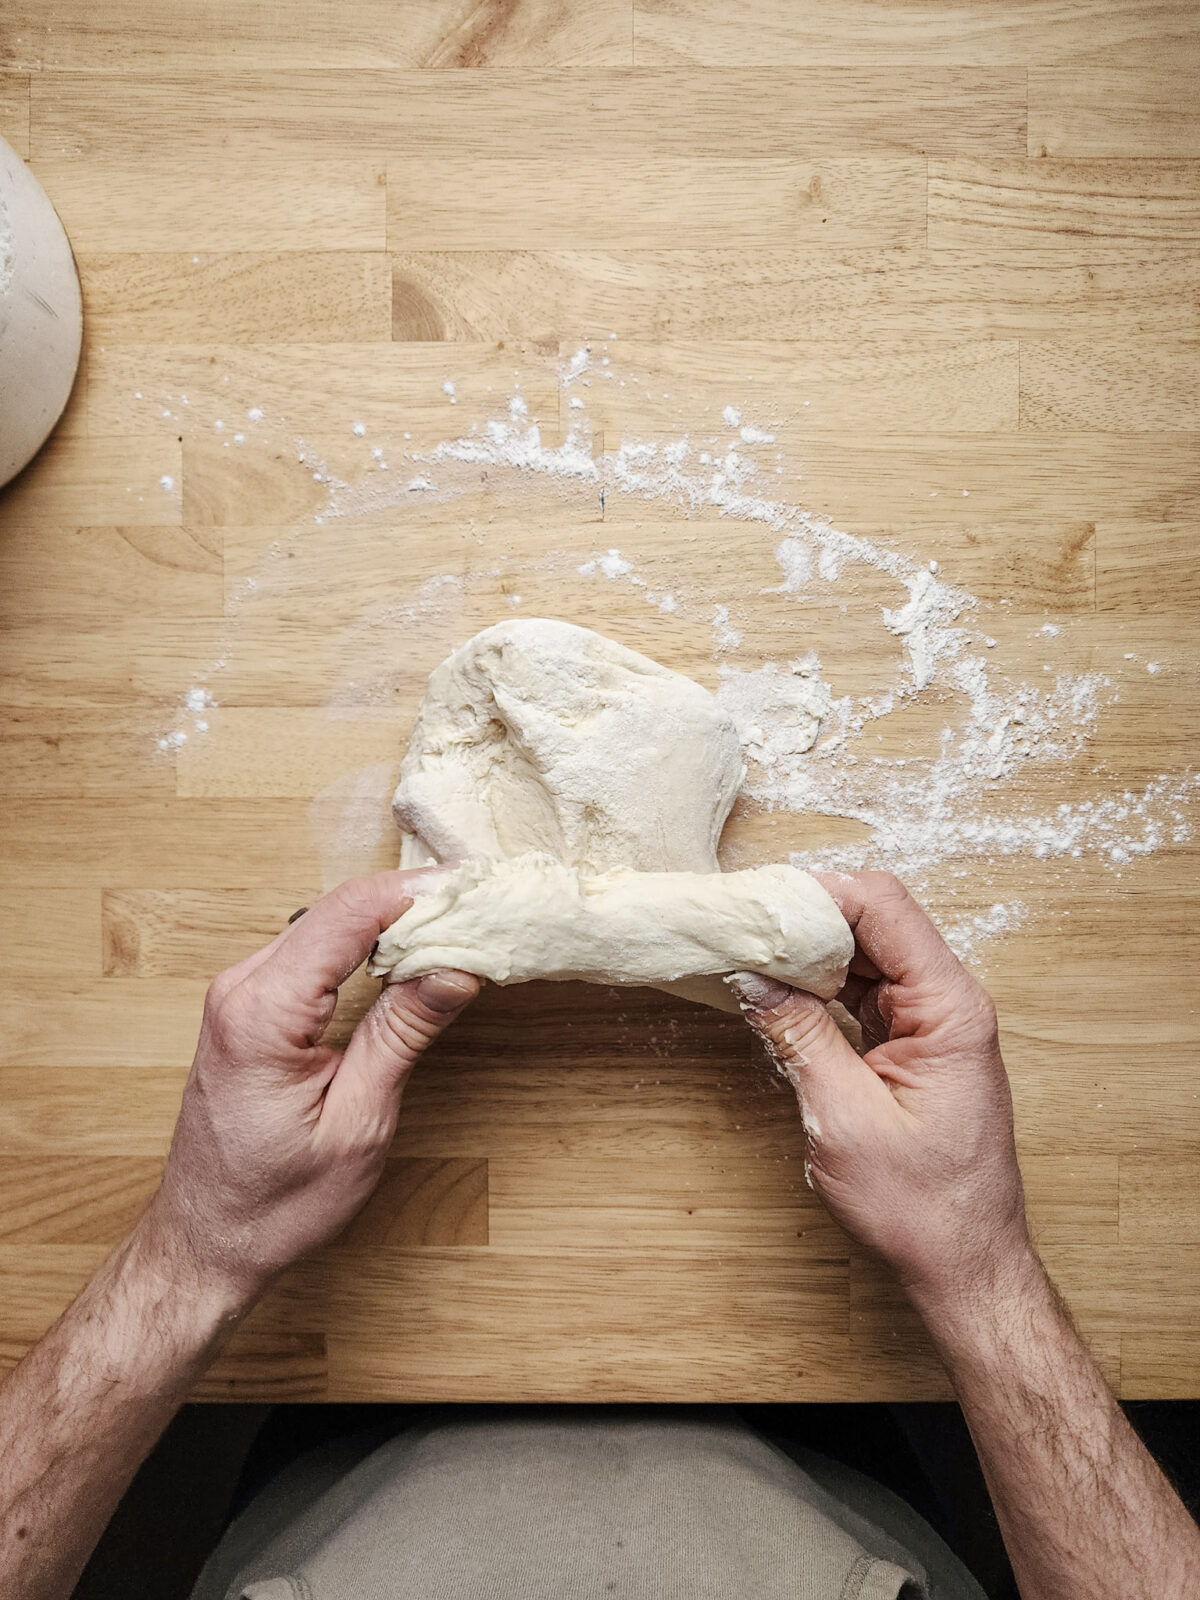
5. Finish folding the dough over itself until you have a relatively smooth dough ball. -
6. Turn the dough ball 90 degrees and repeat the "slap and fold" process two or three more times, then shape into a smooth ball.
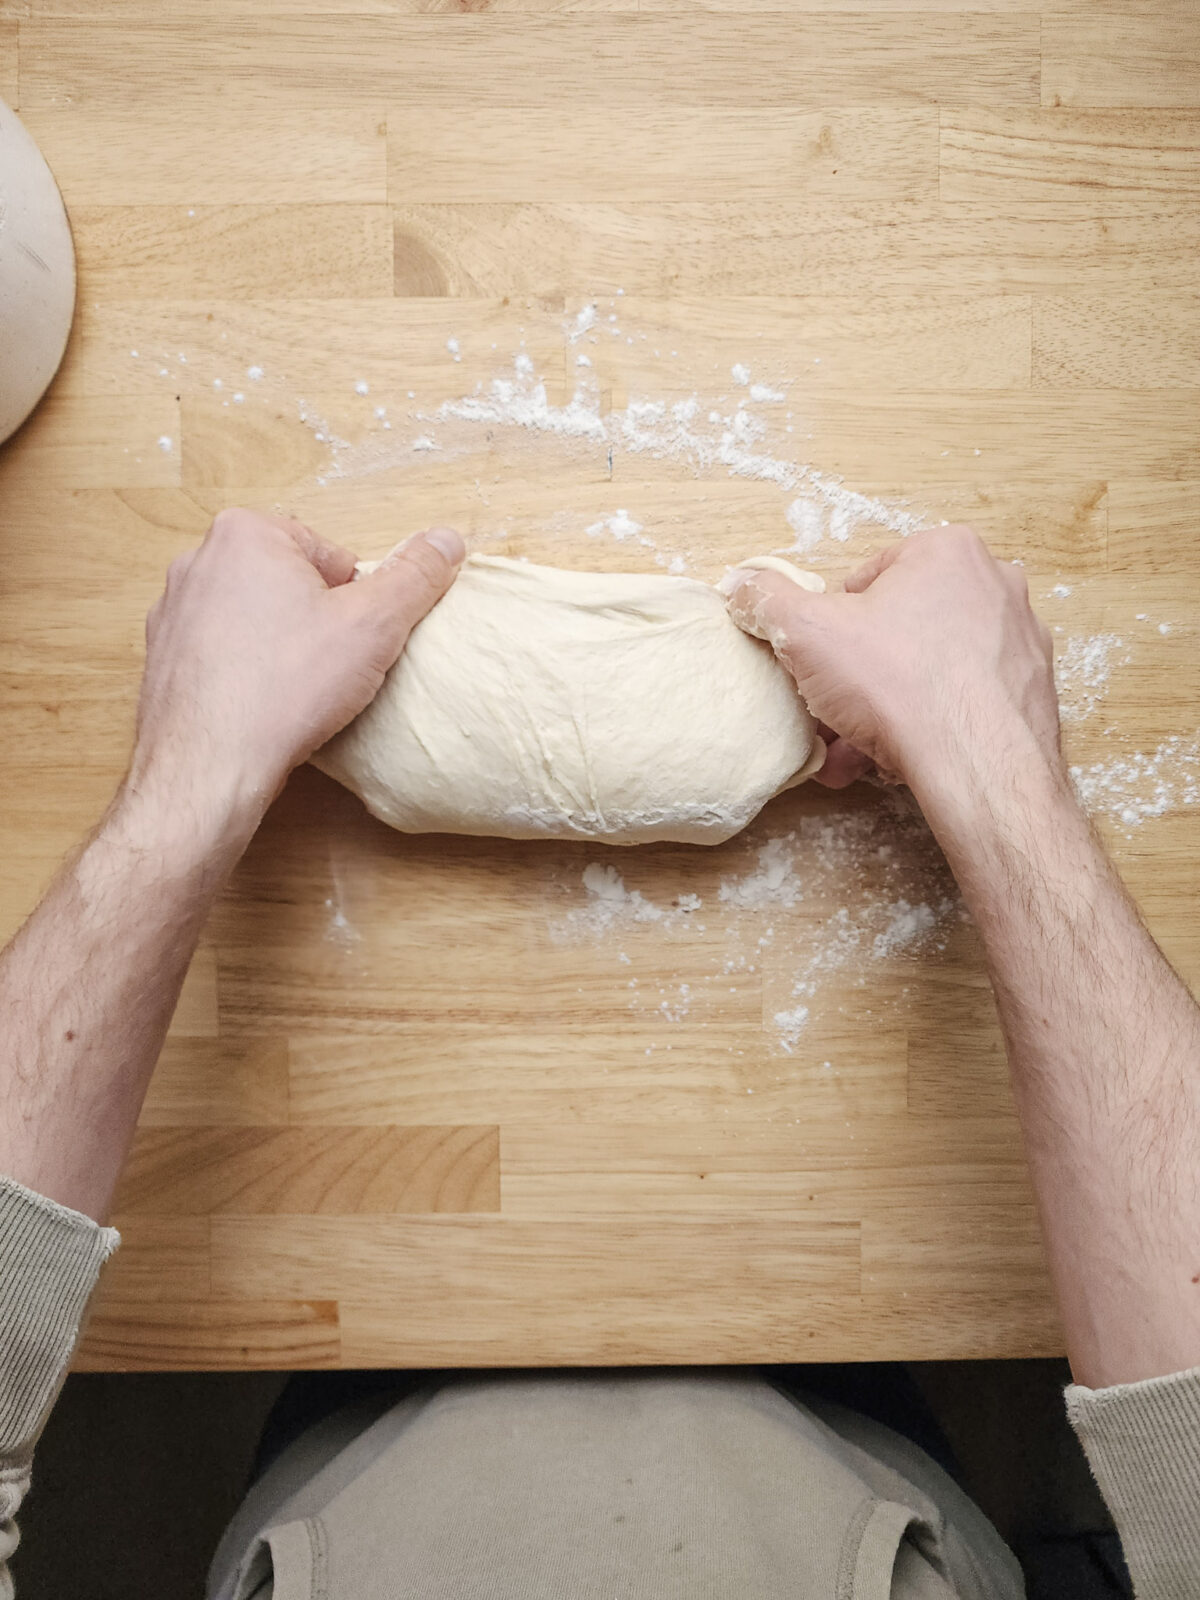
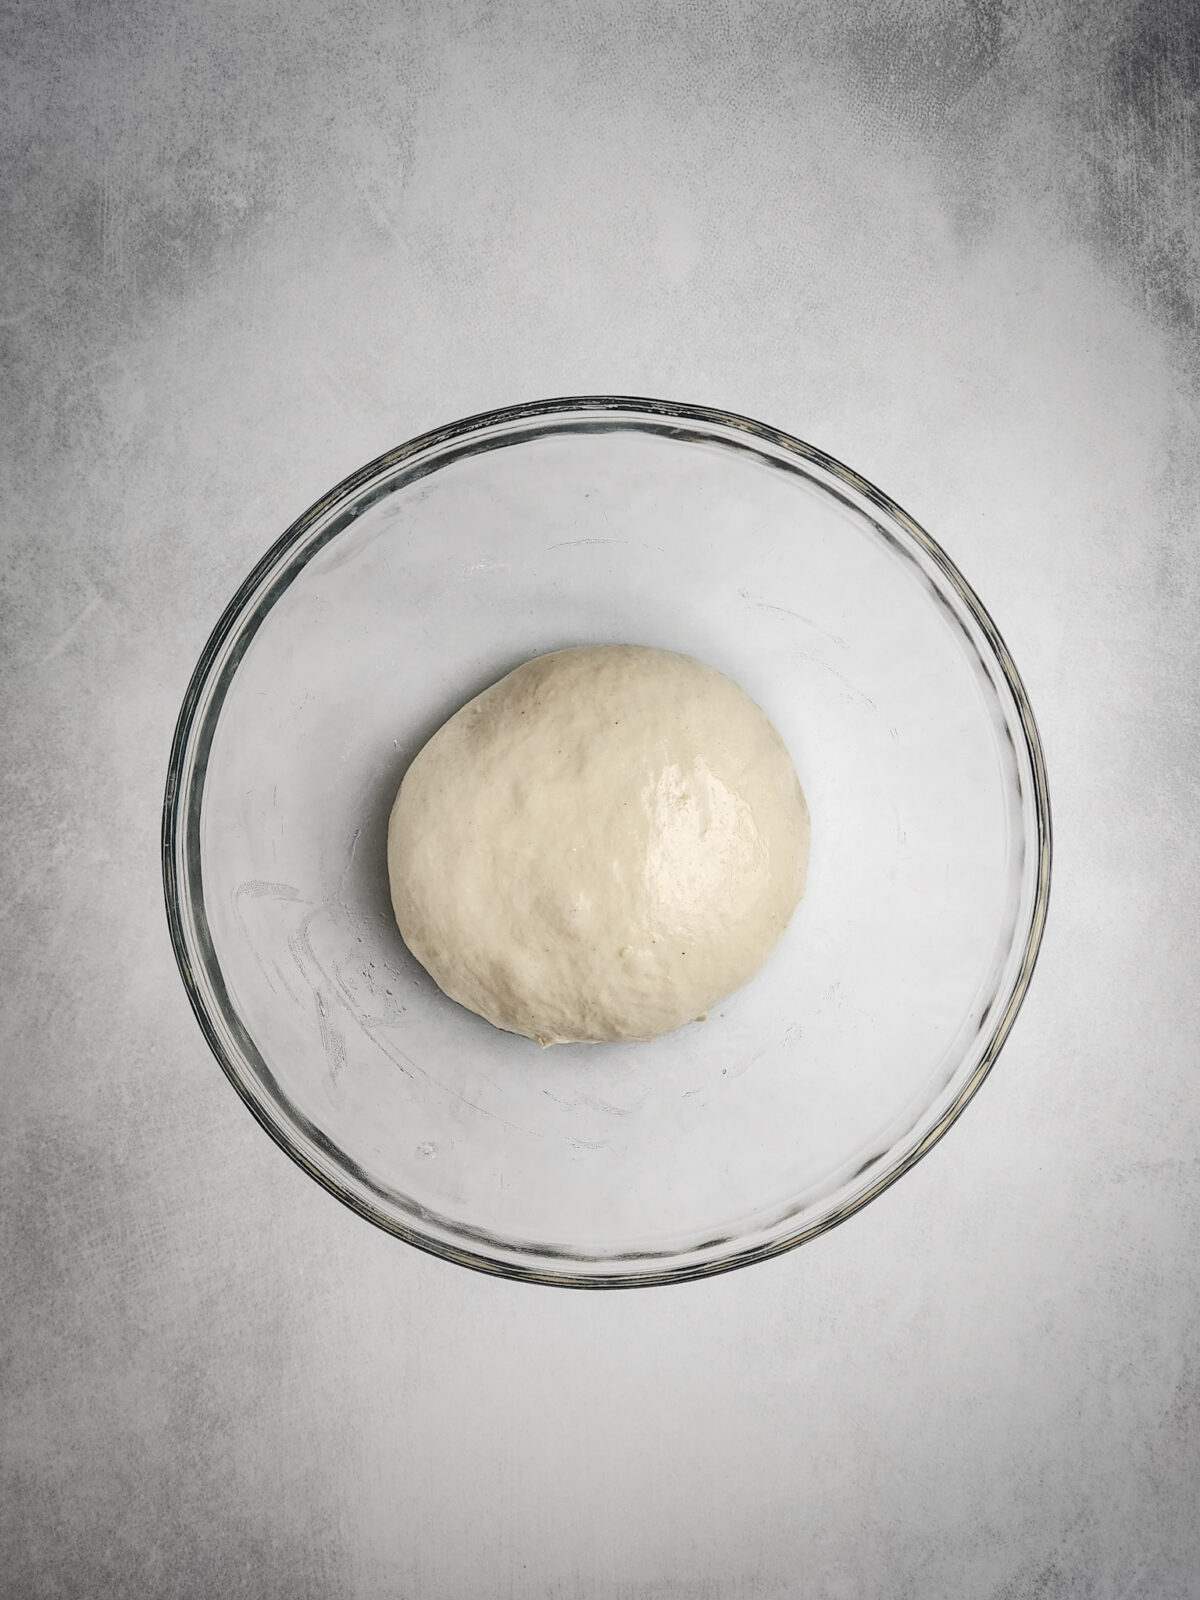
After the slap and folds, transfer the dough to a lightly oiled bowl, cover, and allow to proof (or rise) for one hour.
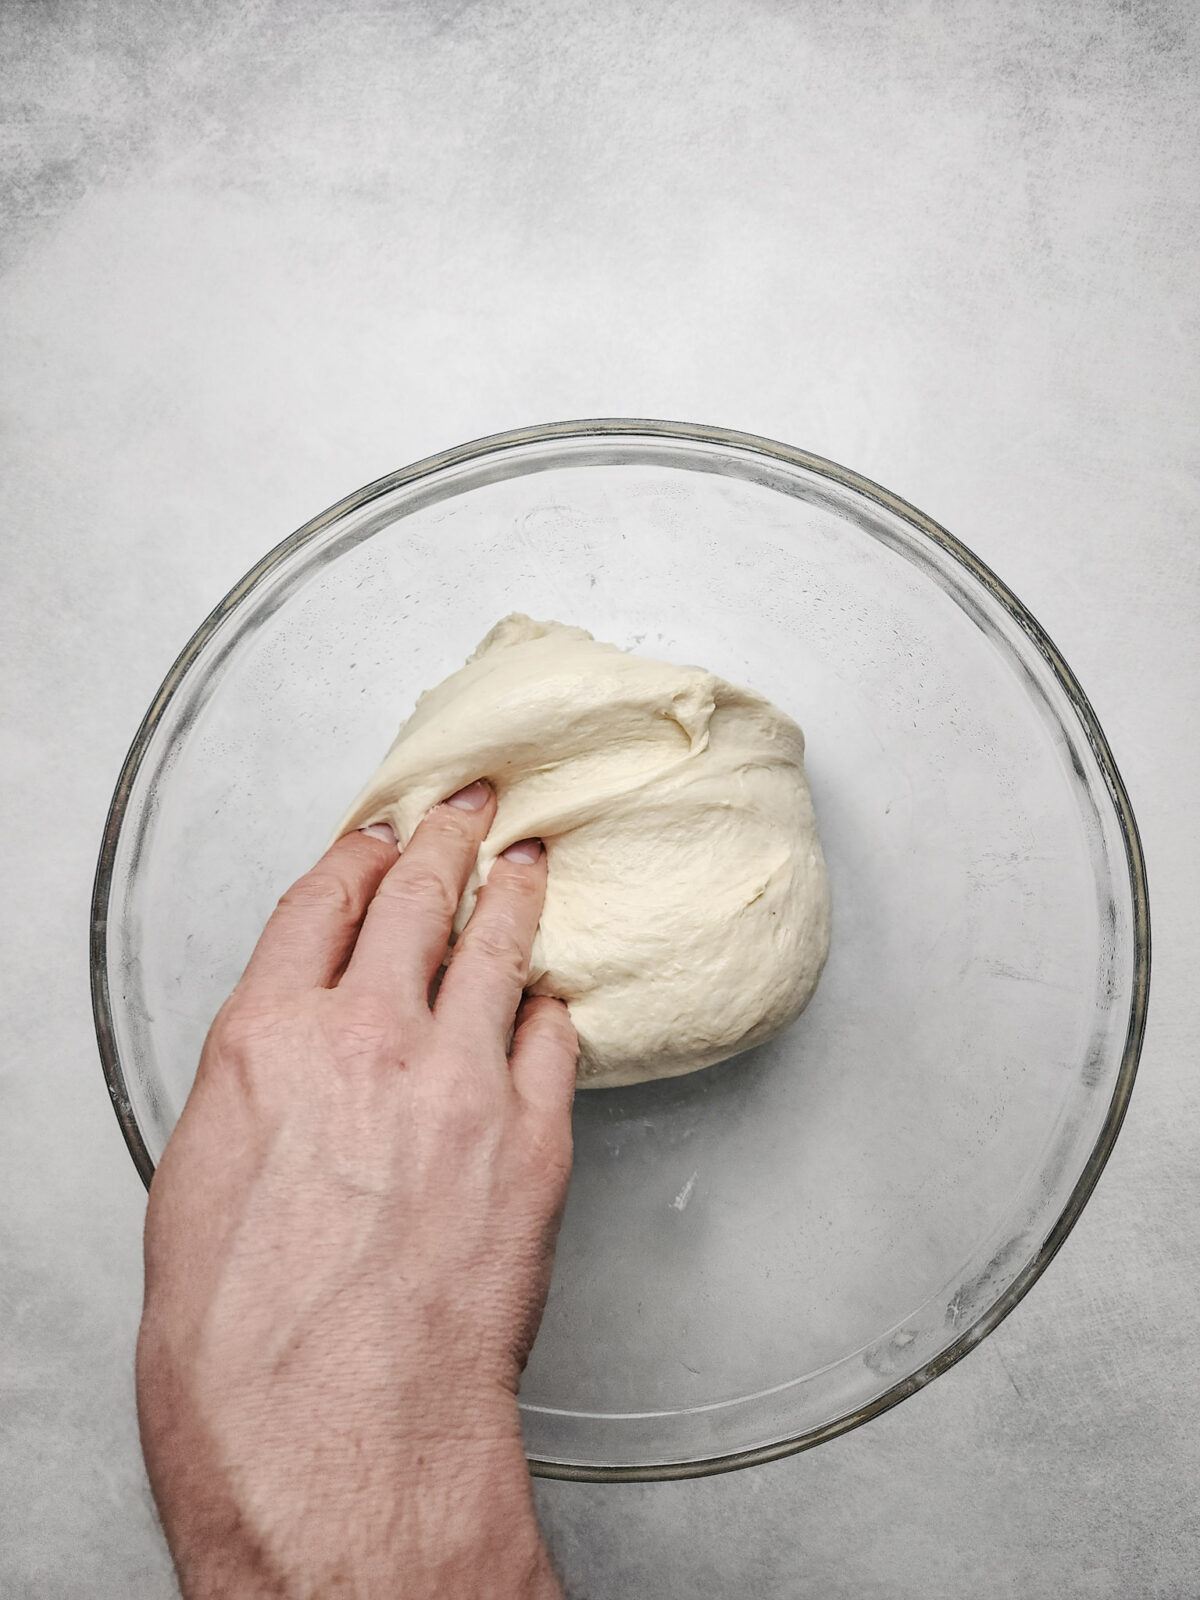
Stretch and Fold
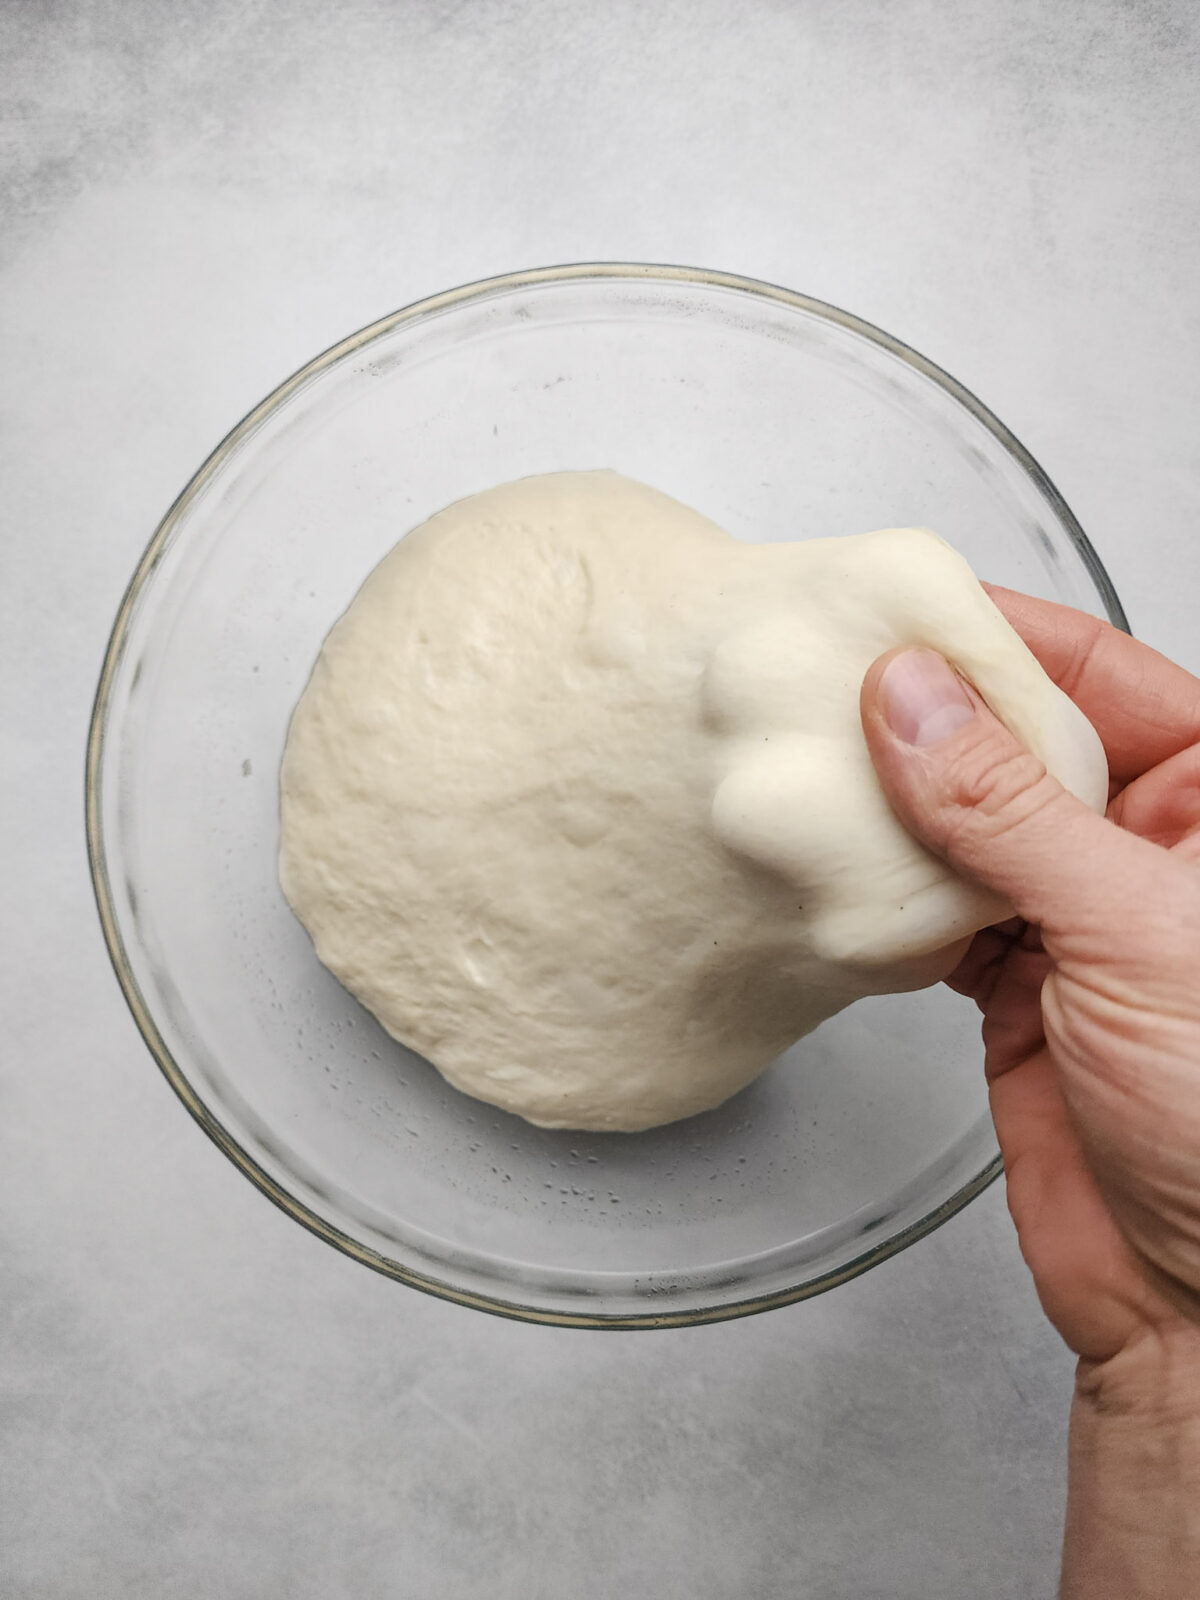
After the first proof, punch the dough down and perform two "sets of stretch and folds". This is a more gentle process than kneading, but it does essentially the same thing. It aids in the development of gluten, gives structure to the dough, and also brings some air to the party. This is key to allowing the dough to stretch out and not collapse on itself as it ferments during the long second proof (more on that later). This also helps give the dough its soft and fluffy texture, which is definitely what we're after. The process is outlined below:

1. After the first proof, begin the "stretch and folds" by punching the dough down. -
2. Grab one edge of the dough and lift it up to stretch it. (Try to avoid tearing the dough if possible.) -
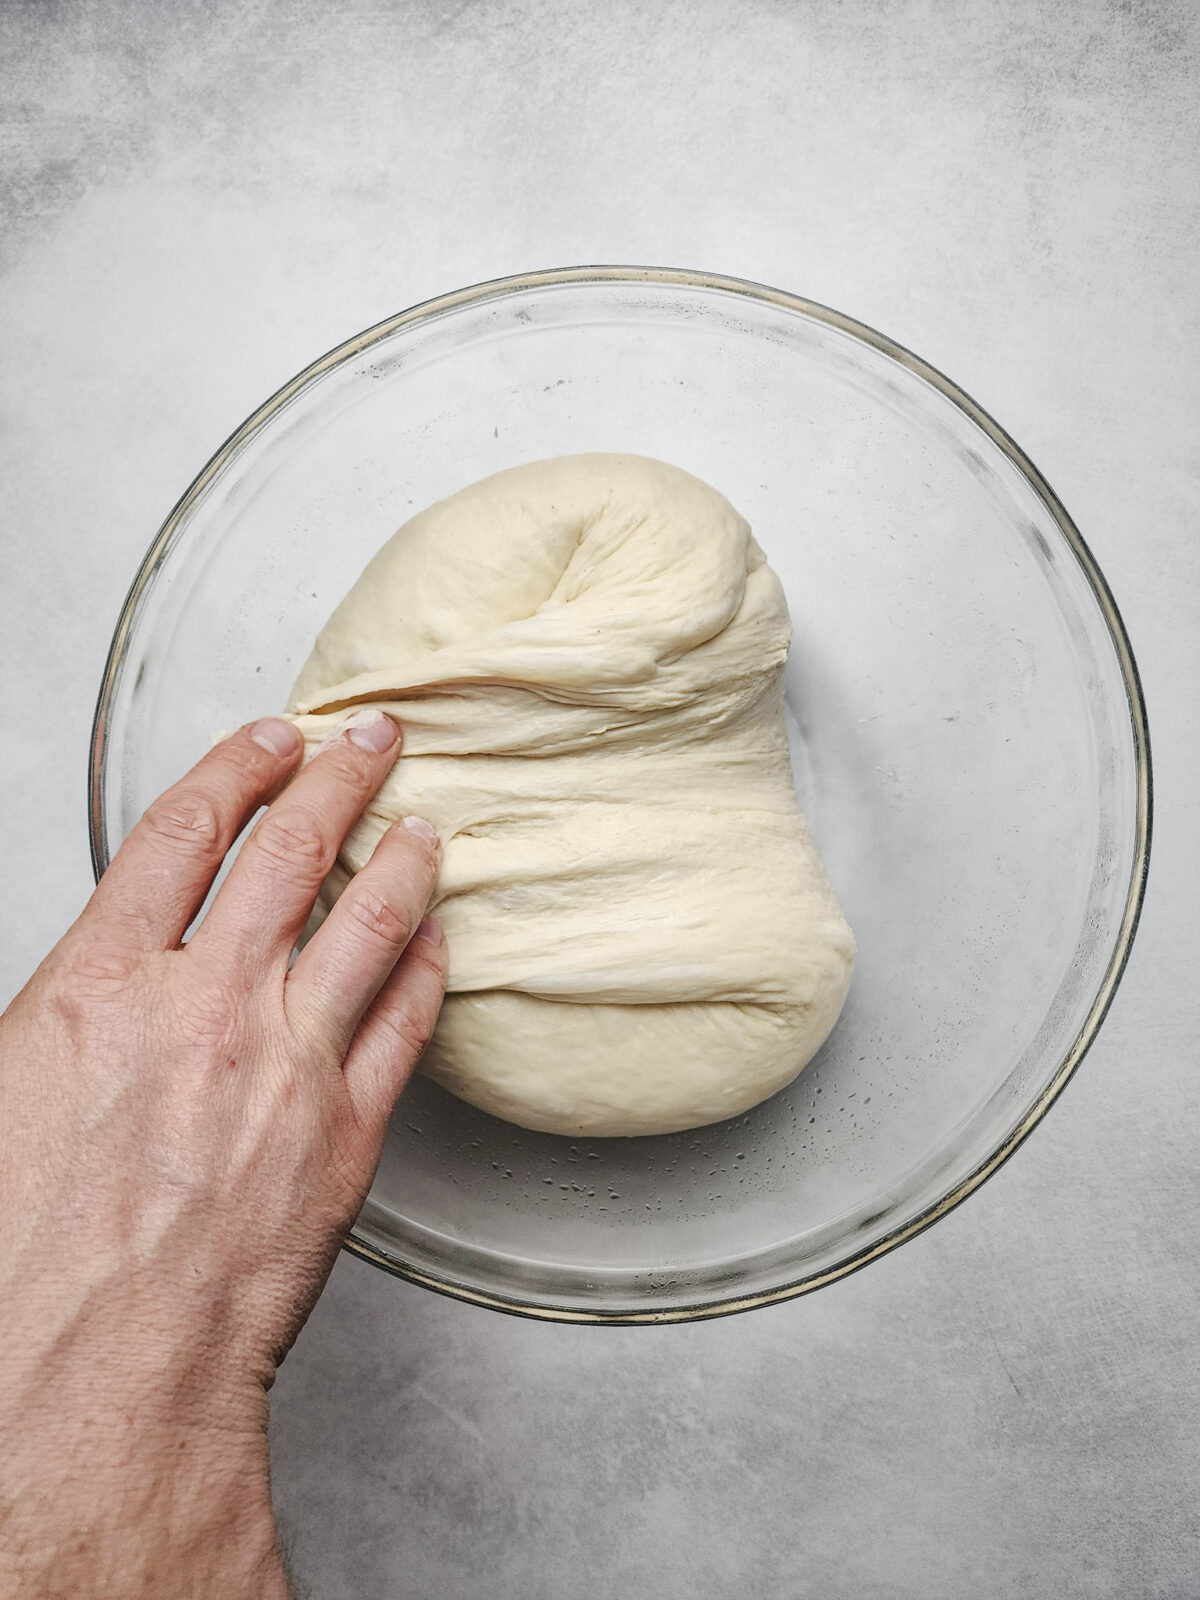
3. Fold the dough over onto itself and turn the bowl 90 degrees. -
4. Grab the dough on the unfolded edge (grabbing both top and bottom of the previous fold) and stretch it. -
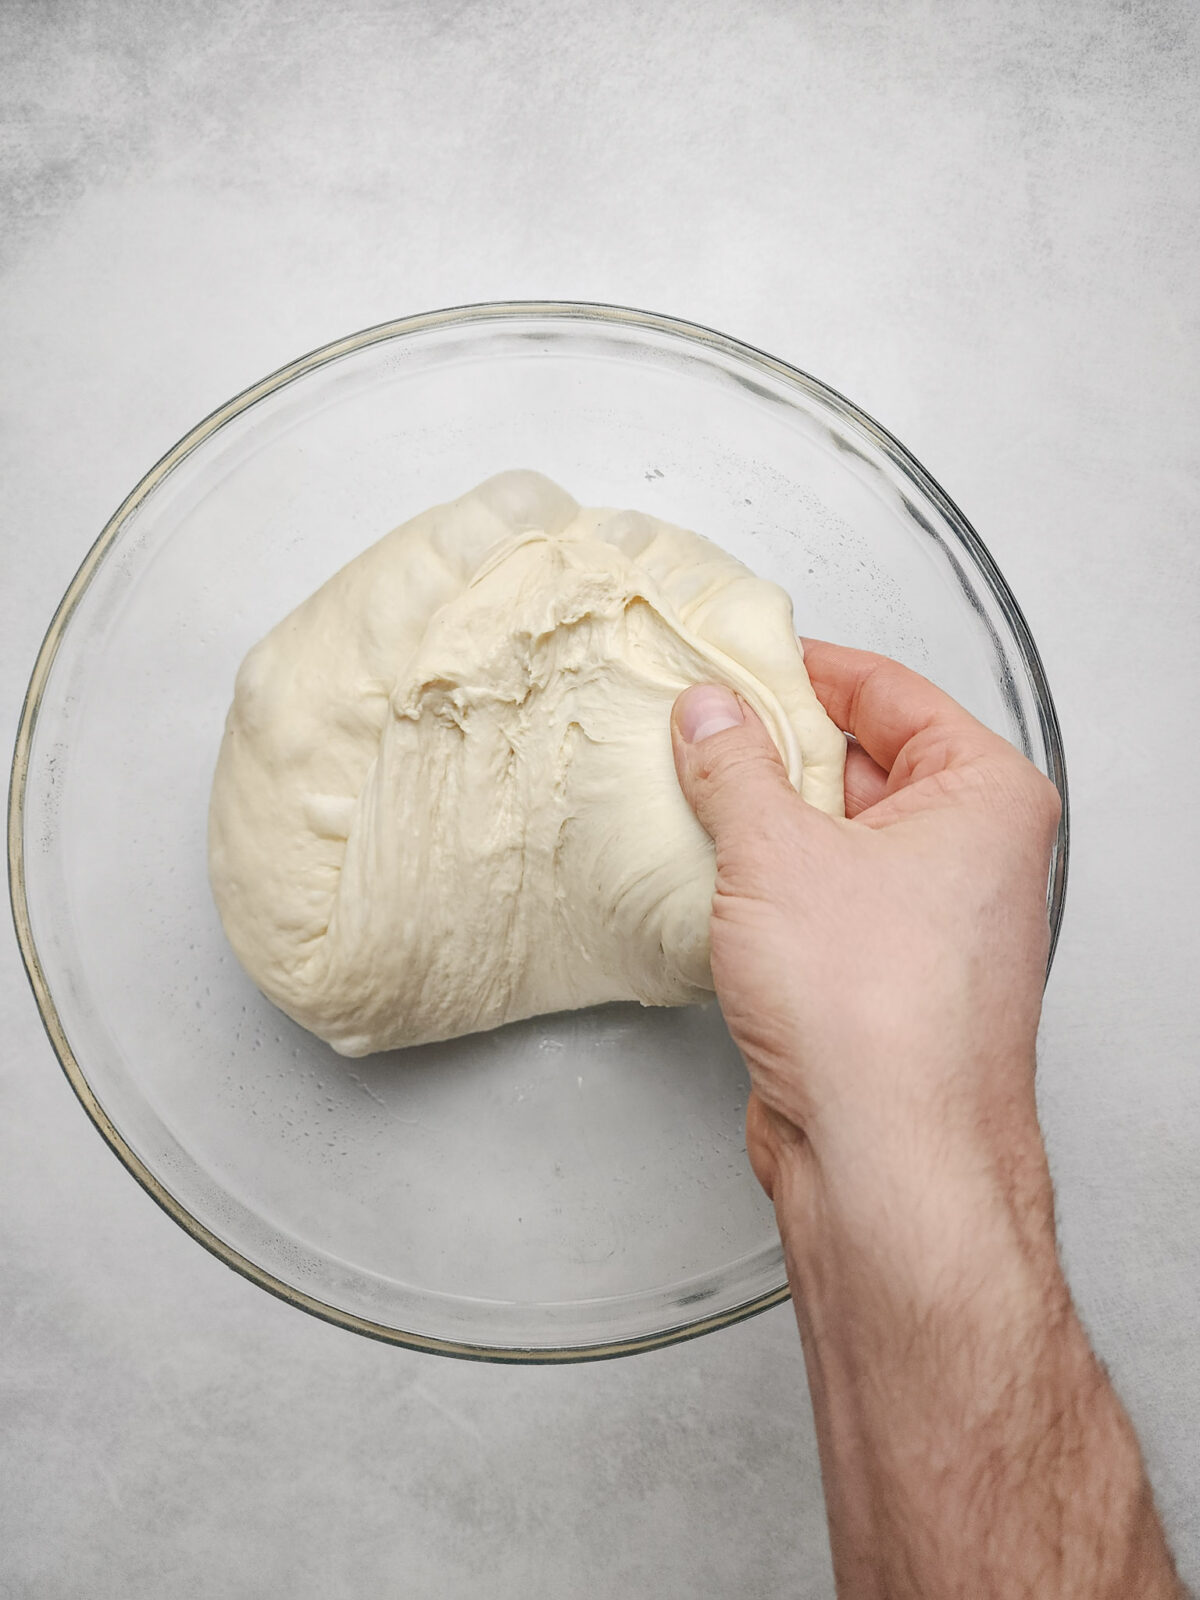
5. Continue by folding the dough over onto itself again. Repeat with the remaining two sides of the dough. -
6. Cover and allow the dough to rest for 30 minutes, then repeat the whole stretch and fold process once. (Be sure not to skip the last 30 minute rest.)

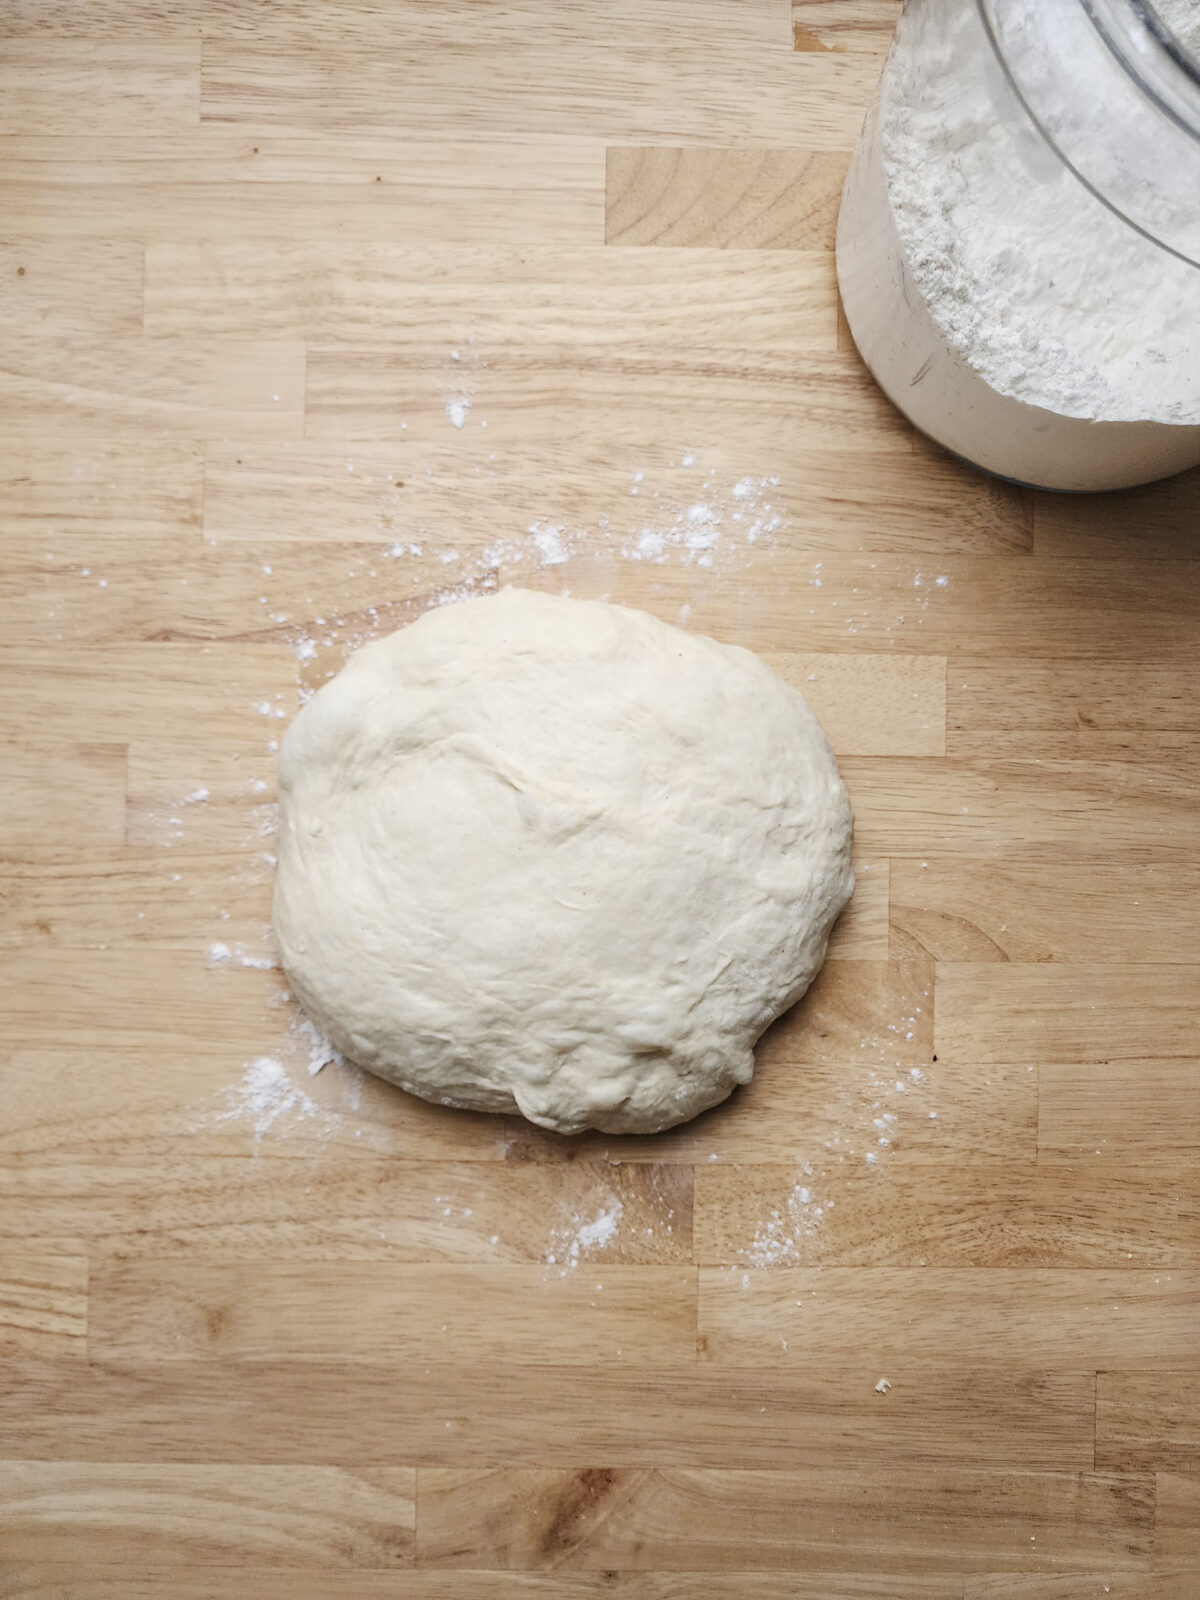
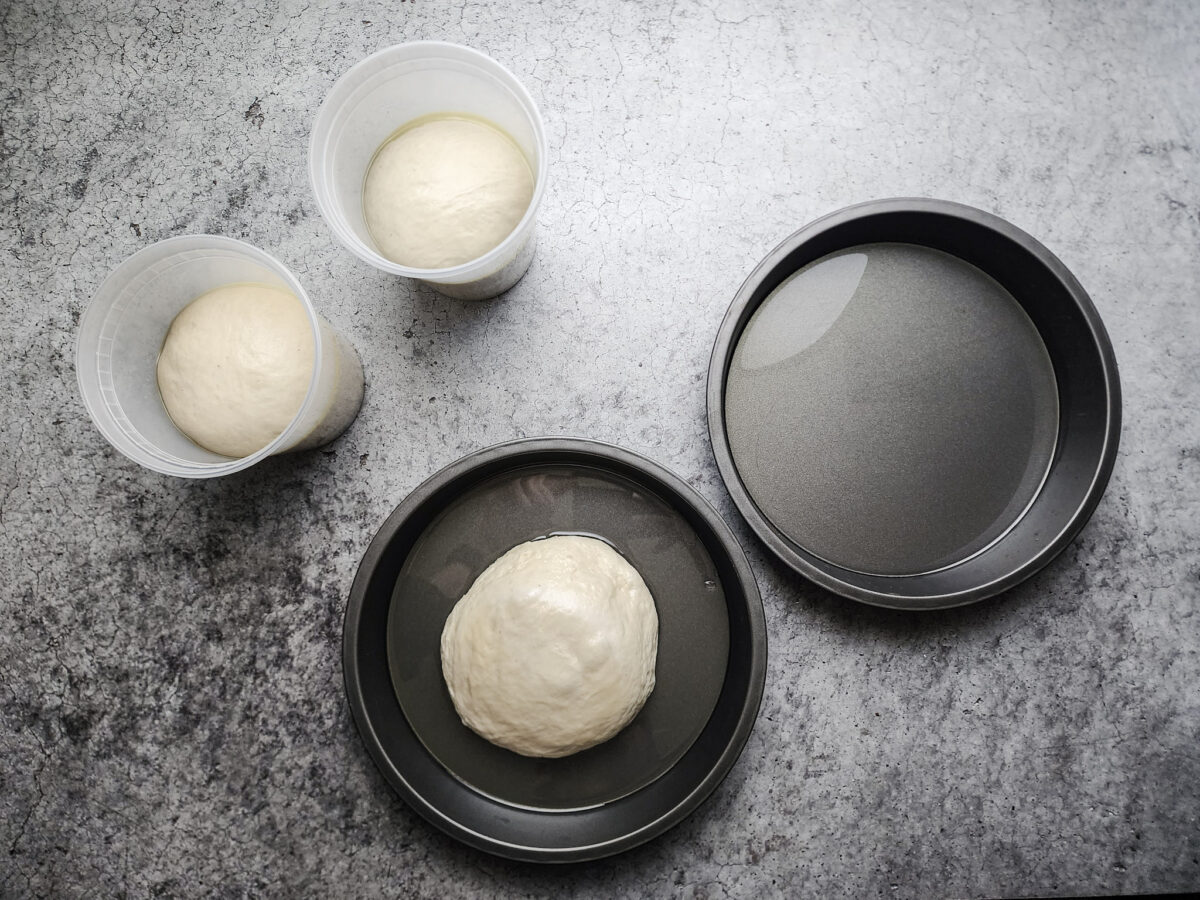
Overnight Proof
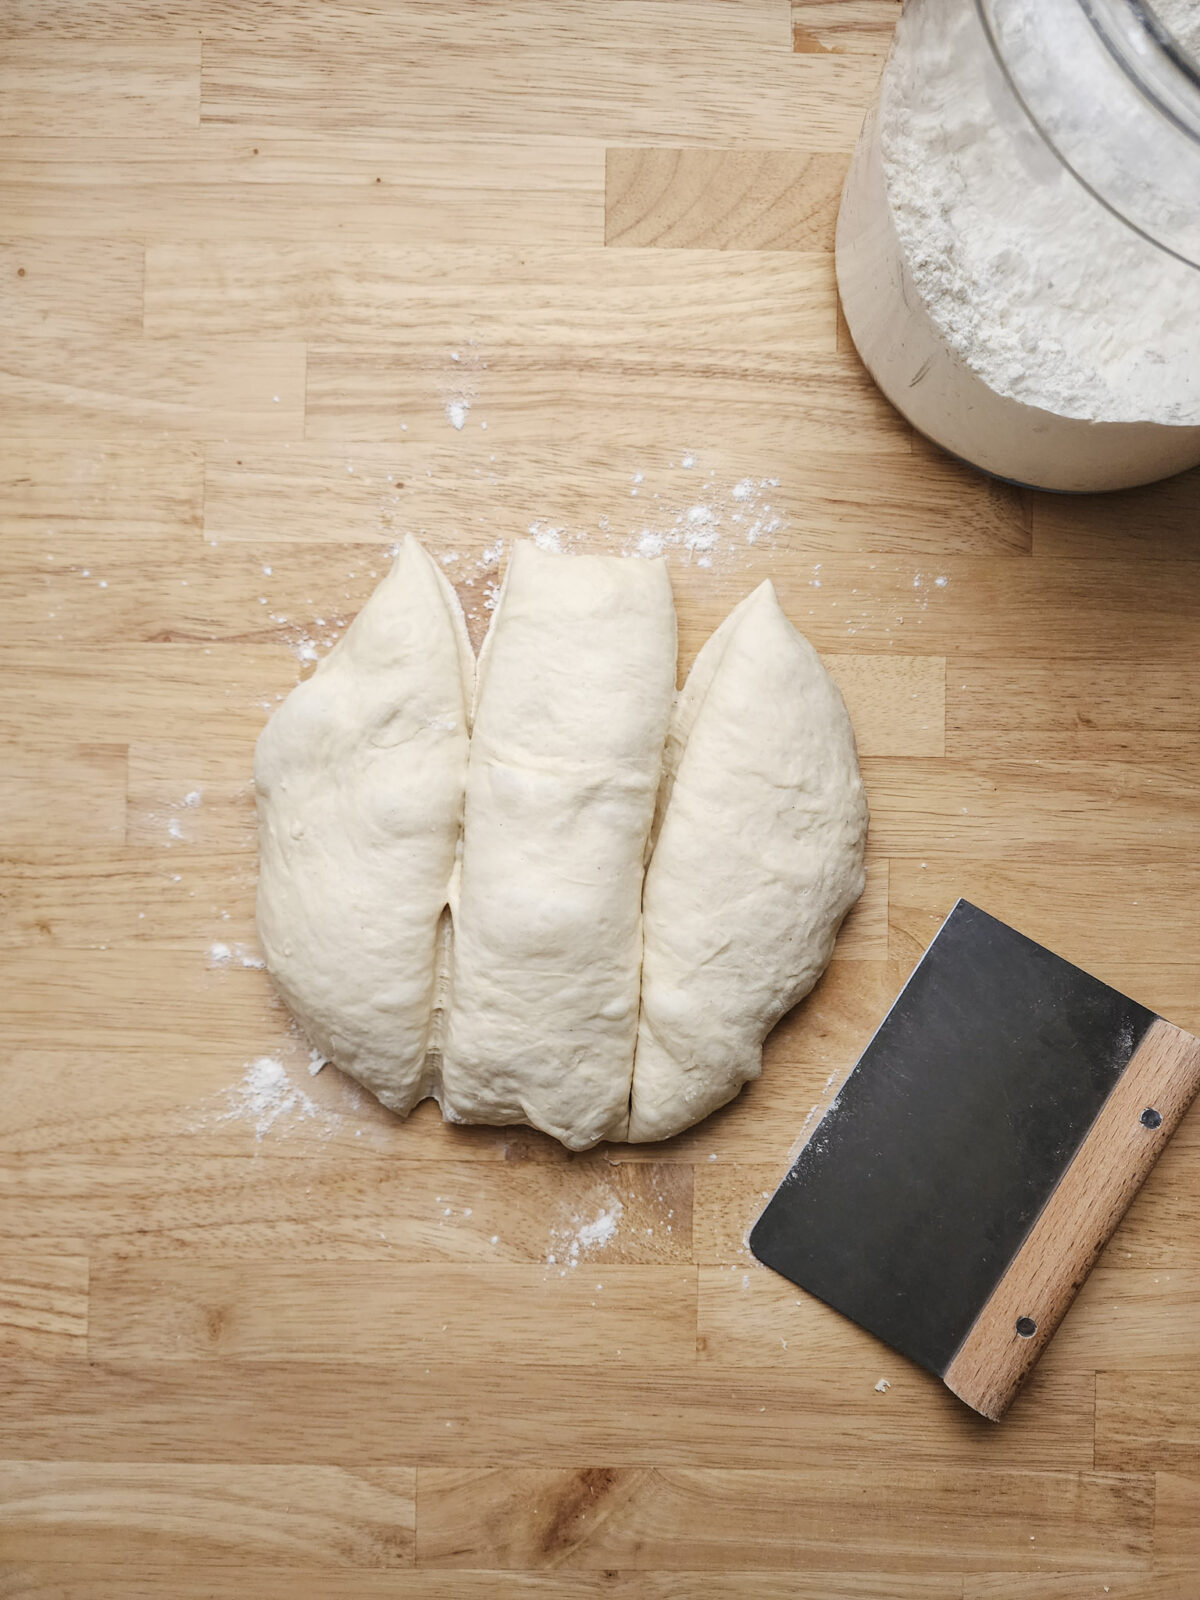
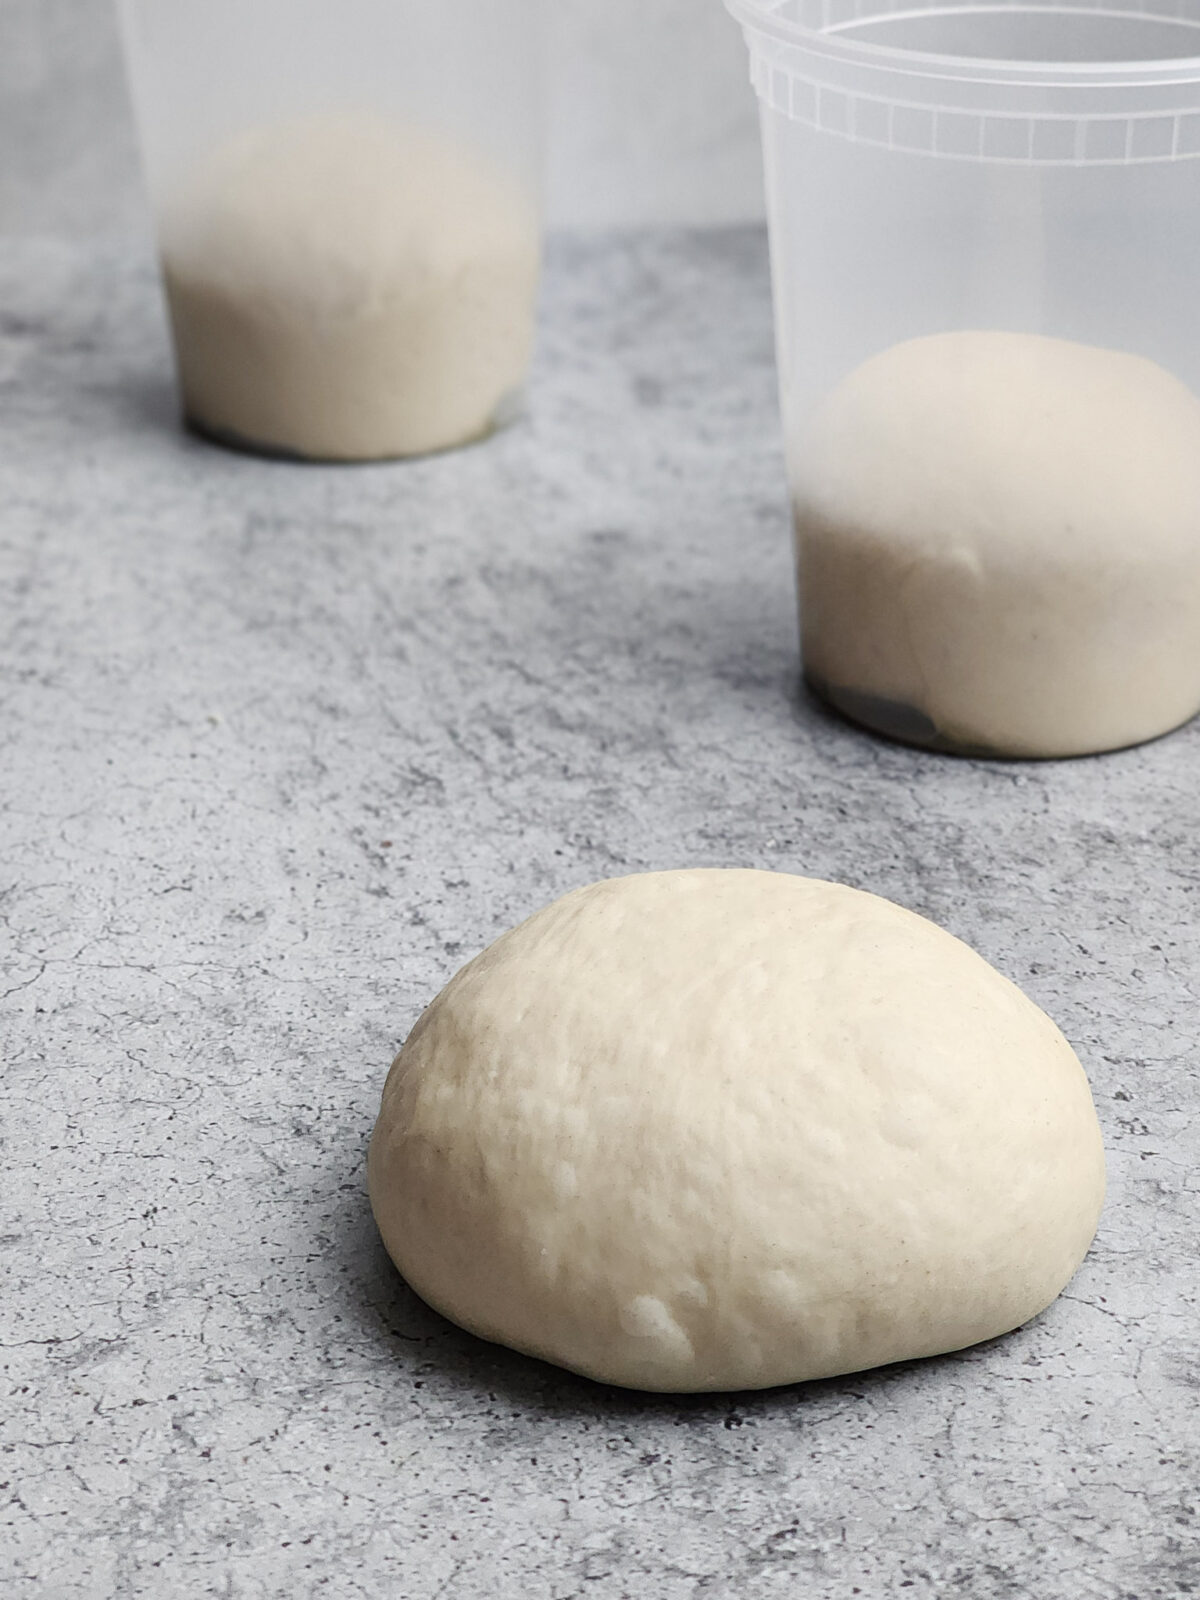
After the last 30-minute rest in the stretch and fold stage, divide the dough into 3 equal pieces. Transfer to lightly oiled quart-sized deli containers, zip-top bags, or covered bowls and ferment in the fridge at least overnight, up to three days. Resting the dough in the refrigerator adds a ton of flavor and is an important step to not skip.
-
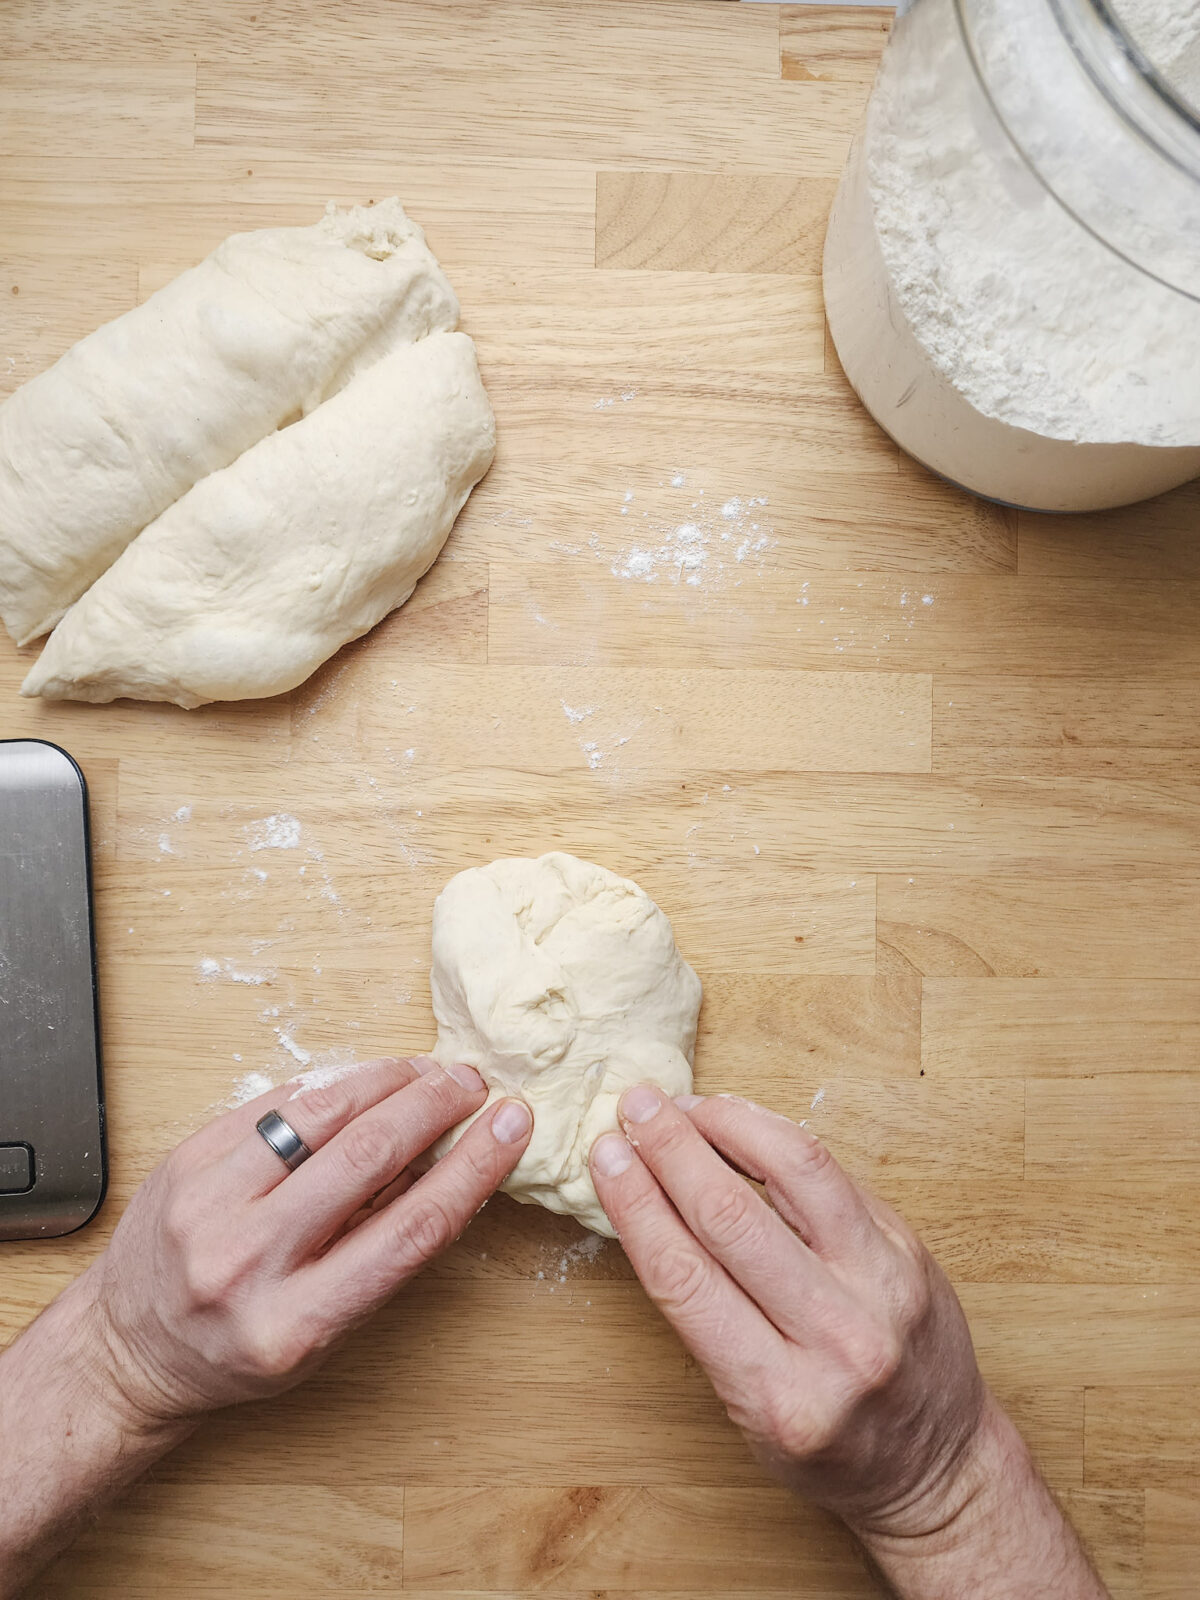
1. Transfer the dough onto a floured work surface. -
2. Divide the dough into three equal pieces. -
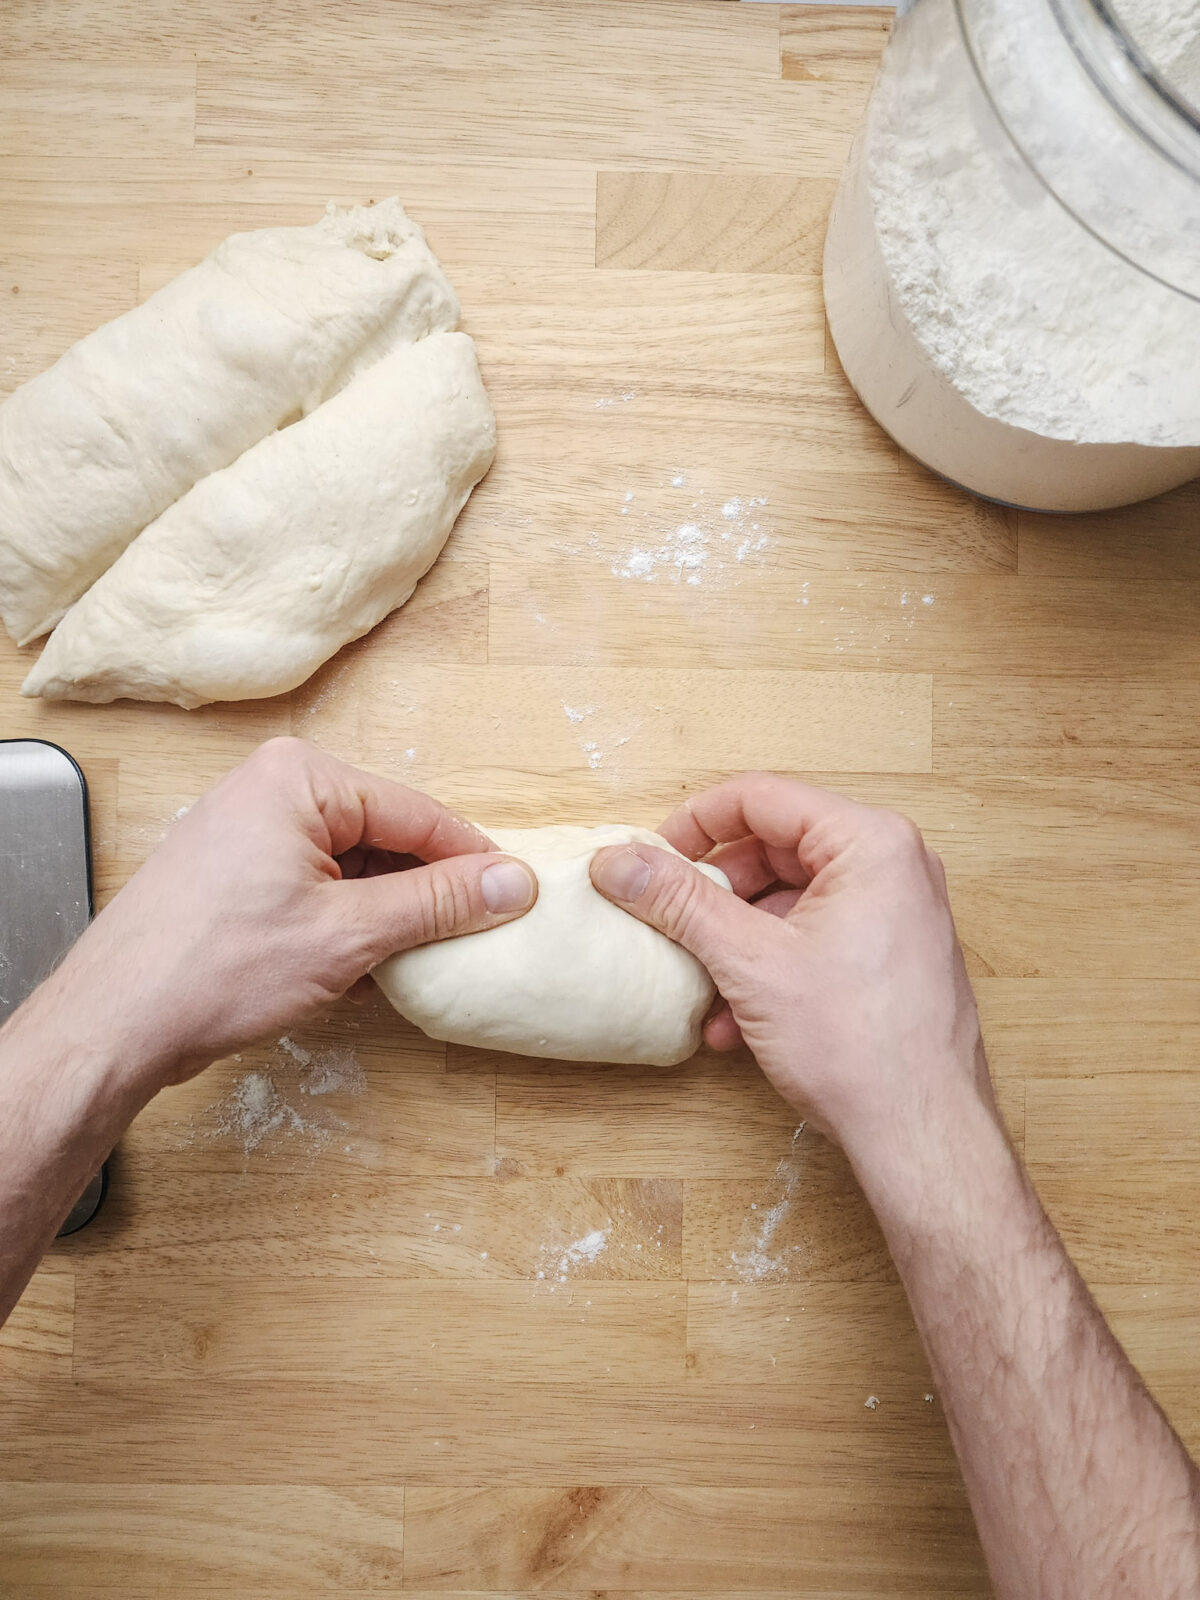
3. Grab the bottom edge of the dough. -
4. Fold it up over onto itself to form a rough dough ball. -
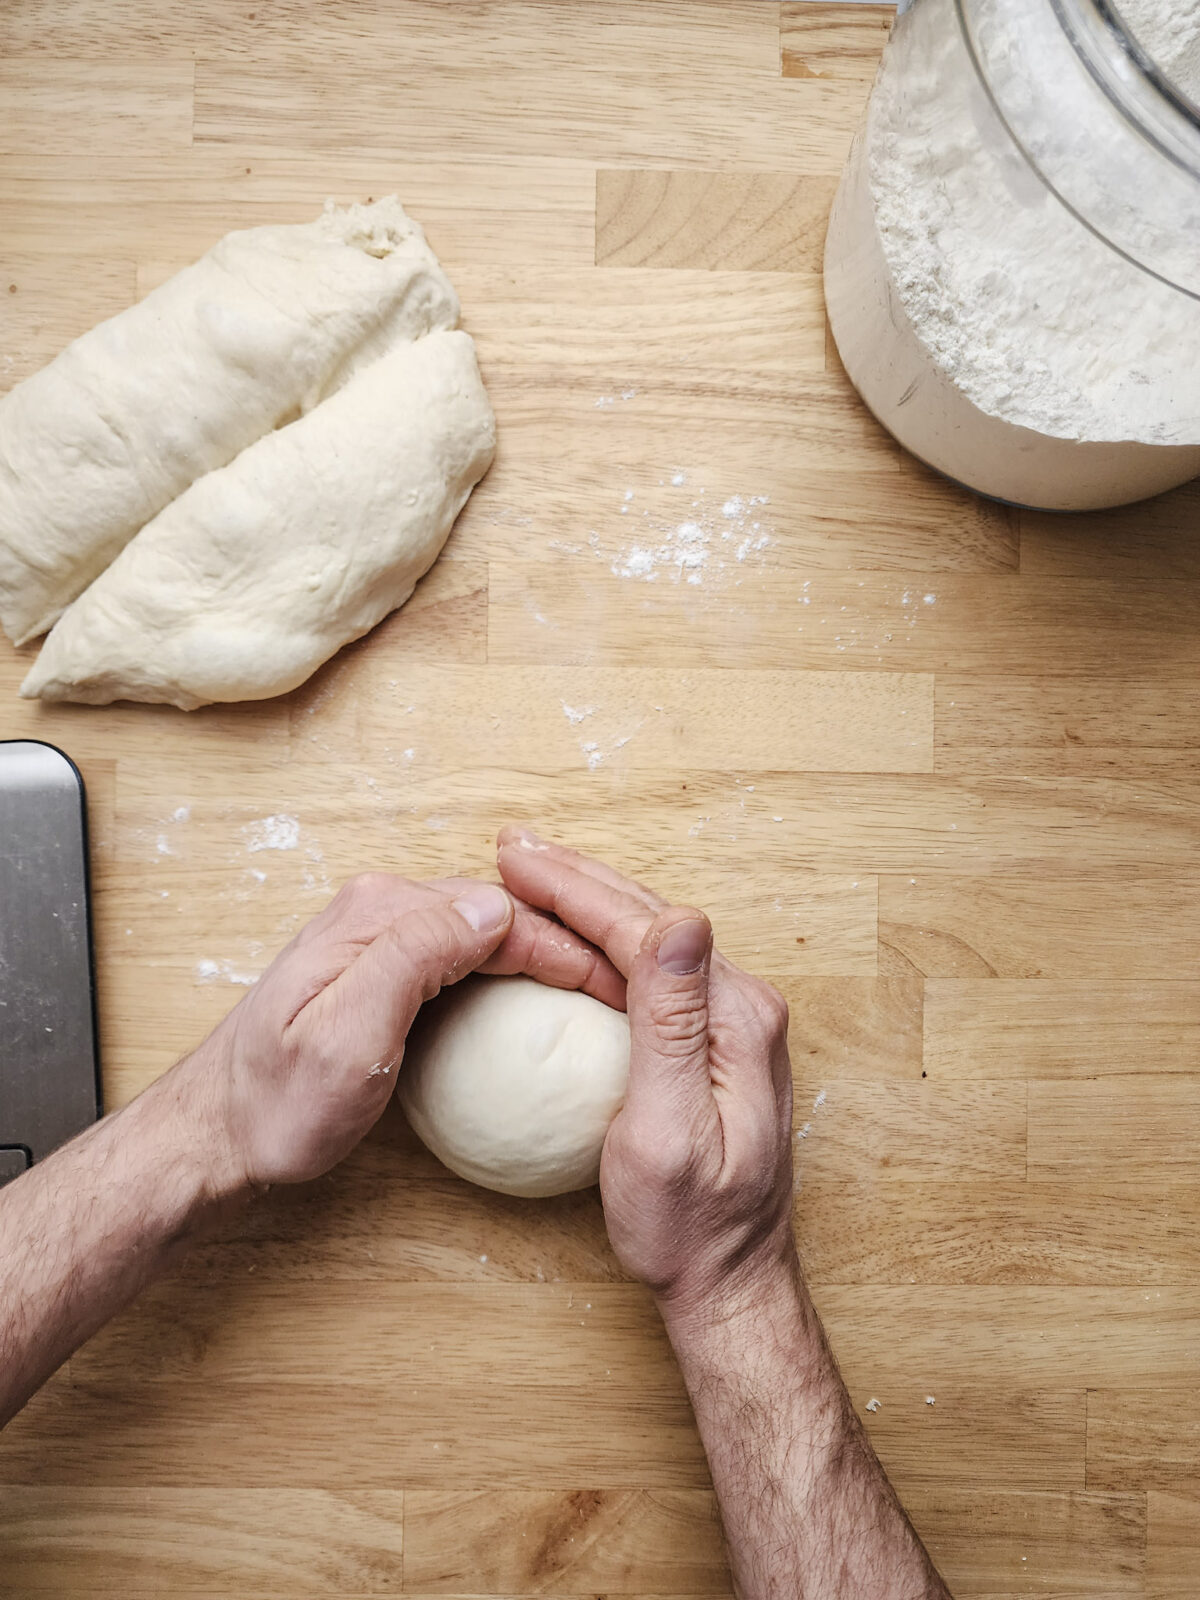
5. Cup your hands and drag the dough ball across the work surface several times to finish shaping. -
6. Transfer the dough balls to oiled containers and proof in the refrigerator overnight.
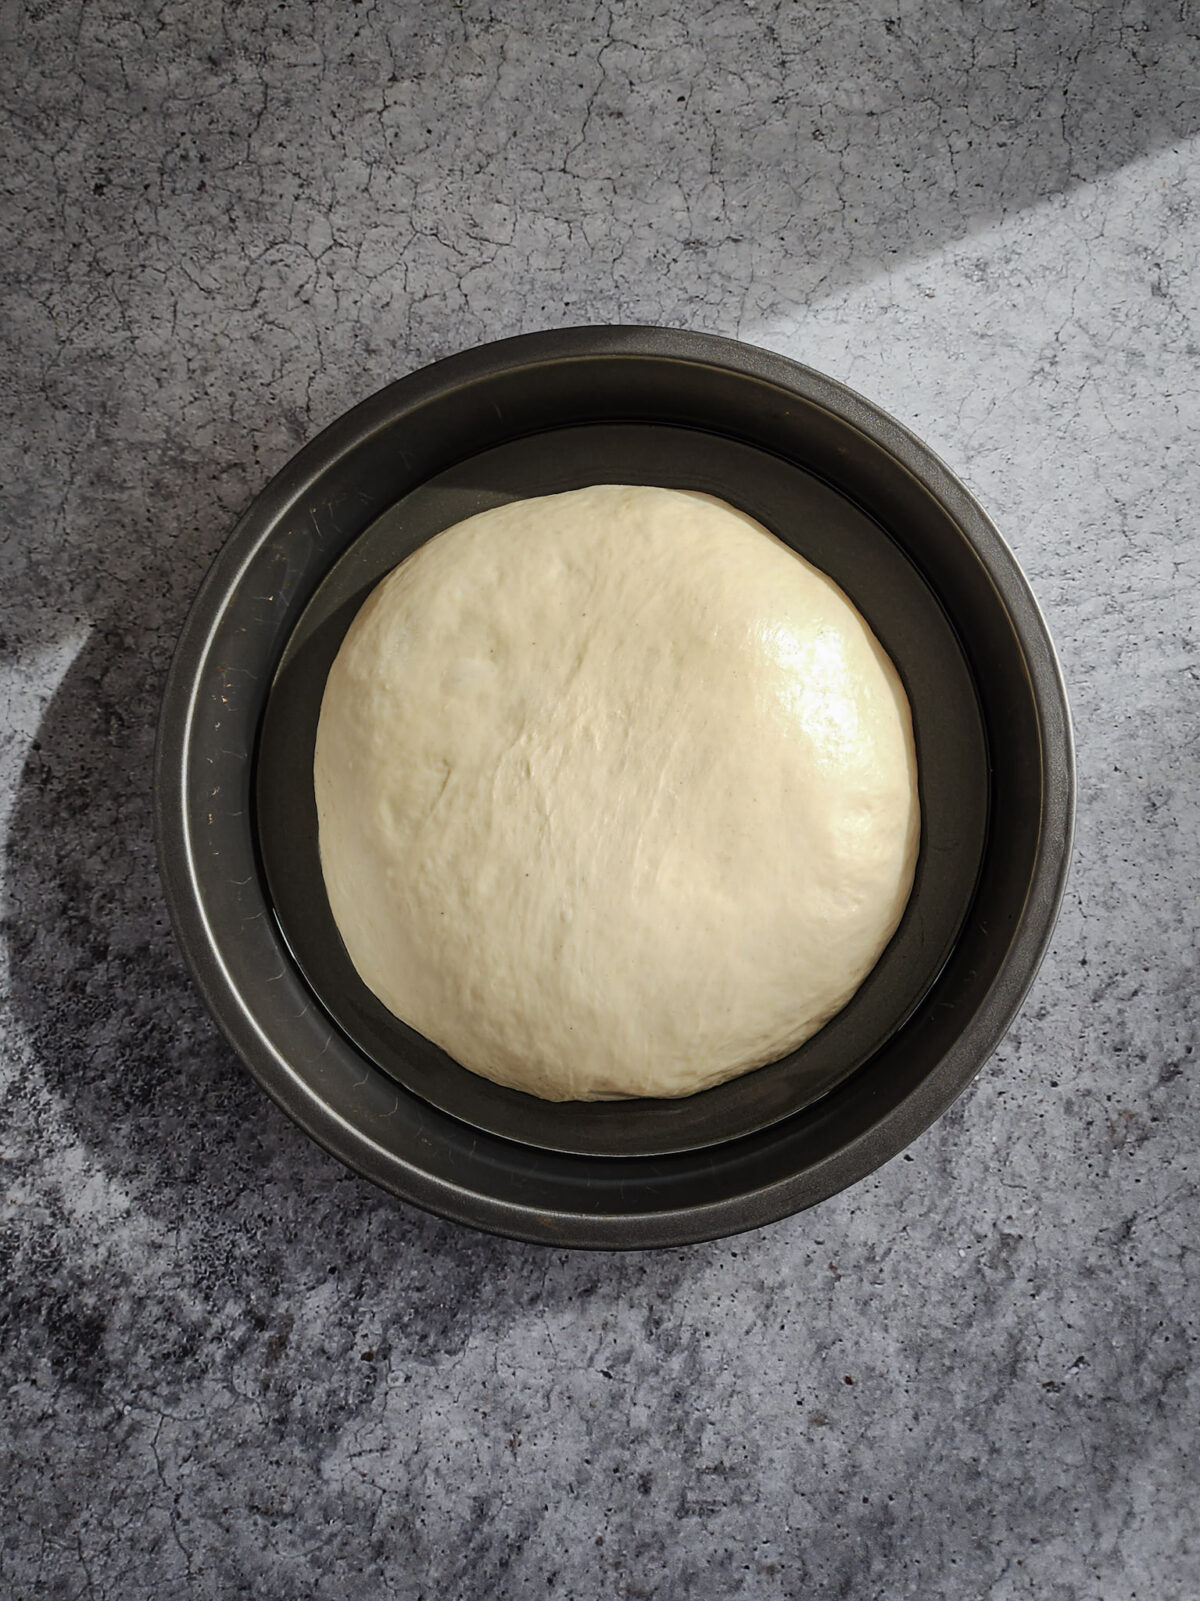
Final Proofing
The final proof is the most important stage in the dough-making process for this recipe. Luckily enough for us, this is largely a "hands-off" process. Simply transfer the dough from the fridge, place each ball in three well-oiled 9-inch cake pans, and allow them to rest for 30-minutes. Stretch the dough out to the edges with your fingertips, then cover and proof at room temperature for several hours until ready to bake! The whole process is outlined below.
-
1. Remove the dough from the fridge four hours prior to when you plan to bake. -
2. Transfer the dough to three well oiled, 9-inch cake pans. 
3. Allow the dough to rest on the counter for 30 minutes. -
4. Dimple the dough with your fingertips to stretch the dough to the edges of the pan. Cover and let proof for an additional 3 ½ hours.

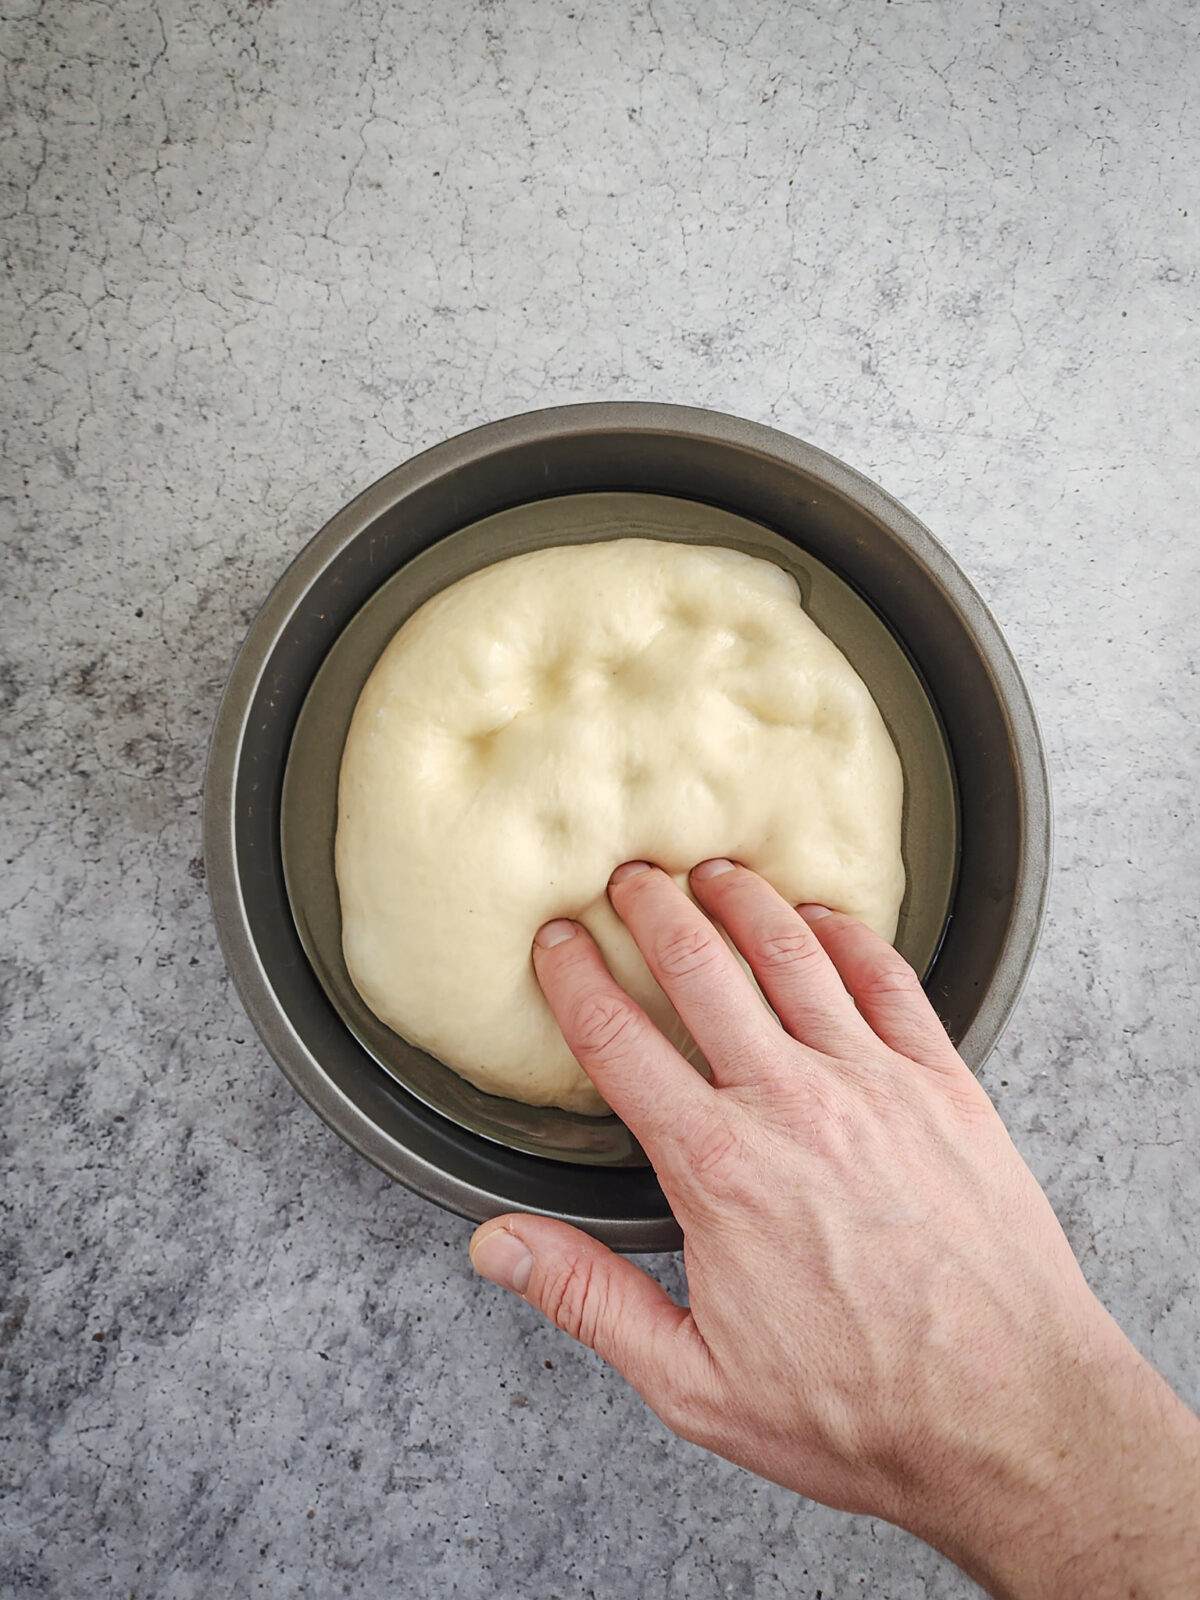
Pro Tip: During the last hour of the final proofing stage, preheat the oven to 450°F to prepare for baking.
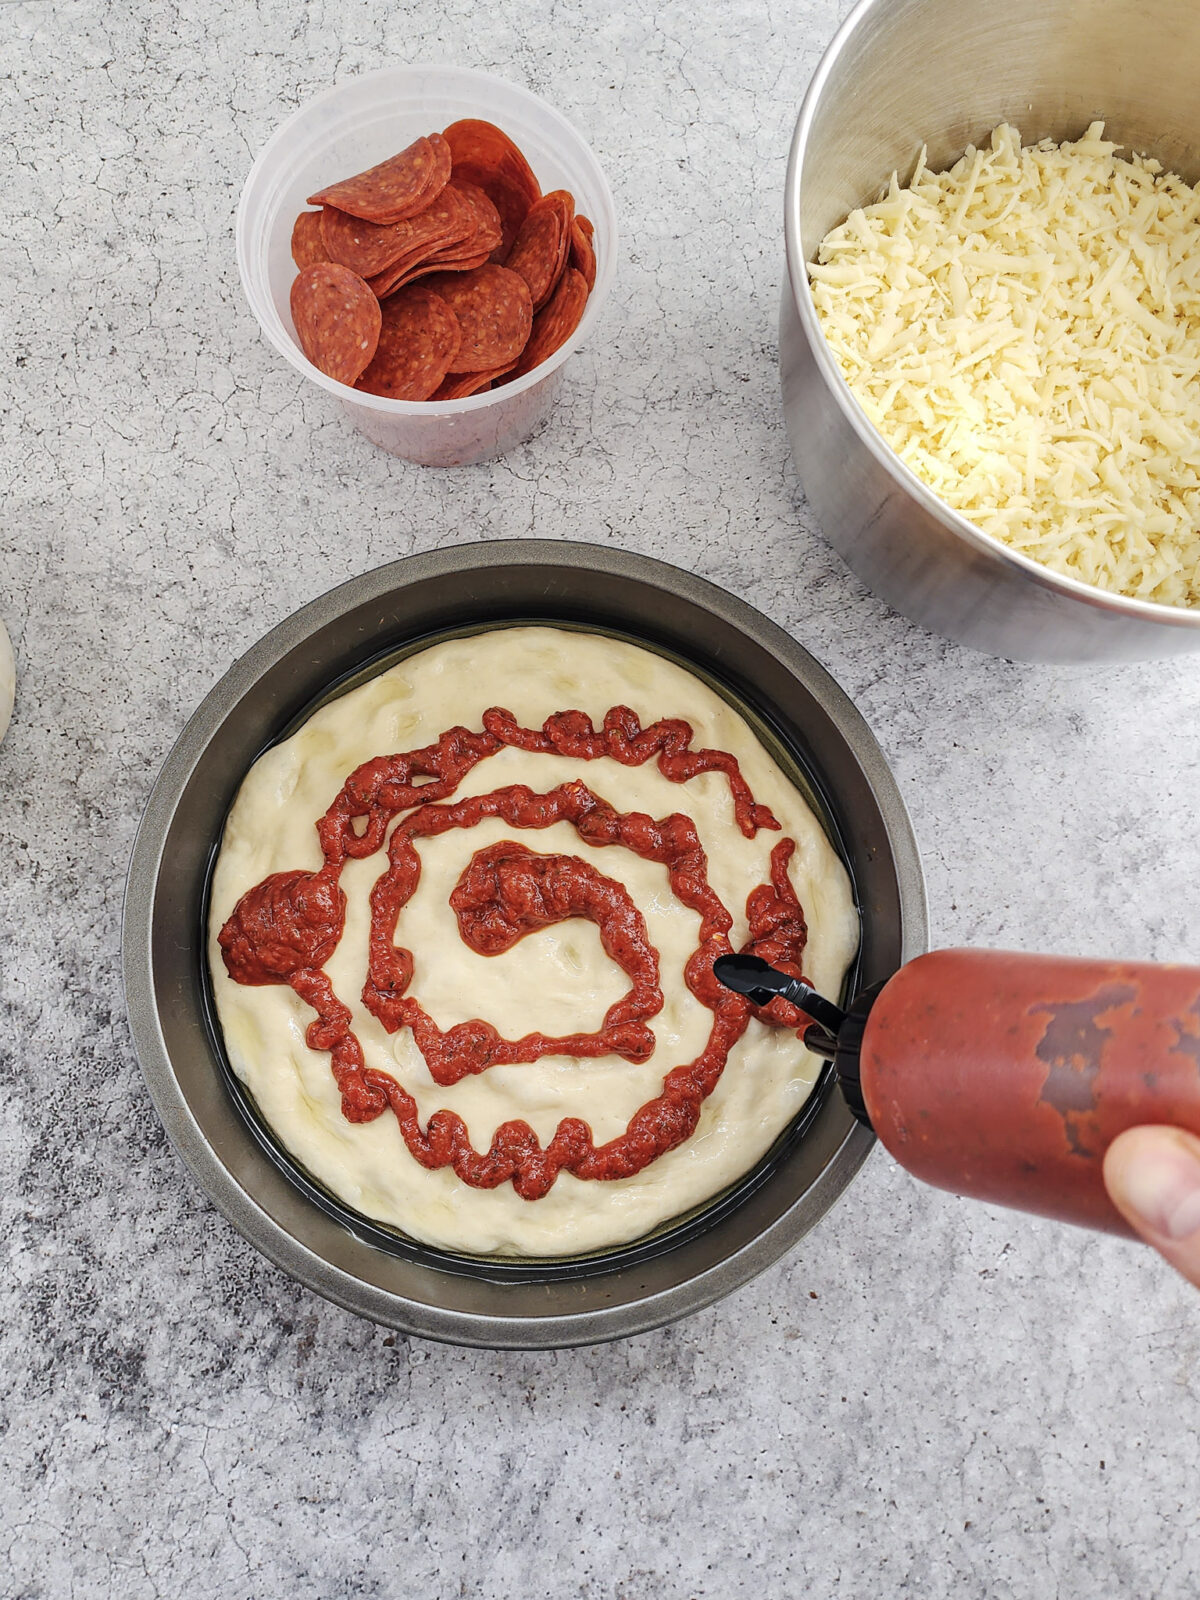
Pizza Assembly
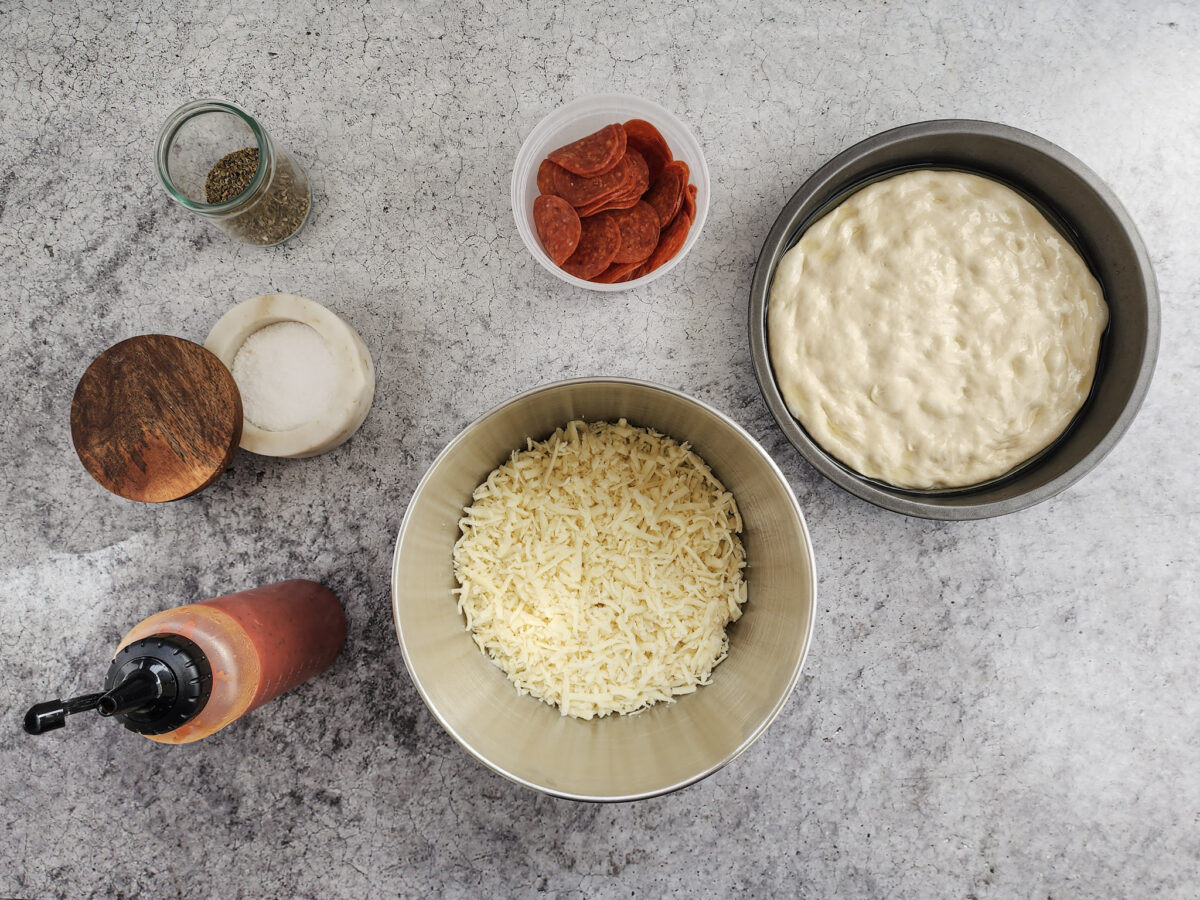
Now that the pizza dough has been properly proofed, we are ready to assemble these pizzas! The process below will show how to make a standard pepperoni. As mentioned previously, feel free to use any toppings you like!
-
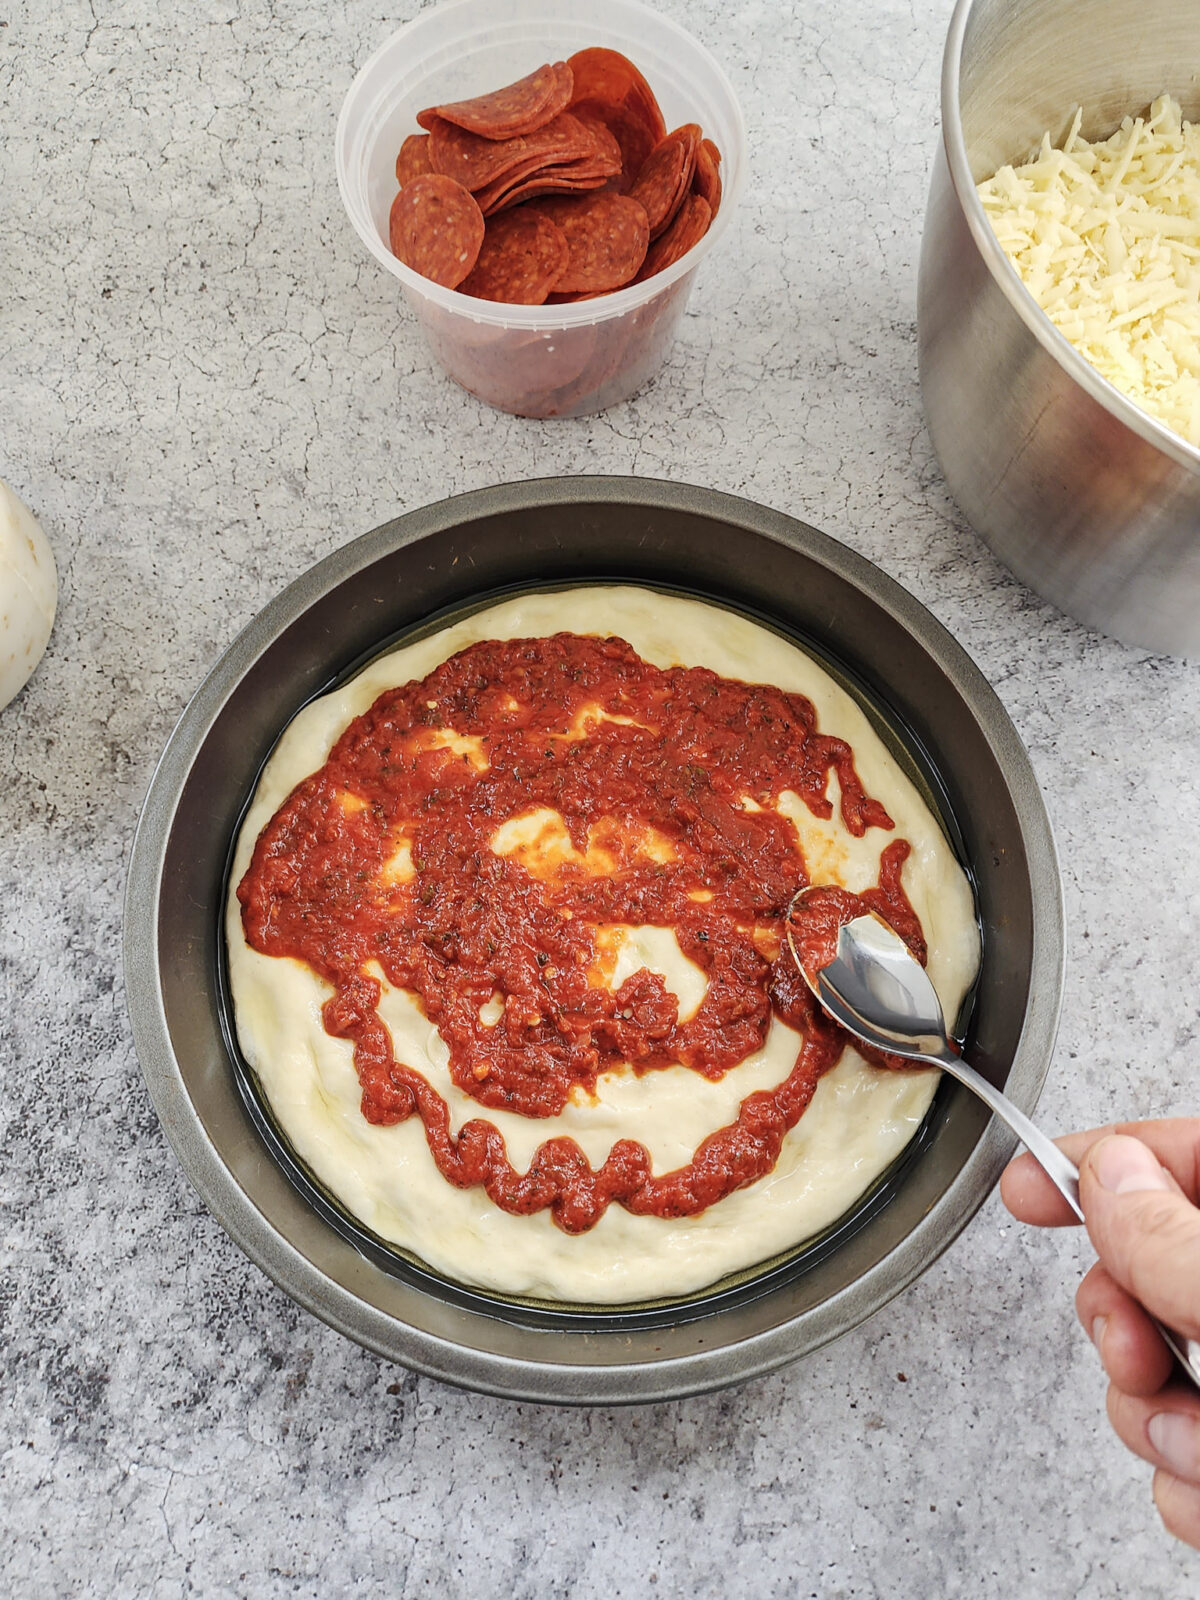
1. Gather all of your ingredients and toppings. -
2. Drizzle or spoon ⅓ cup of sauce over the dough. -
3. Gently spread the sauce over the dough, taking care not to press down too hard, otherwise you will deflate the dough. -
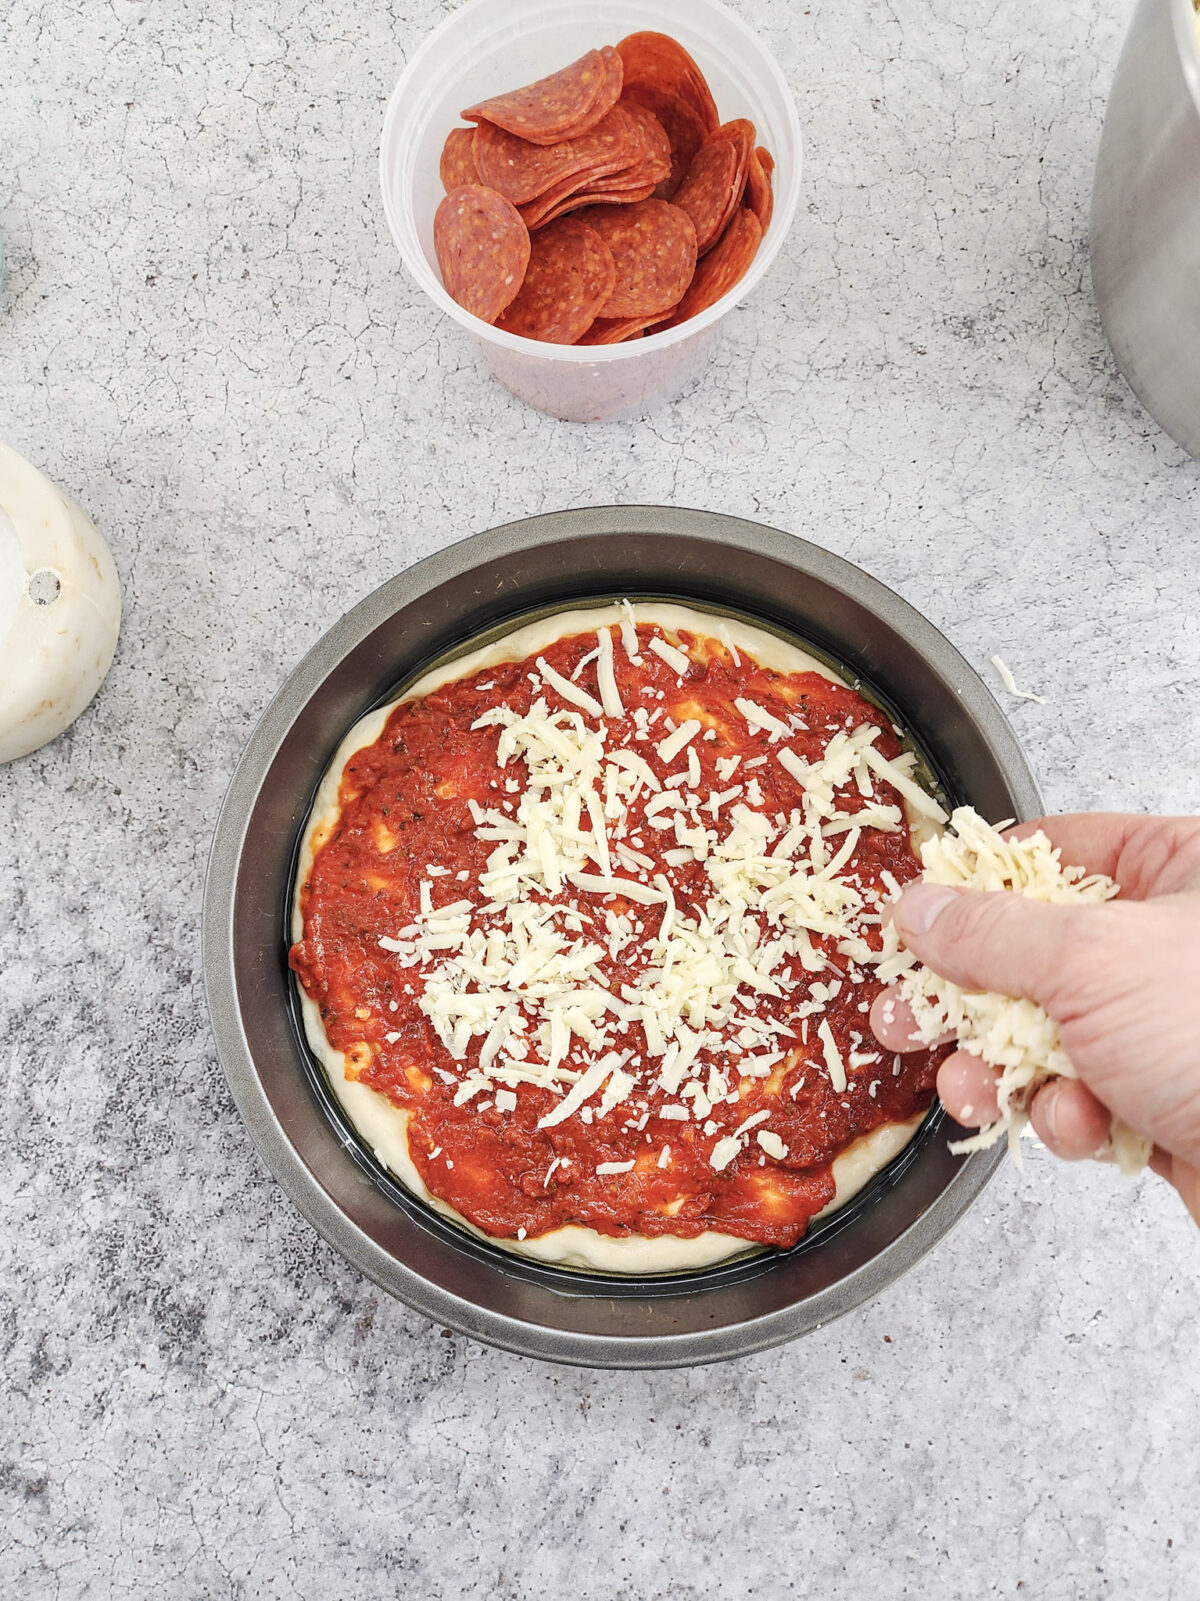
4. Sprinkle 1 cup of the cheese mixture over the top.
-
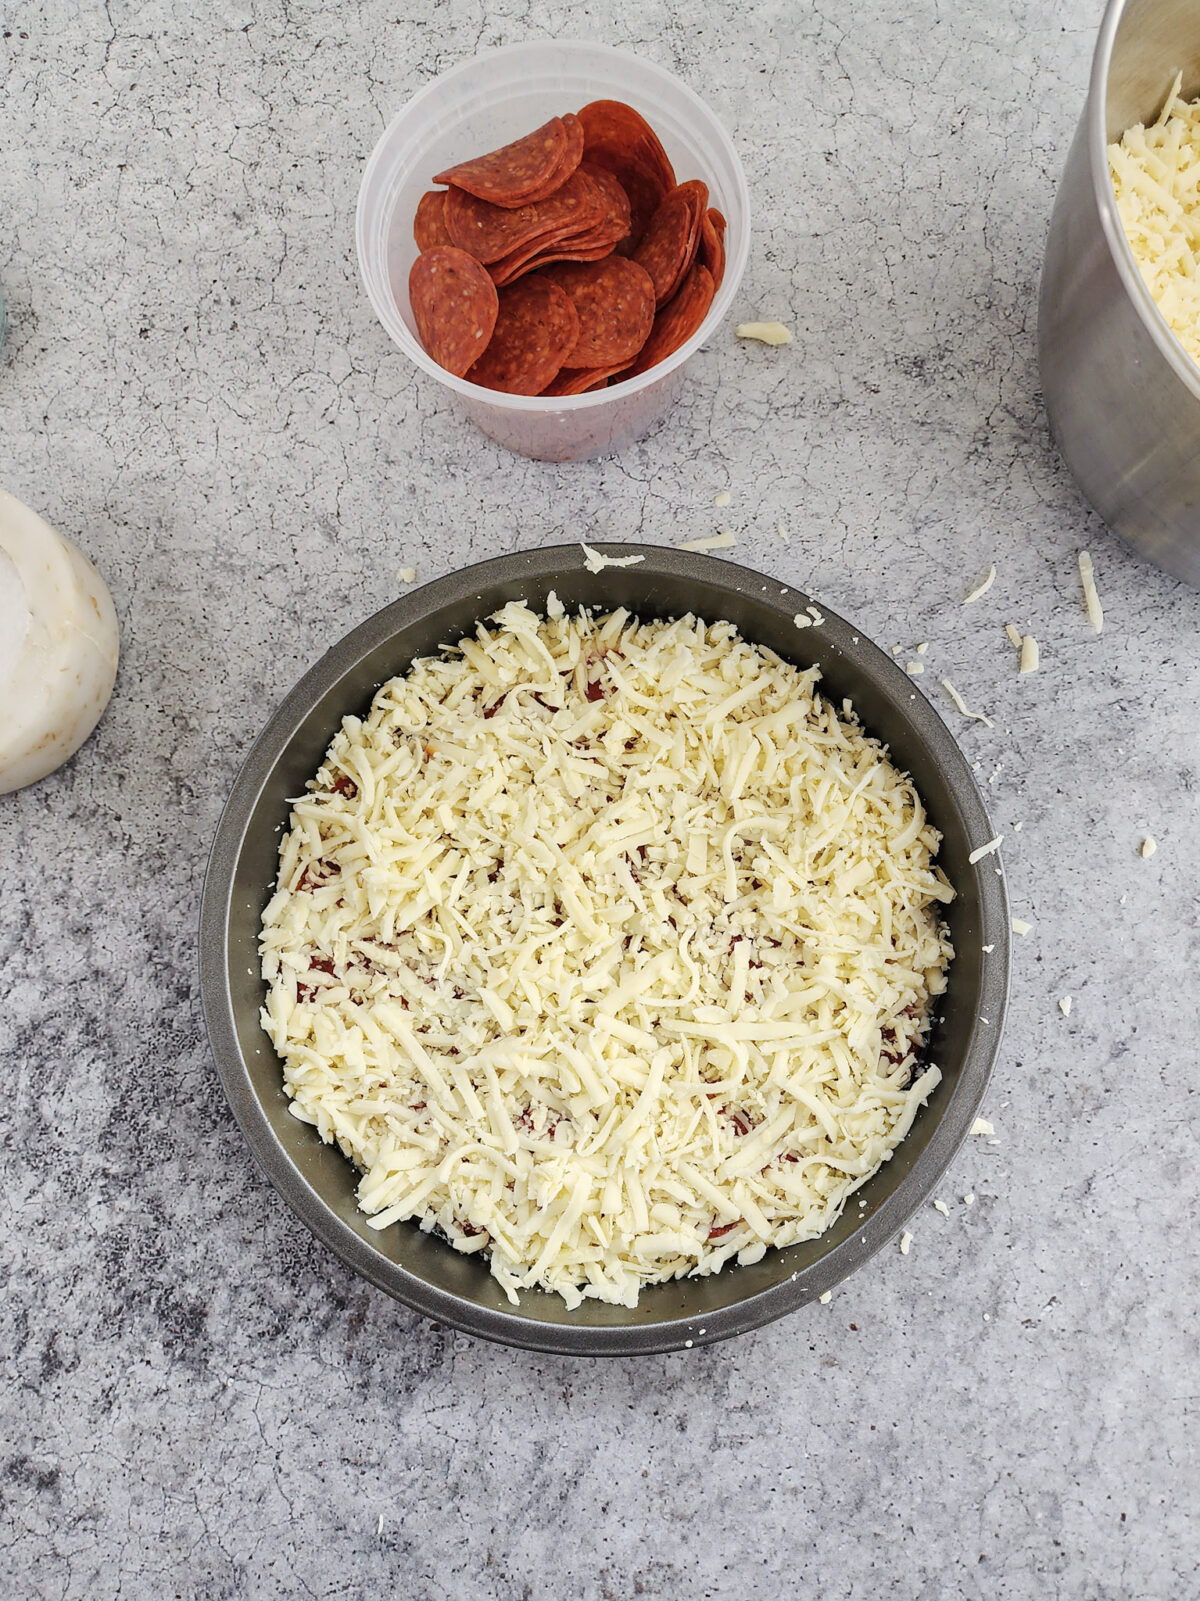
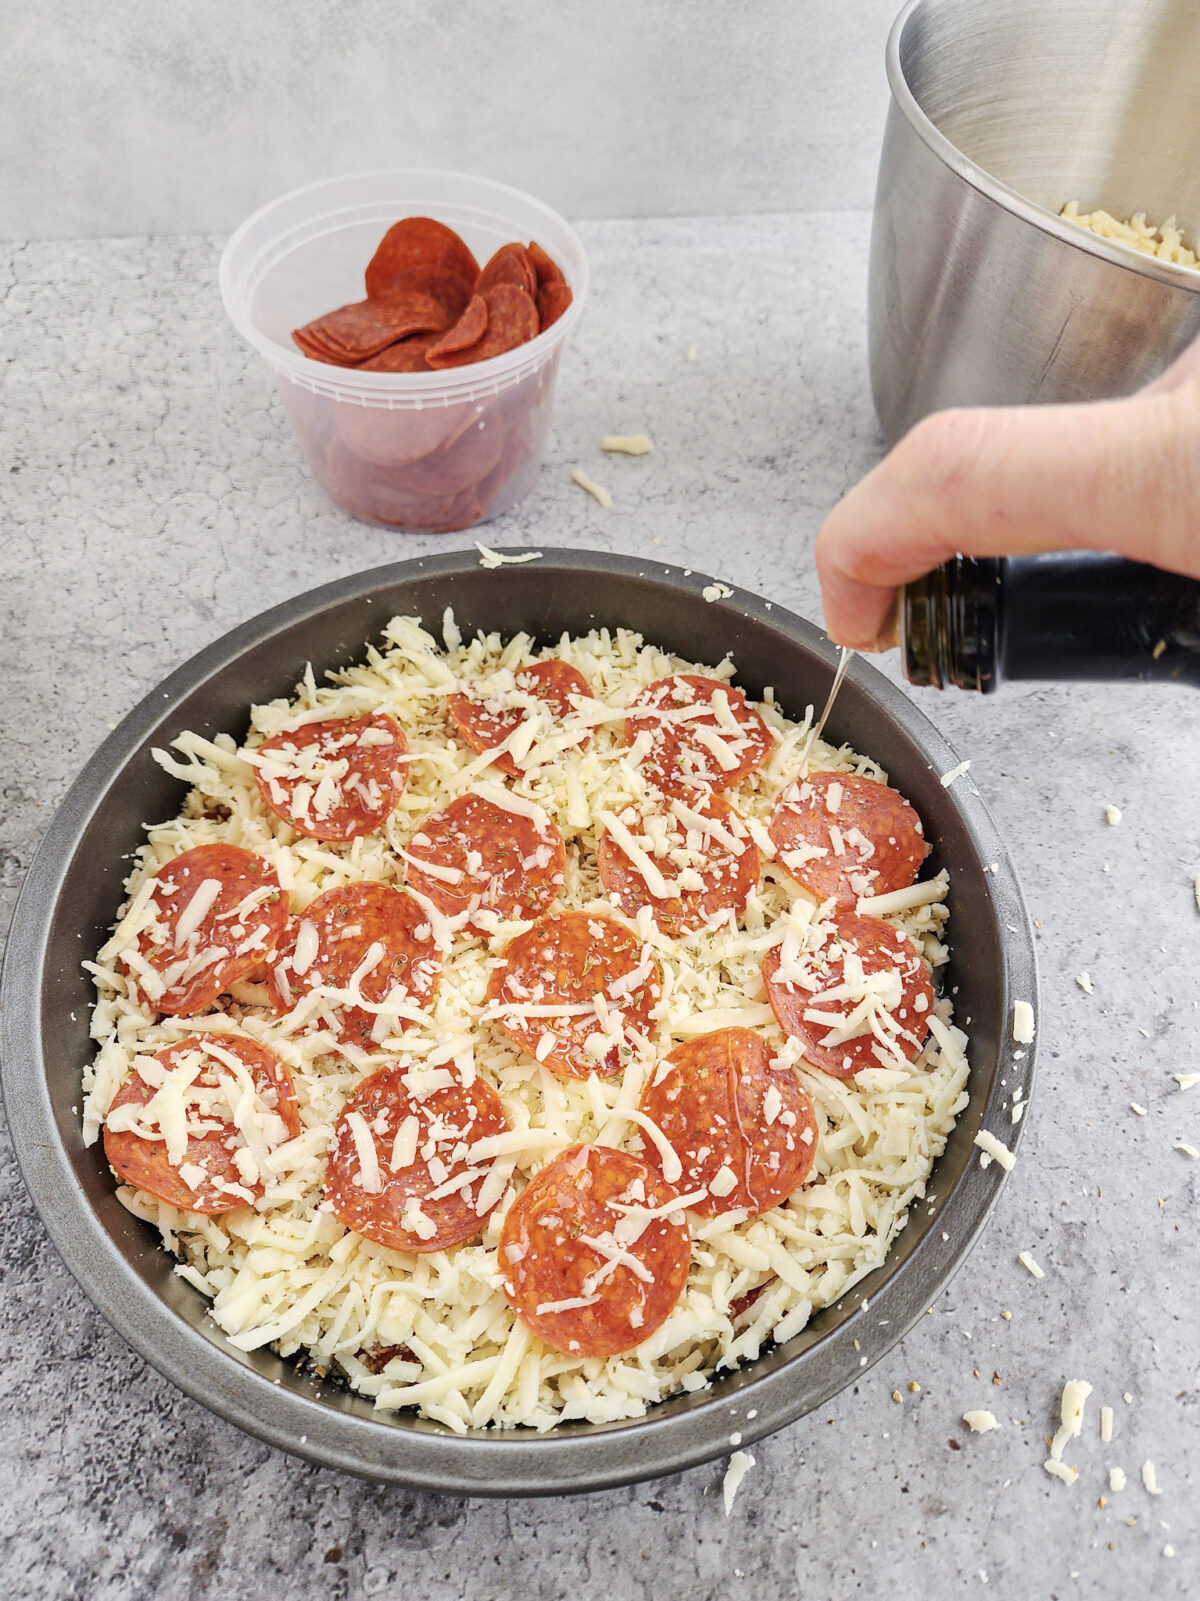
5. Extend the cheese all the way to the edges of the pan. This is what gives us that crispy edge! -
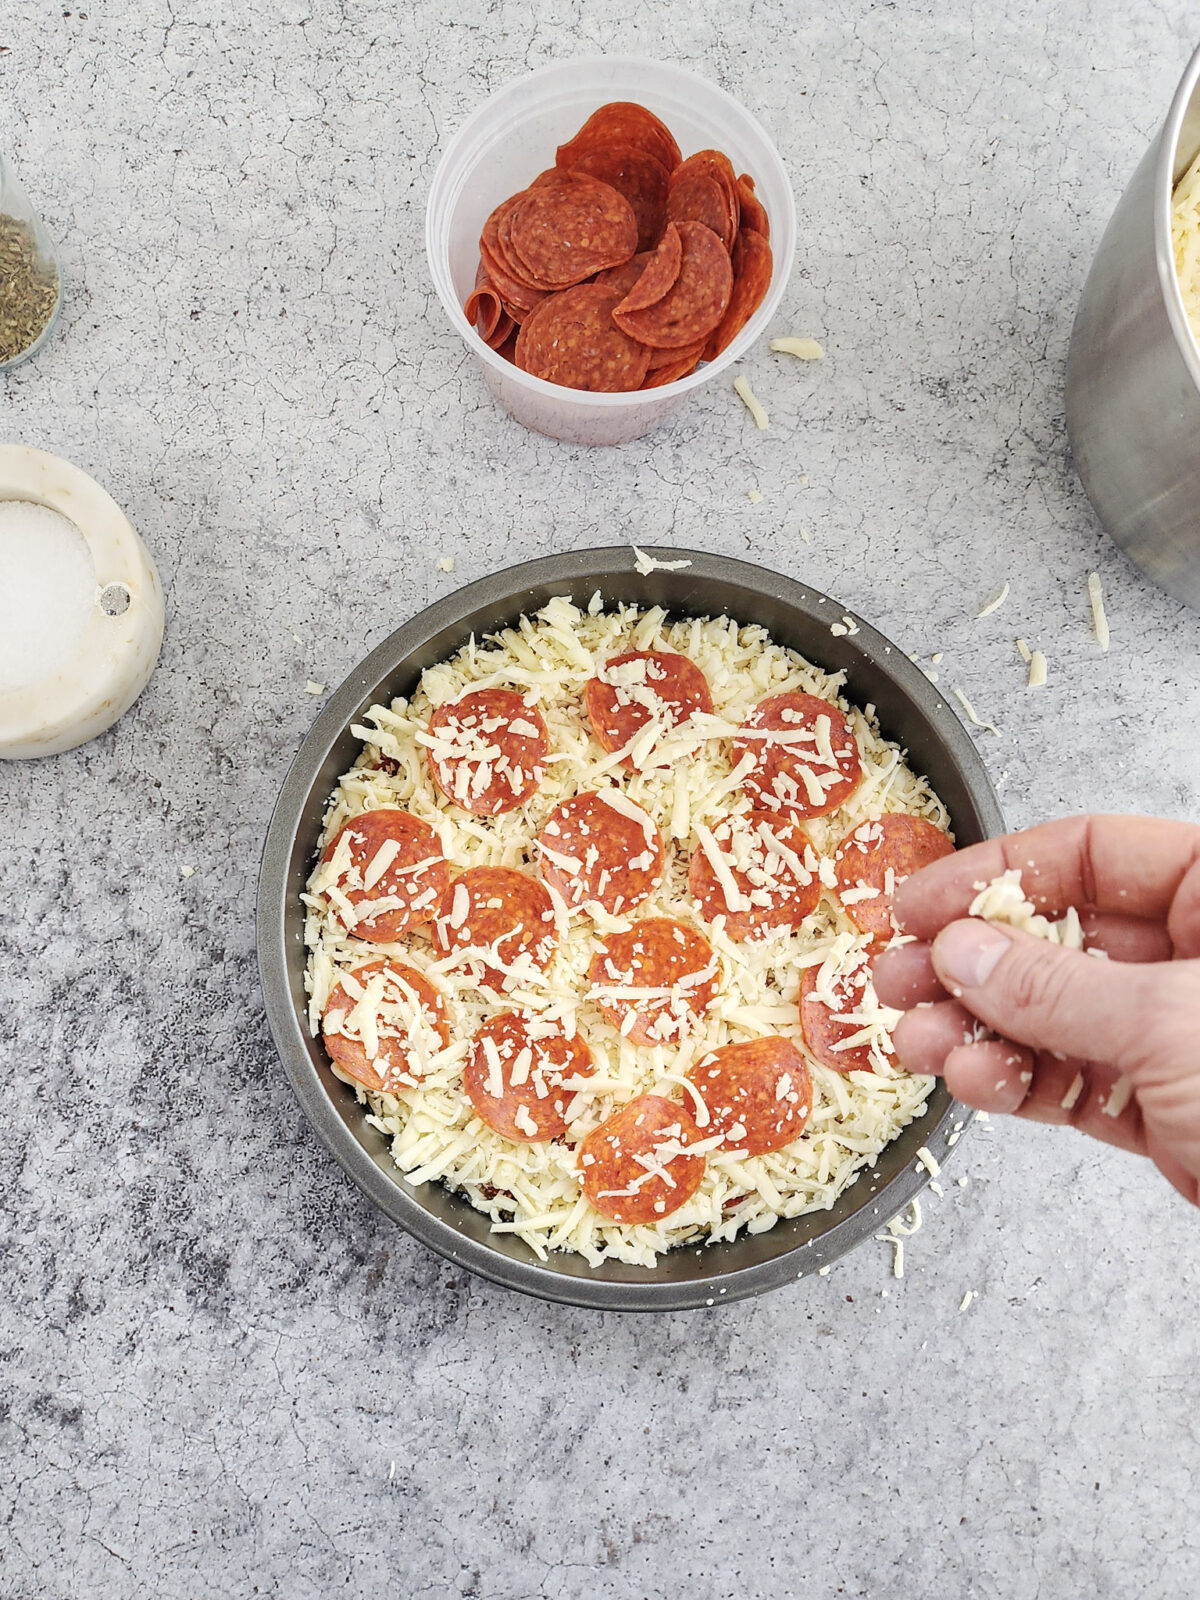
6. Cover the top of the pizza with pepperoni, leaving a small gap between the slices. -
7. Sprinkle the remaining ⅓ cup of cheese over the pepperoni. -
8. Drizzle with olive oil, sprinkle with some kosher salt, and oregano, and you're ready to bake!

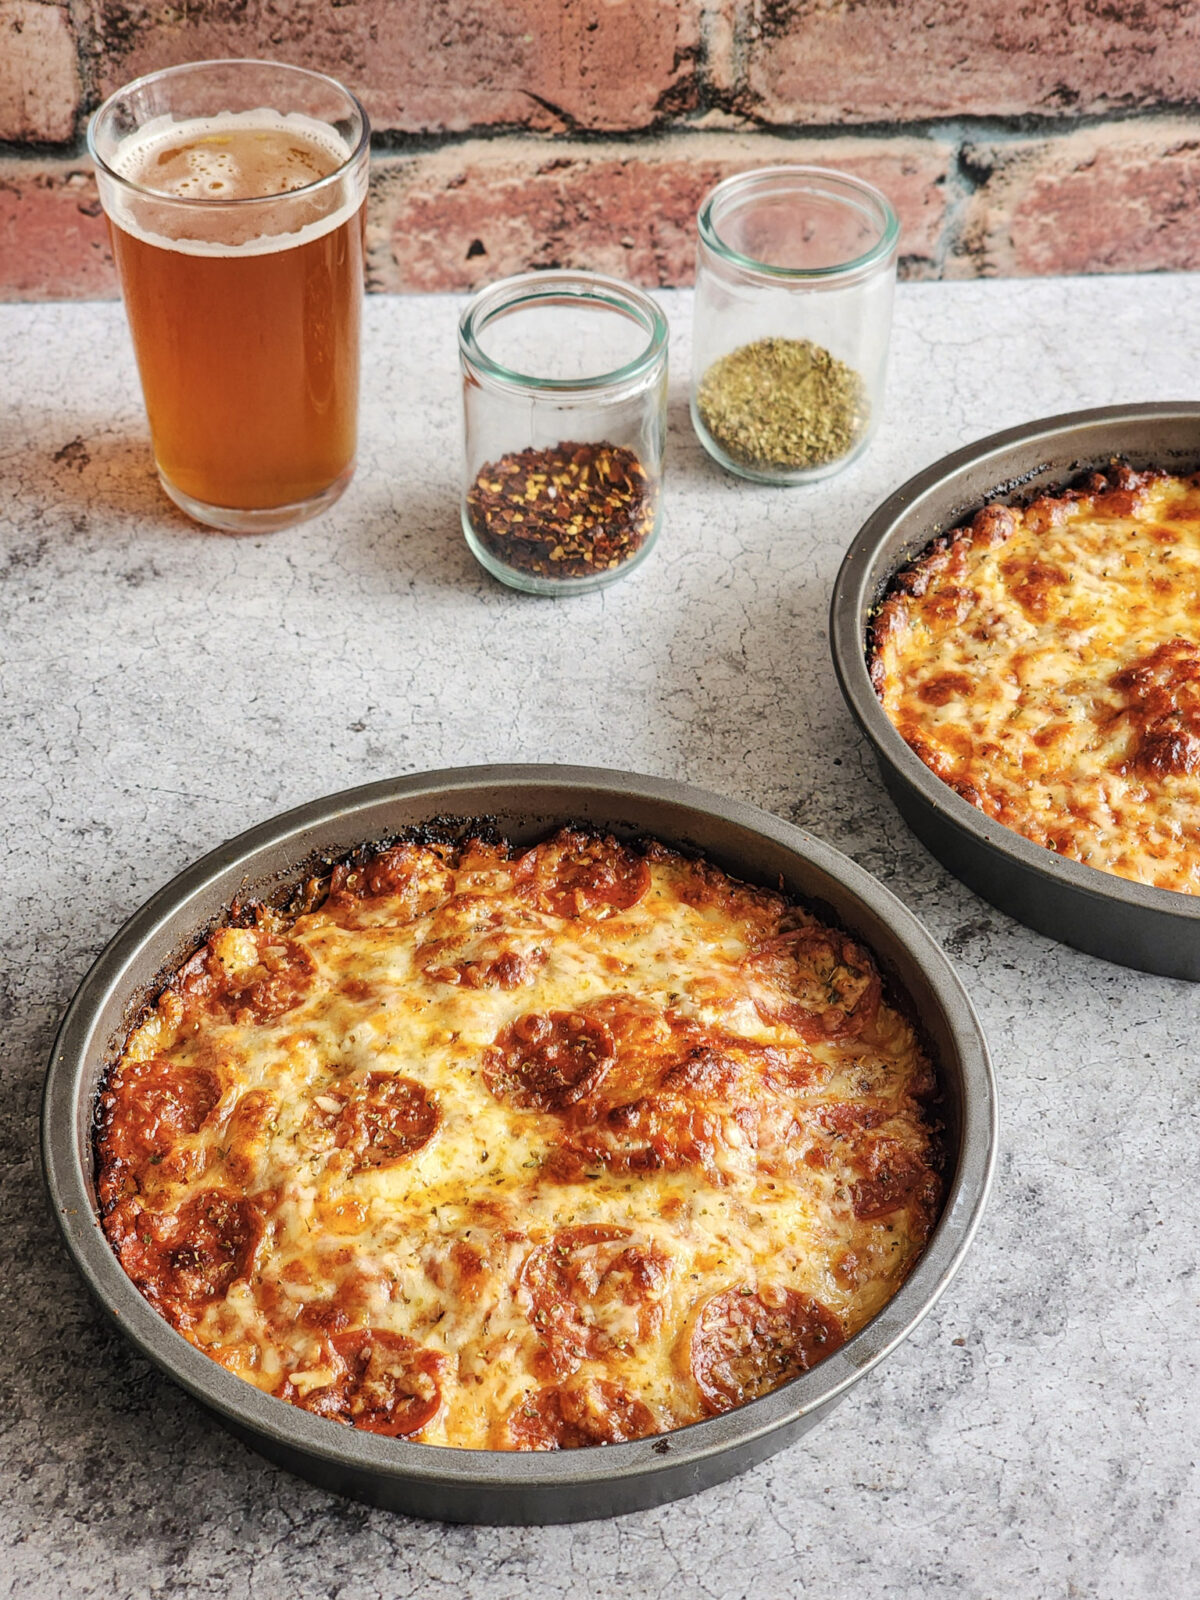
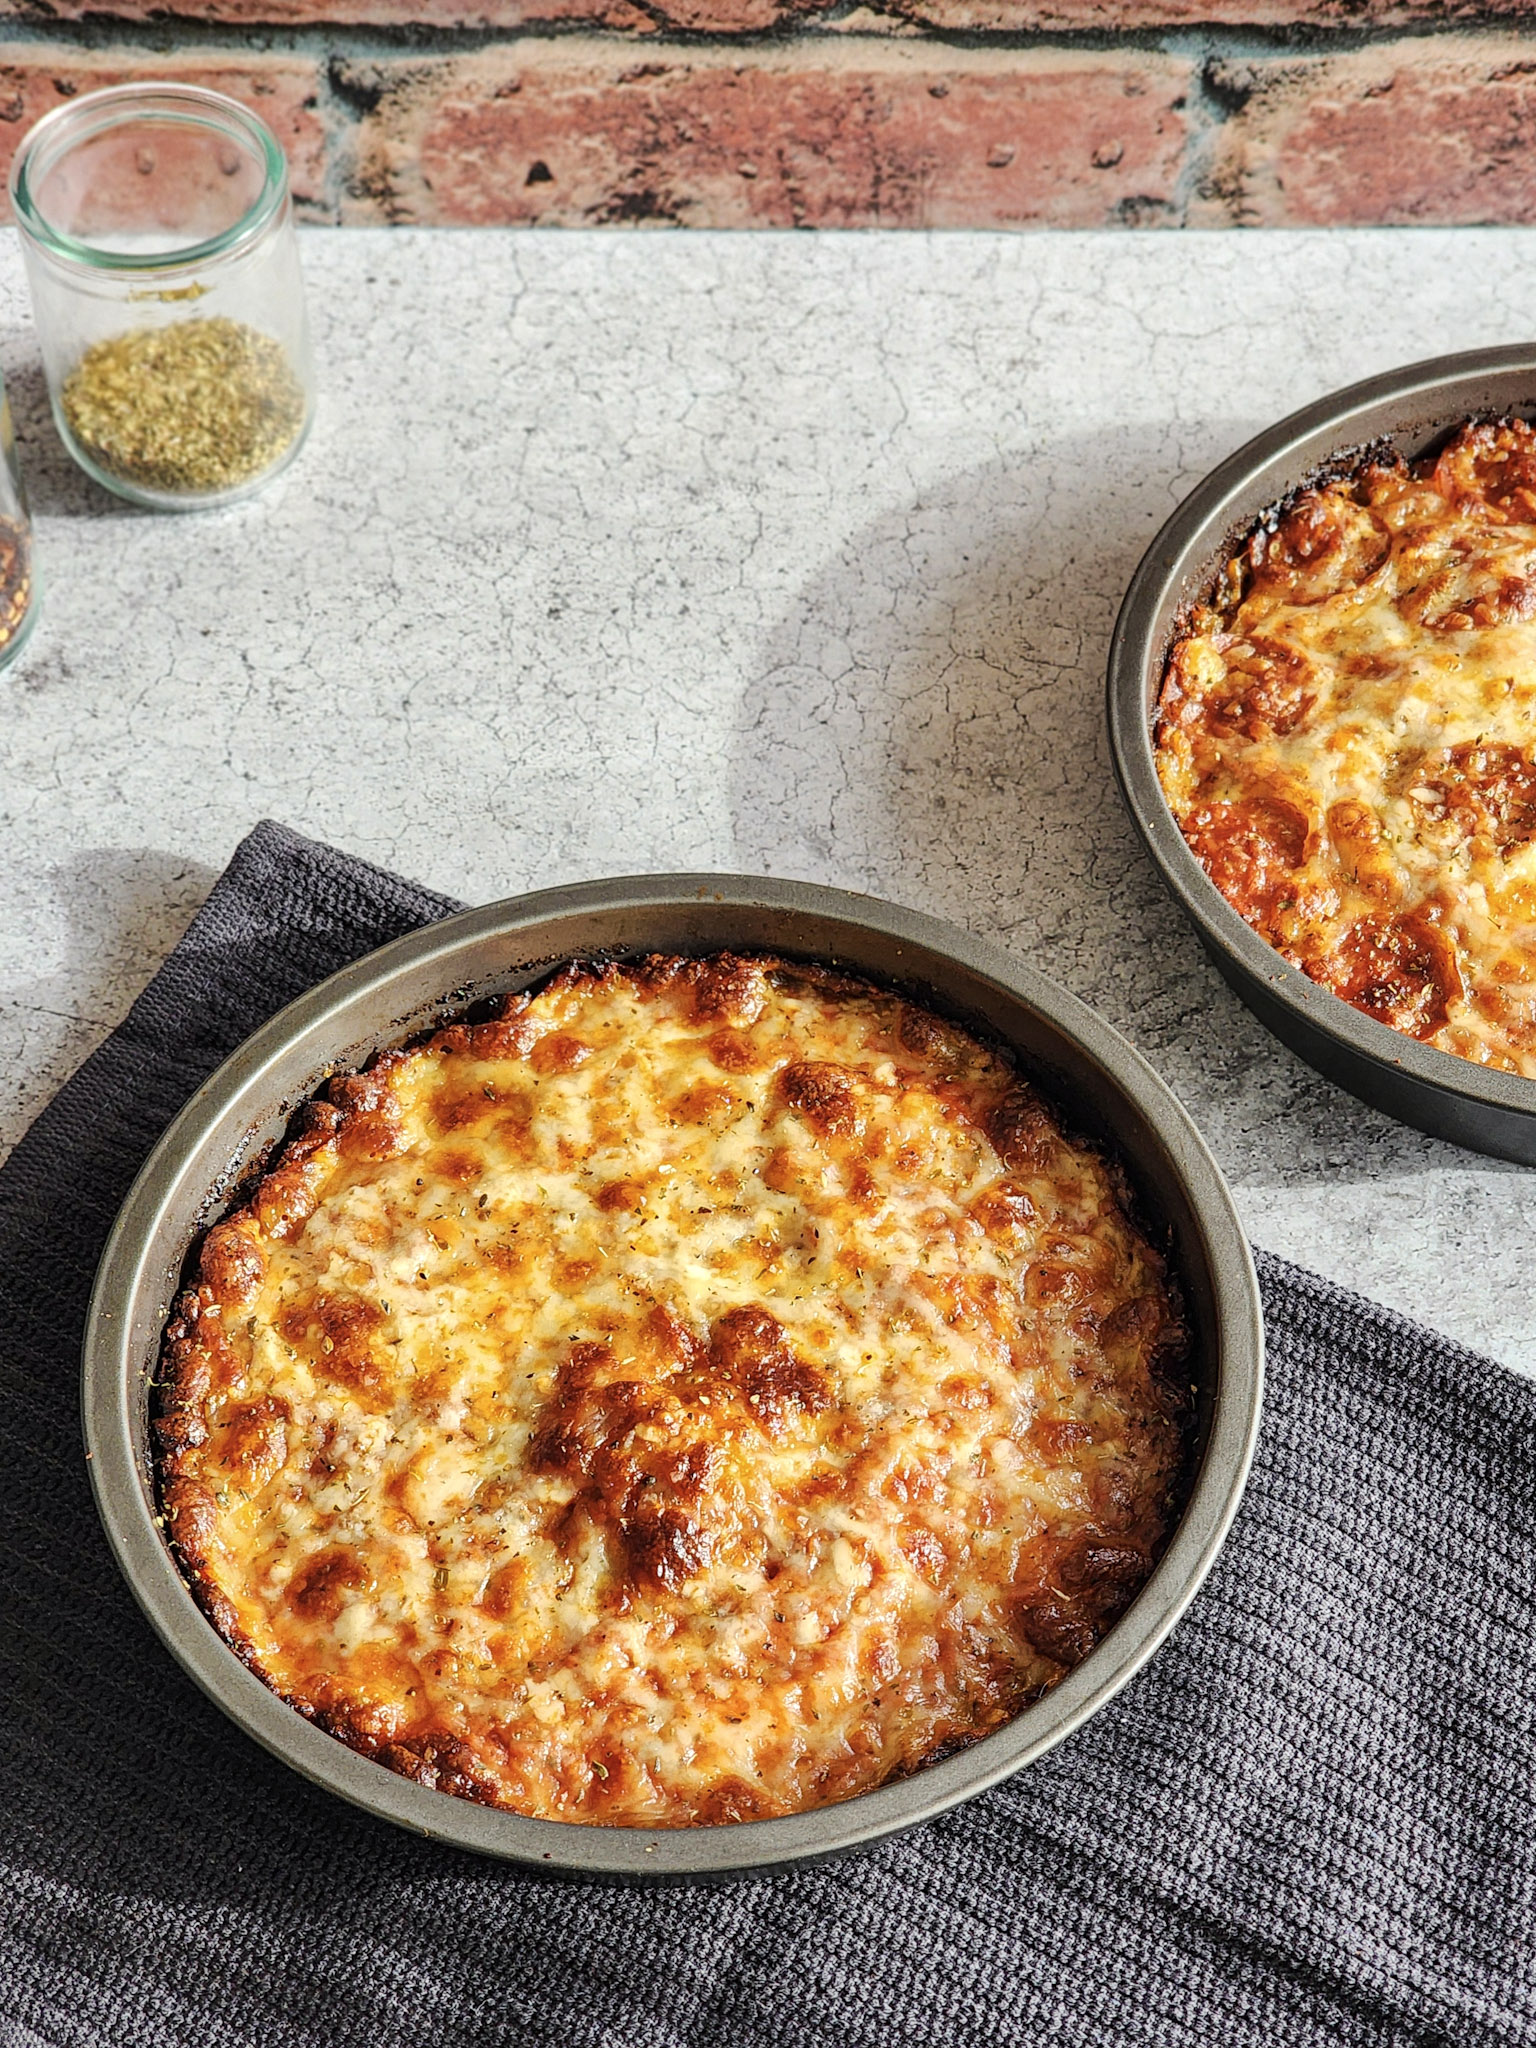
After you assemble the pizzas to your liking, transfer all three of them to the preheated oven and bake for 20 minutes until the cheese is melted and bubbling. I like to turn the pizzas halfway through cooking to ensure that everything cooks evenly.
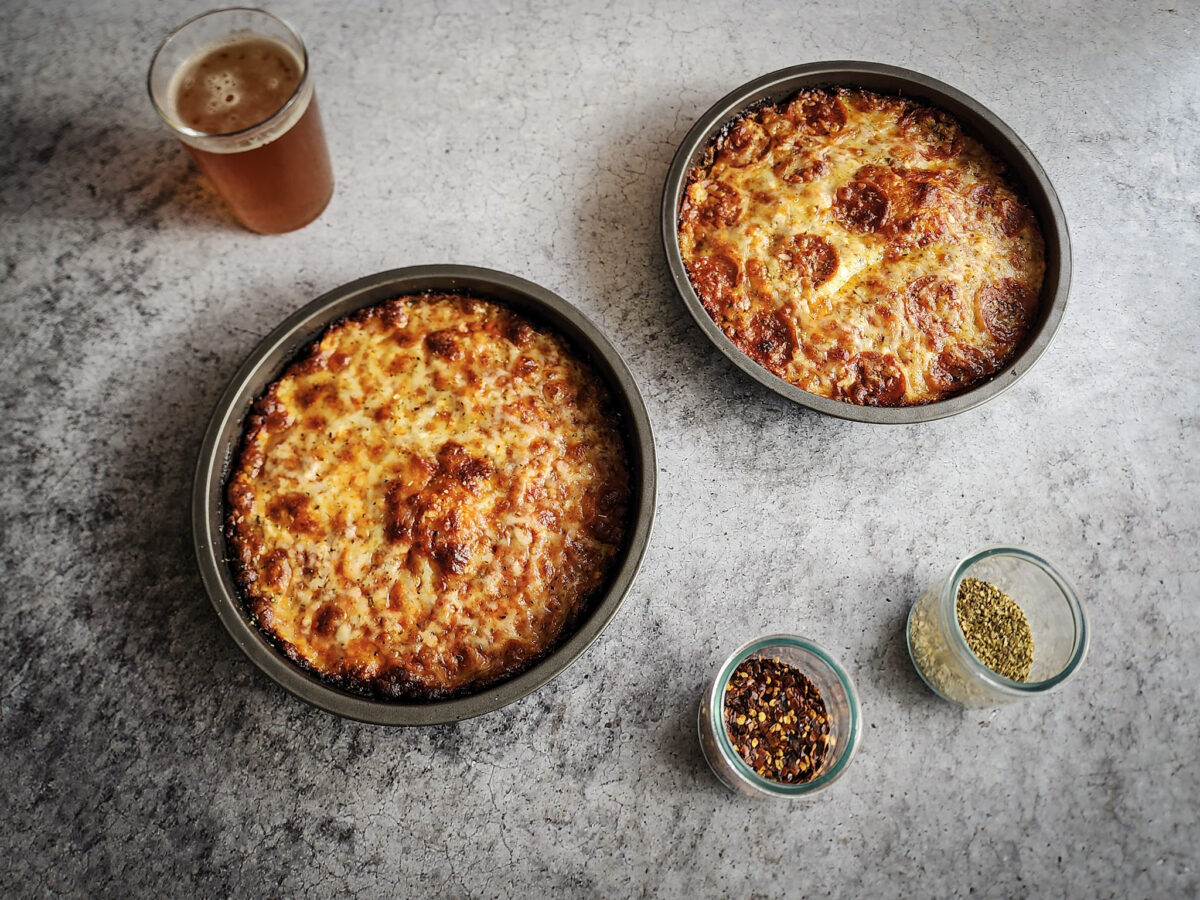
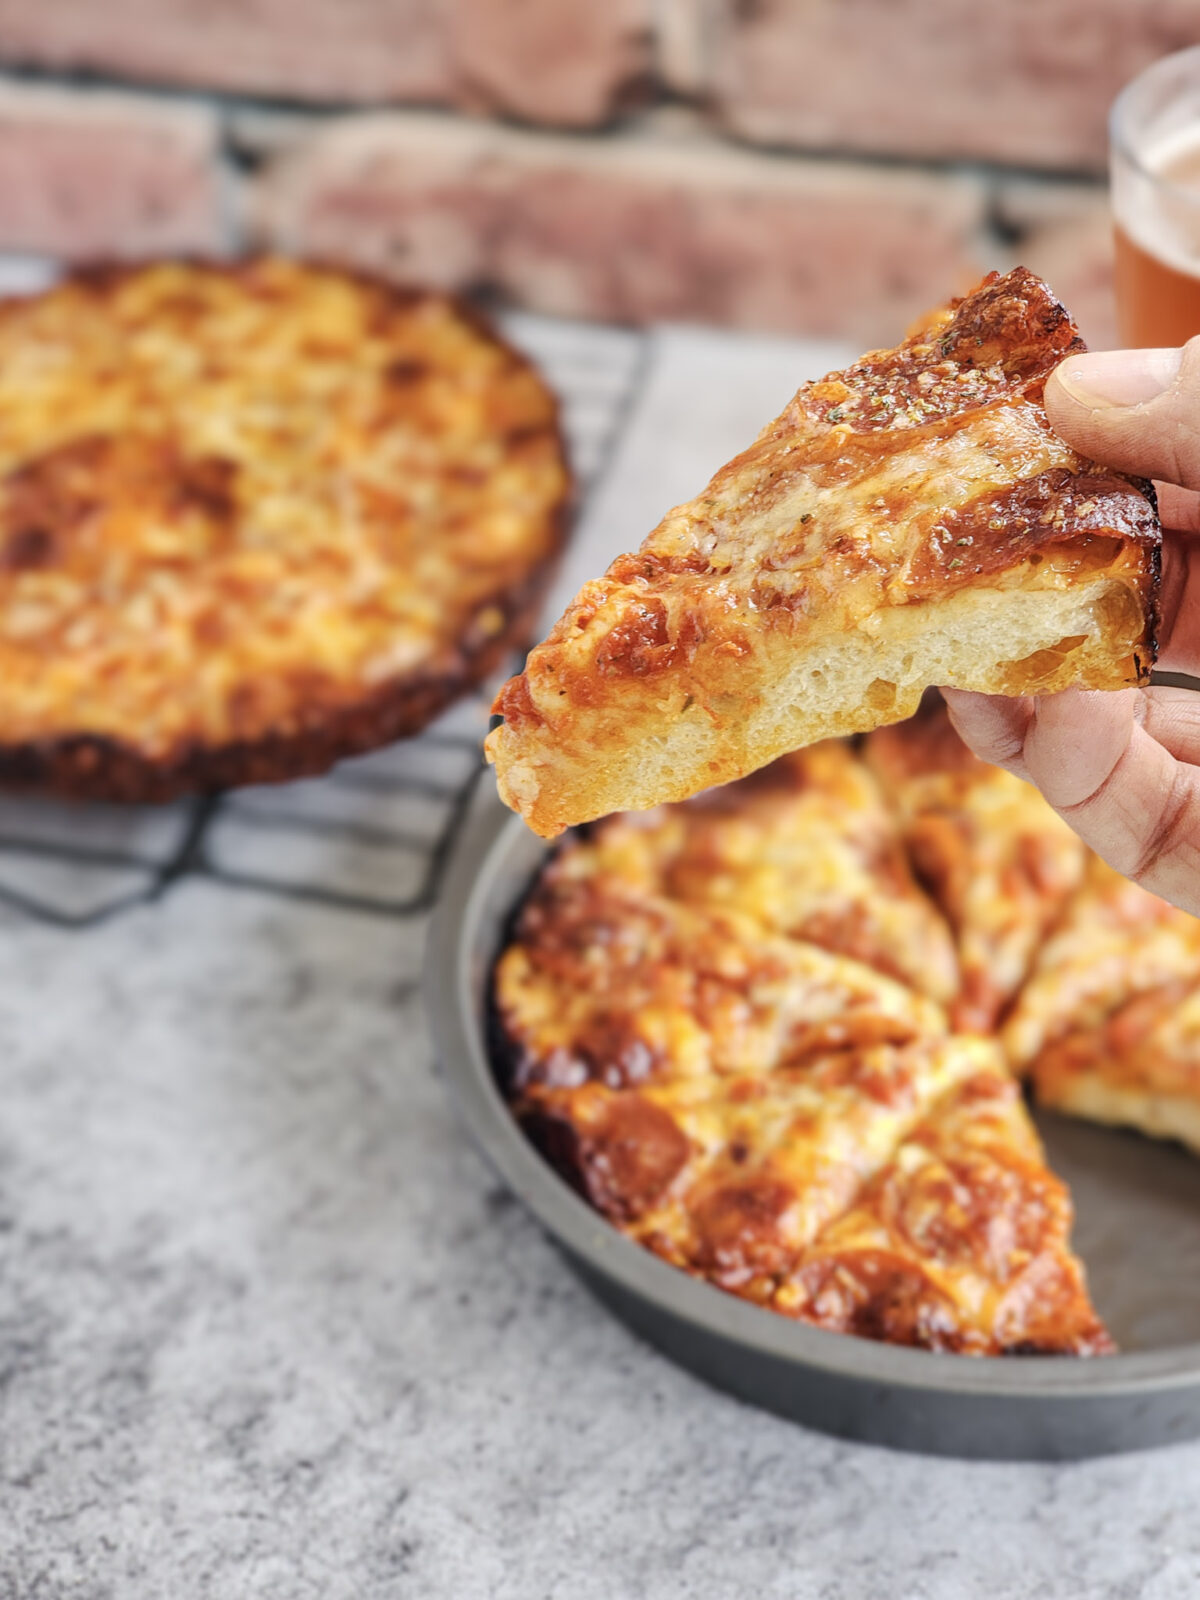
Remove from the oven and allow to cool for about 10 to 15 minutes. Gently run a butter knife around the edge of the pizza to separate it from the pan. Carefully lift the pizzas out with a spatula and transfer them to a cutting board to slice and serve. I don't recommend cutting the pizzas in the pan due to the high likelihood of ruining the non-stick coatings (plus, you don't want to eat that stuff anyway).
Storing and Reheating Tips
Storing Tips
Keep any leftovers (if you're fortunate enough to HAVE any, that is) in an airtight container in the fridge for up to five days. Freeze any leftovers for up to three months.
This pizza dough also freezes really well. After you perform your last stretch and folds, place any dough that you want to save in freezer bags and freeze for 3 to 4 months. To thaw, just rest on the counter for several hours until completely unfrozen. Add the thawed dough to the cake pans, stretch it out, and perform the second 3 ½-hour proof as the recipe is written.
Reheating Tips
Moderate, even heat, is crucial for reheating pizza correctly. The best way to reheat pizza is to throw it into a 400°F oven on a pan, covered in tinfoil, for 5 to 7 minutes. This allows the bottom of the pizza to crisp back up, and for the cheese to melt. A toaster oven works great for this as well.
Another option available is to heat a few slices up in a covered skillet over medium heat on the stovetop for about 5 to 7 minutes. The pan crisps the crust back up, and putting the lid on helps to direct heat to the top of the pizza to help melt the cheese and heat everything up evenly.
Frequently Asked Questions
Did you make this recipe for Ultimate Homemade Pan Pizzas?
Let me know how yours turned out in the comments below, and don't forget to leave a rating!
Recipe
Ultimate Homemade Pan Pizza
Equipment
- Stand Mixer Optional
- 3 9-inch Non-Stick Cake Pans
- Wire Cooling Rack
Ingredients
Pizza Dough
- 1 ¼ Cups Water Heated to 90 to 100°F
- 2 ¼ Teaspoons Granulated Sugar
- 2 ½ Teaspoons Active Dry Yeast
- 3 ½ Cups Bread Flour (Substitute equal amounts All-Purpose Flour)
- 1 Tablespoon Fine Sea Salt
- ⅓ Cup Olive Oil
Pizza Sauce
- 3 Tablespoons Olive Oil Divided
- ½ White Onion Finely Minced or Grated (About ½ Cup)
- 3 Cloves Garlic Finely Minced
- 3 Tablespoons Tomato Paste
- 1 28 oz can Crushed Tomatoes
- 1 Tablespoon + 1 Teaspoon Dried Oregano
- 1 Teaspoon Dried Basil
- ½ Teaspoon Kosher Salt Plus more to Taste
- ¼ Teaspoon Black Pepper Plus more to Taste
Cheeses
- 1 lb. Whole Milk Low-Moisture Mozzarella Grated
- ⅓ Cup Sharp White Cheddar Grated
- ⅓ Cup Parmesan Grated
Optional Toppings
- Pepperoni Slices
- Italian Sausage
- Various Sliced Vegetables Mushrooms Black Olives, Bell Peppers, Onions, etc.
Instructions
Pizza Dough
- In a small sauce pan, heat up the water to 90 to 100°F. Remove from the heat and stir in the granulated sugar and active dry yeast to combine. Allow to bloom for 5 minutes until frothy.
- In the bowl of a stand mixer, combine the bread flour and salt. Add the yeast mixture and oil. Mix on low for 2 to 3 minutes until the ingredients are completely combined. Allow the dough to rest for about 10 minutes, then continue to knead on medium speed for 5 to 7 minutes until the dough becomes smooth.
- Turn the dough out onto a lightly floured work surface and perform 3 to 4 sets of slap and folds (complete instructions are outlined in the blog post above). Pick up the dough with both hands on either side and allow it to stretch some. Quickly slap the bottom of the dough onto the work surface, and stretch the dough over onto itself. Repeat this process 3 to 4 times. Shape the dough into a ball and transfer to a lightly oiled bowl. Cover and proof at room temperature for 1 hour.
- Punch the dough down and perform two sets of "stretch and folds" (complete instructions are outlined in the blog post above). Grab one edge of the dough and pull it up to stretch it some without tearing. Fold the dough over onto itself, then turn the bowl 90 degrees, and repeat with the remaining three sides. Allow to rest for 30 minutes and repeat once more.
- Turn the dough out onto a lightly floured work surface again, and divide into three equal pieces. Roll into dough balls and transfer to lightly oiled containers (deli containers, quart freezer bags, covered bowls, etc.) and refrigerate overnight or up to three days.
- Remove the dough from the fridge 4 hours before baking and transfer to three, lightly oiled 9-inch, non-stick cake pans. After 30 minutes, stretch the dough out by heavily dimpling it with your fingertips until it reaches the edge of the pan. Tightly cover the pans and allow the dough to rise for the remaining 3 ½ hours.
- In the last hour of proofing, preheat the oven to 450°F.
Pizza Sauce
- While the pizza dough is proofing, heat a medium-sized pot over medium-high heat. Add 2 tablespoons of oil and add the grated/minced onion, stirring until it begins to turn soft and slightly translucent, about 4 to 5 minutes. Add the garlic and red pepper flakes, and sauté for another 30 seconds.
- Add the tomato paste and sauté for 2 minutes, stirring frequently, until it begins to stick to the pan. Add the oregano, basil, salt and pepper, and cook for a few seconds, stirring to incorporate. Add the can of crushed tomatoes, and stir until evenly incorporated.
- Bring the sauce to a gentle boil, and reduce the heat to medium-low. Hold for 45 minutes up to 1 hour until thickened. Add the remaining 1 tablespoon of oil, and taste for salt and pepper, adjusting as needed. Remove from the heat and allow to slightly cool before assembling the pizzas.
Pizza Assembly and Baking
- If using the OXO squeeze bottles mentioned in the blog post, drizzle ⅓ cup (about 3 ounces) of sauce evenly over the dough. If not, use a spoon to apply the sauce. Gently spread the sauce evenly over the dough, taking care not to deflate it.
- Add 1 cup of the cheese mixture evenly over each pizza, ensuring that you go all the way to the edges of the pan. If using toppings, add them evenly over the pizza, then add the remaining ⅓ cup of cheese to each pizza on top of the toppings. Sprinkle with dried oregano and kosher salt, then drizzle a few teaspoons of oil over the top.
- Transfer all three pizzas to the preheated oven and bake for 20 minutes until golden brown and bubbling, spinning the pans half way through baking to make sure they cook evenly. Remove from the oven and allow to cool for about 10 minutes.
- If the edges are stuck, run a butter knife around the edges of each pizza, then gently lift the them out of the pans and onto a cutting board with a spatula to slice and serve.
Greg says
You NEED this pizza! The best recipe I have found.