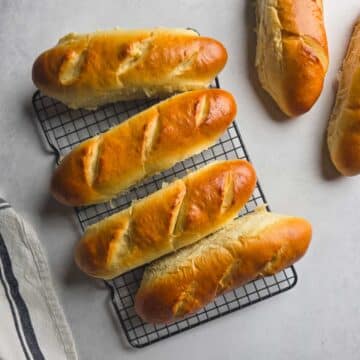
These Handmade Sub Rolls (aka hoagie rolls or grinder rolls) are ideal for any kind of sub sandwich. I developed this recipe specifically for my Homemade Meatball Sub Sandwiches, but they work perfectly for basically any deli-style sandwich that you pile into a roll.

I never hear complaints about having fresh-baked bread in the house-I doubt you will either! These rolls are soft and fluffy inside, but sturdy enough for saucy sandwiches (meatballs, Italian subs, chicken cutlets, etc.) without turning to mush. Honestly, they are so much better than store-bought that it's hard to go back to anything else!
Want a topping variation? Try my Italian Herb and Cheese Bread (Sub Rolls) for a Subway-style herb-and-cheese crust on the same soft dough!
If you're exploring more Kitchen Coalition reader favorites, my Chicken Schnitzel with Lemon Cream Sauce is one of the most requested dishes in my house - crispy, bright, and weeknight-friendly!
Quick Recipe Insights
- Hands-On Time: ~25 min
- Rising Time: 1 hr 30 min (total proofing)
- Bake Time: 15 min (plus 1-3 min if needed)
- Total Time: ~2 hr 10 min
- Servings: Six 10-inch rolls
- Calories: ~363 per roll
- Difficulty: Easy-Moderate
- Flavor Profile: Rich, buttery, lightly sweet-classic deli-style sandwich/hoagie roll.
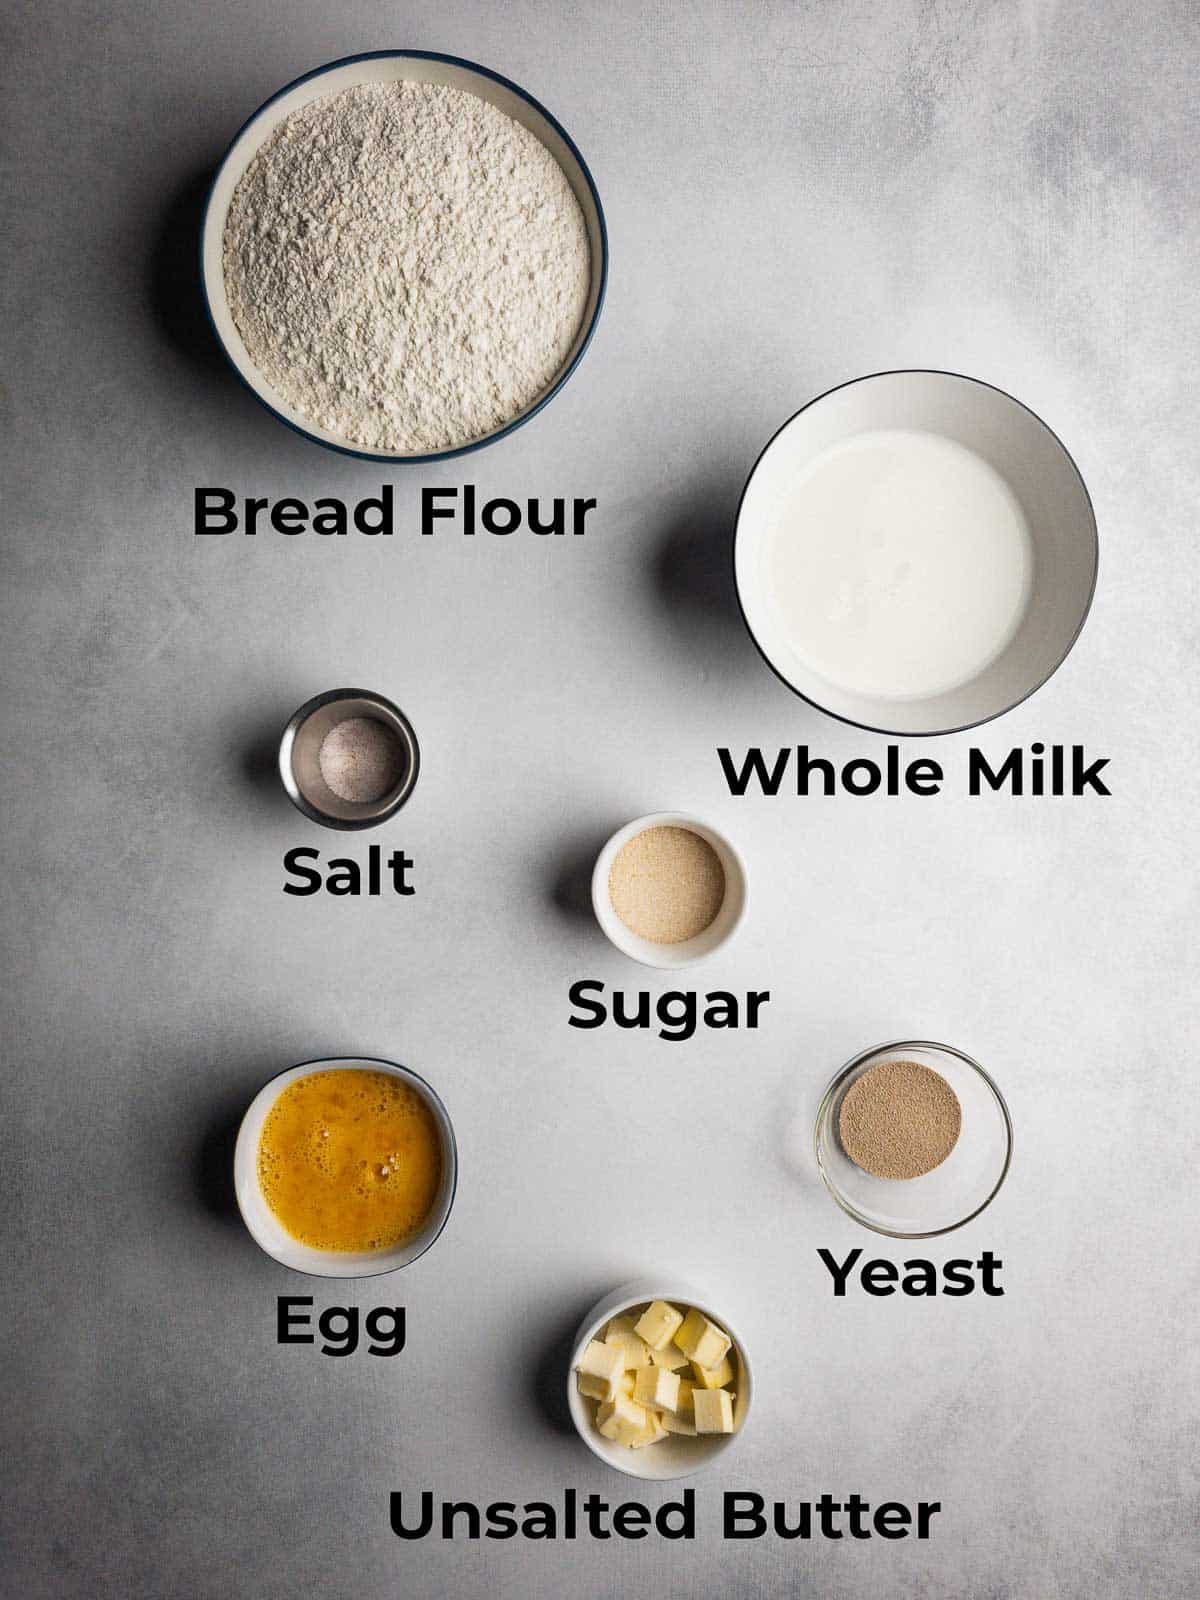
Handmade Sub Roll Ingredients
I had a few goals I wanted to achieve with this bread. I wanted the rolls to have a good amount of structure to them, yet still remain soft and pliable. Bread flour was the logical starting point in my mind. It has a higher protein content than all-purpose flour, which helps form a strong gluten network. In turn, this helps create more structure and body to the bread. I also opted for whole milk for my liquid component instead of water for the added fat content and slight sweetness that it lends.
I also opted for cold, cubed, unsalted butter. Using cold butter versus softened butter extends the kneading time by several minutes, which is by design. Using softened butter takes about 3-5 minutes to completely incorporate into the dough, while using cold butter takes closer to 8-10 minutes. The longer kneading time helps bring everything together to make a really smooth dough and adds more body to the finished product. The longer you knead dough, the stiffer/chewier your bread will be. Having a moderate amount of kneading was key to properly developing the structure of the finished product.
I also strongly encourage you to invest in a digital kitchen scale if you do any baking. In my experience, you will have more accurate, repeatable results when measuring by weight vs. volume, which is always a plus.
Dough Proofing and Shaping Process
This dough will go through two proofing (or rising) stages: a one-hour bulk proof, and then a secondary proof after the dough has been shaped into rolls. I have the complete shaping and proofing process outlined below.
Steps 1 - 4: Mixing & Dough Development
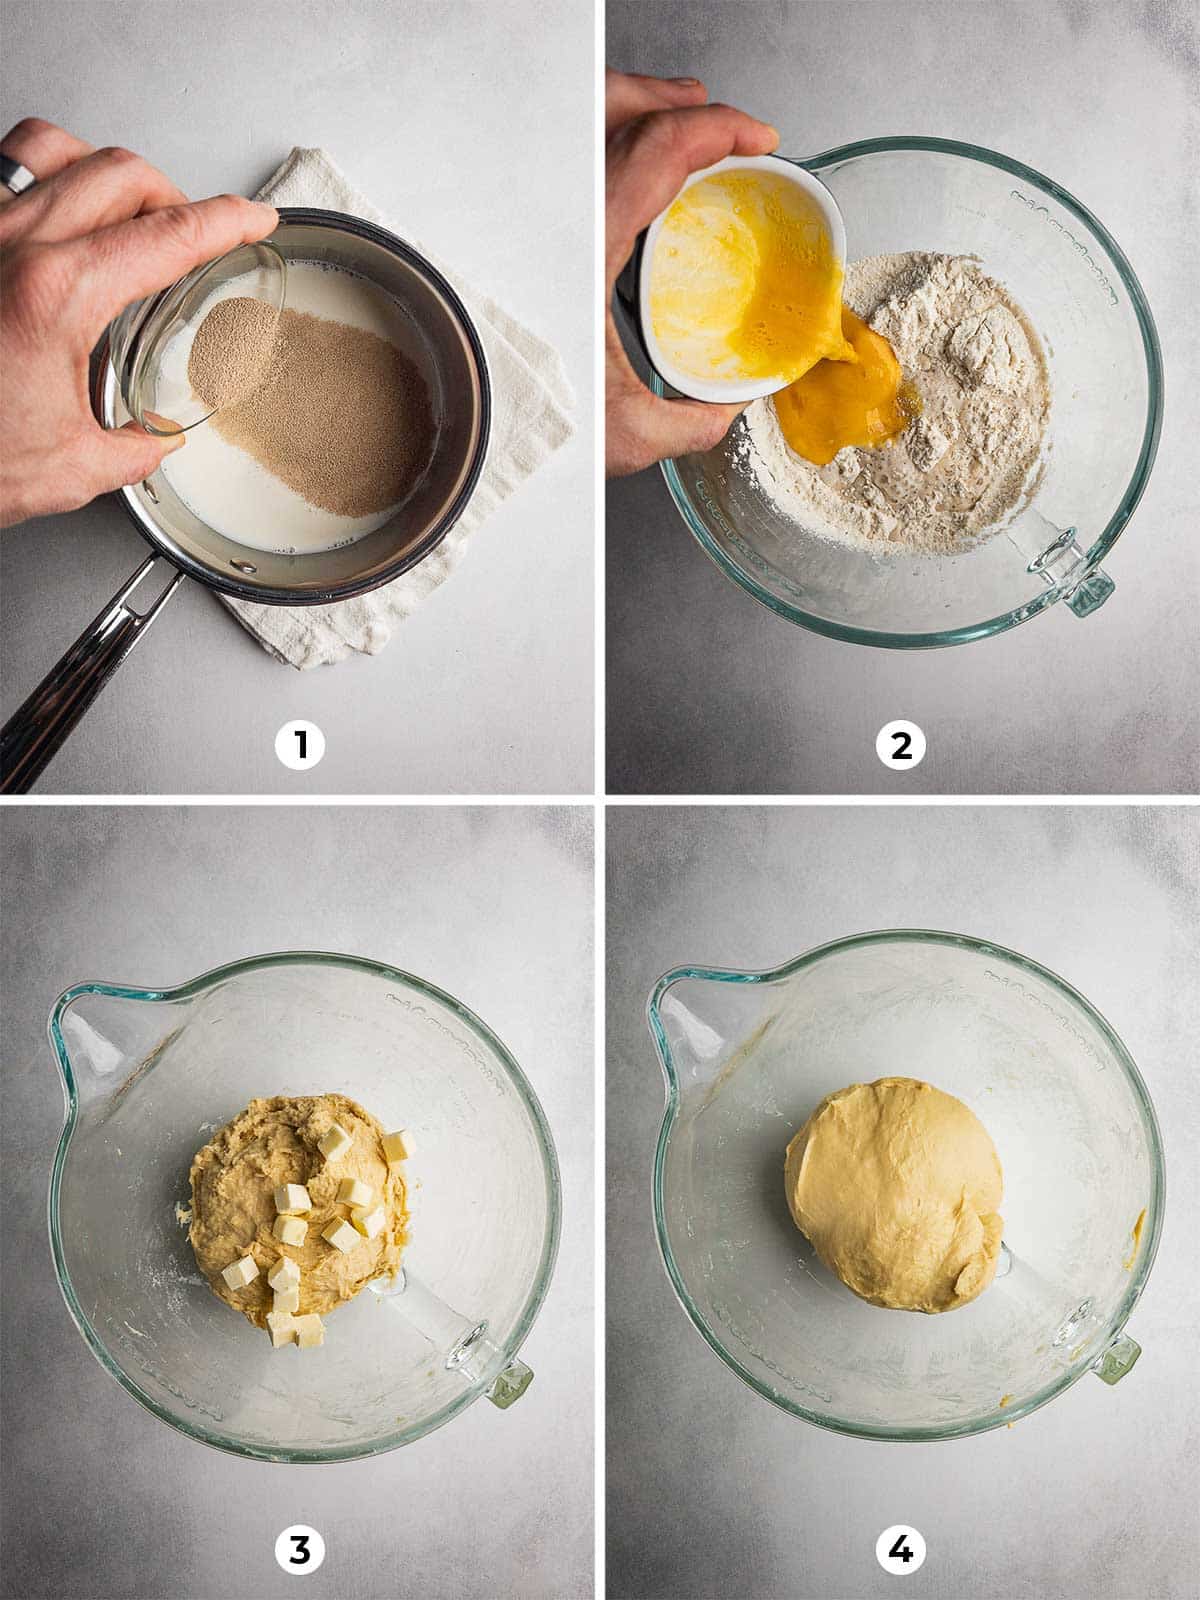
Bloom yeast → combine wet + dry → add butter → knead until smooth.
Steps 5 - 8: Bulk Rise, Dividing, & Shaping
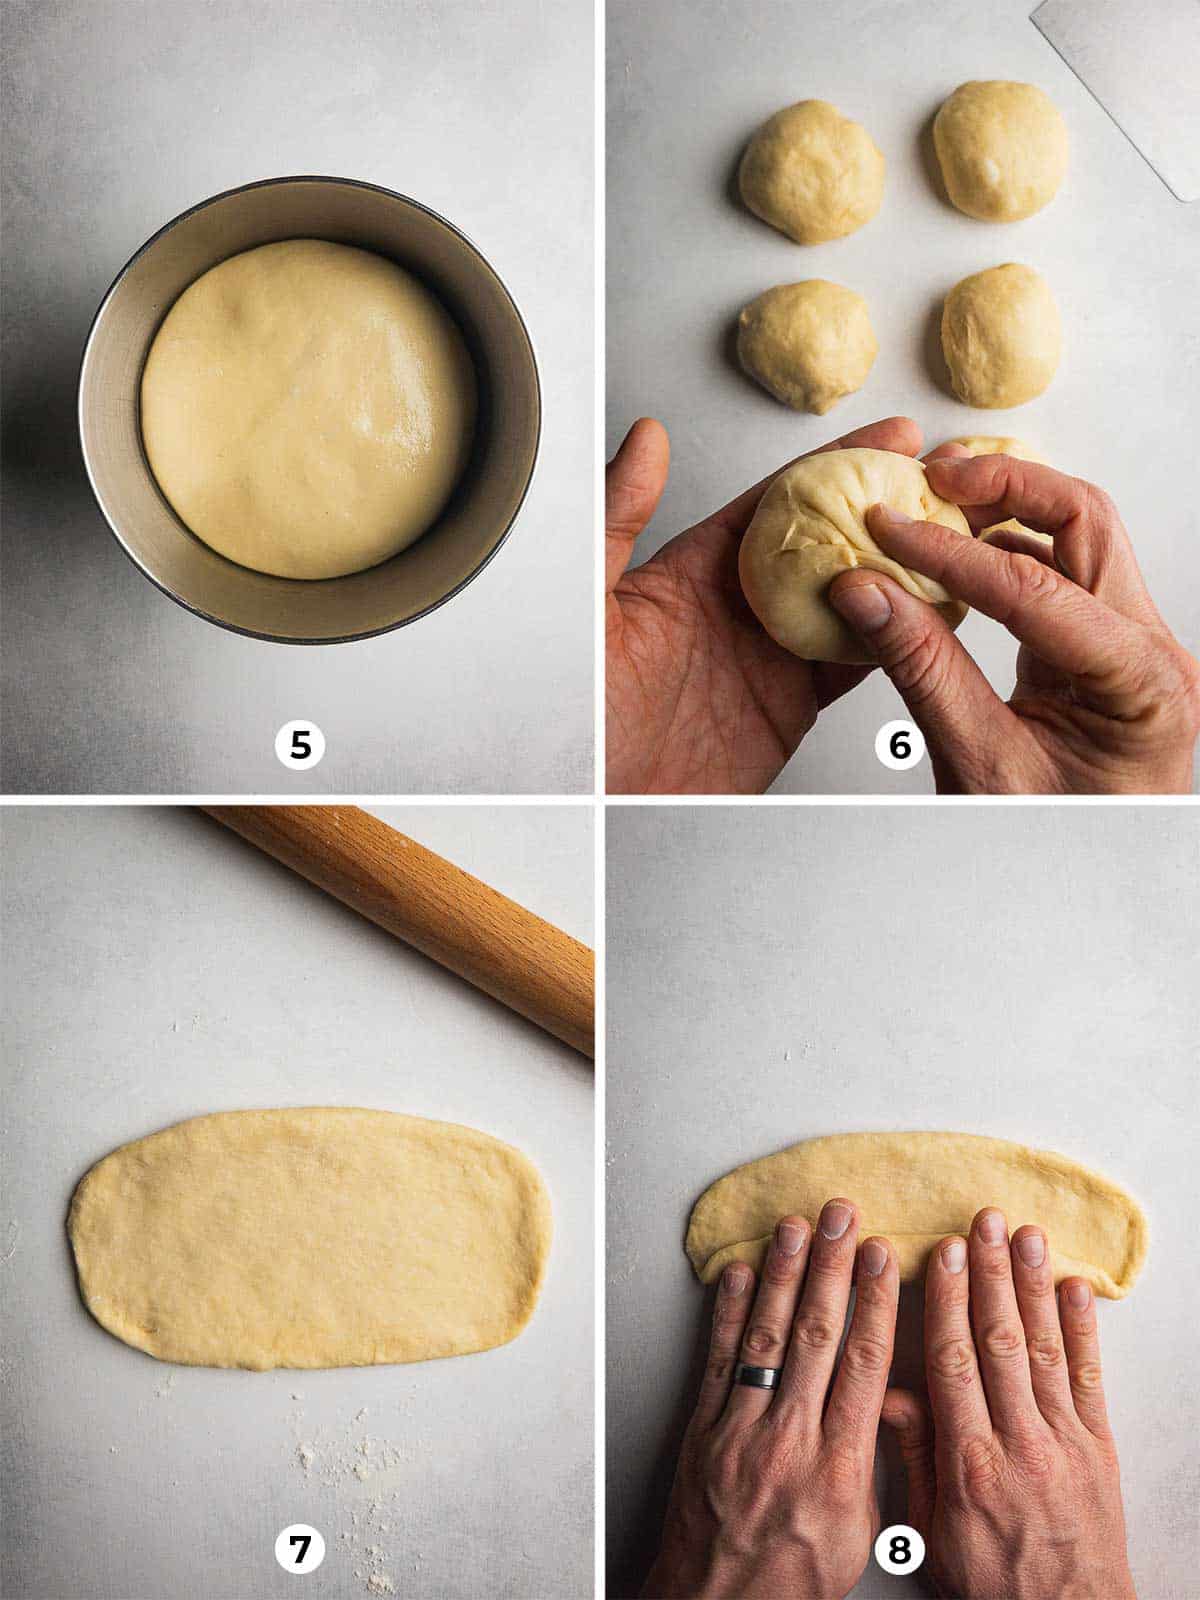
Shaping stages: bulk rise → portion → flatten → roll tightly

Step 9 - Second Proof: The rolls should look puffy and slightly relaxed before scoring.
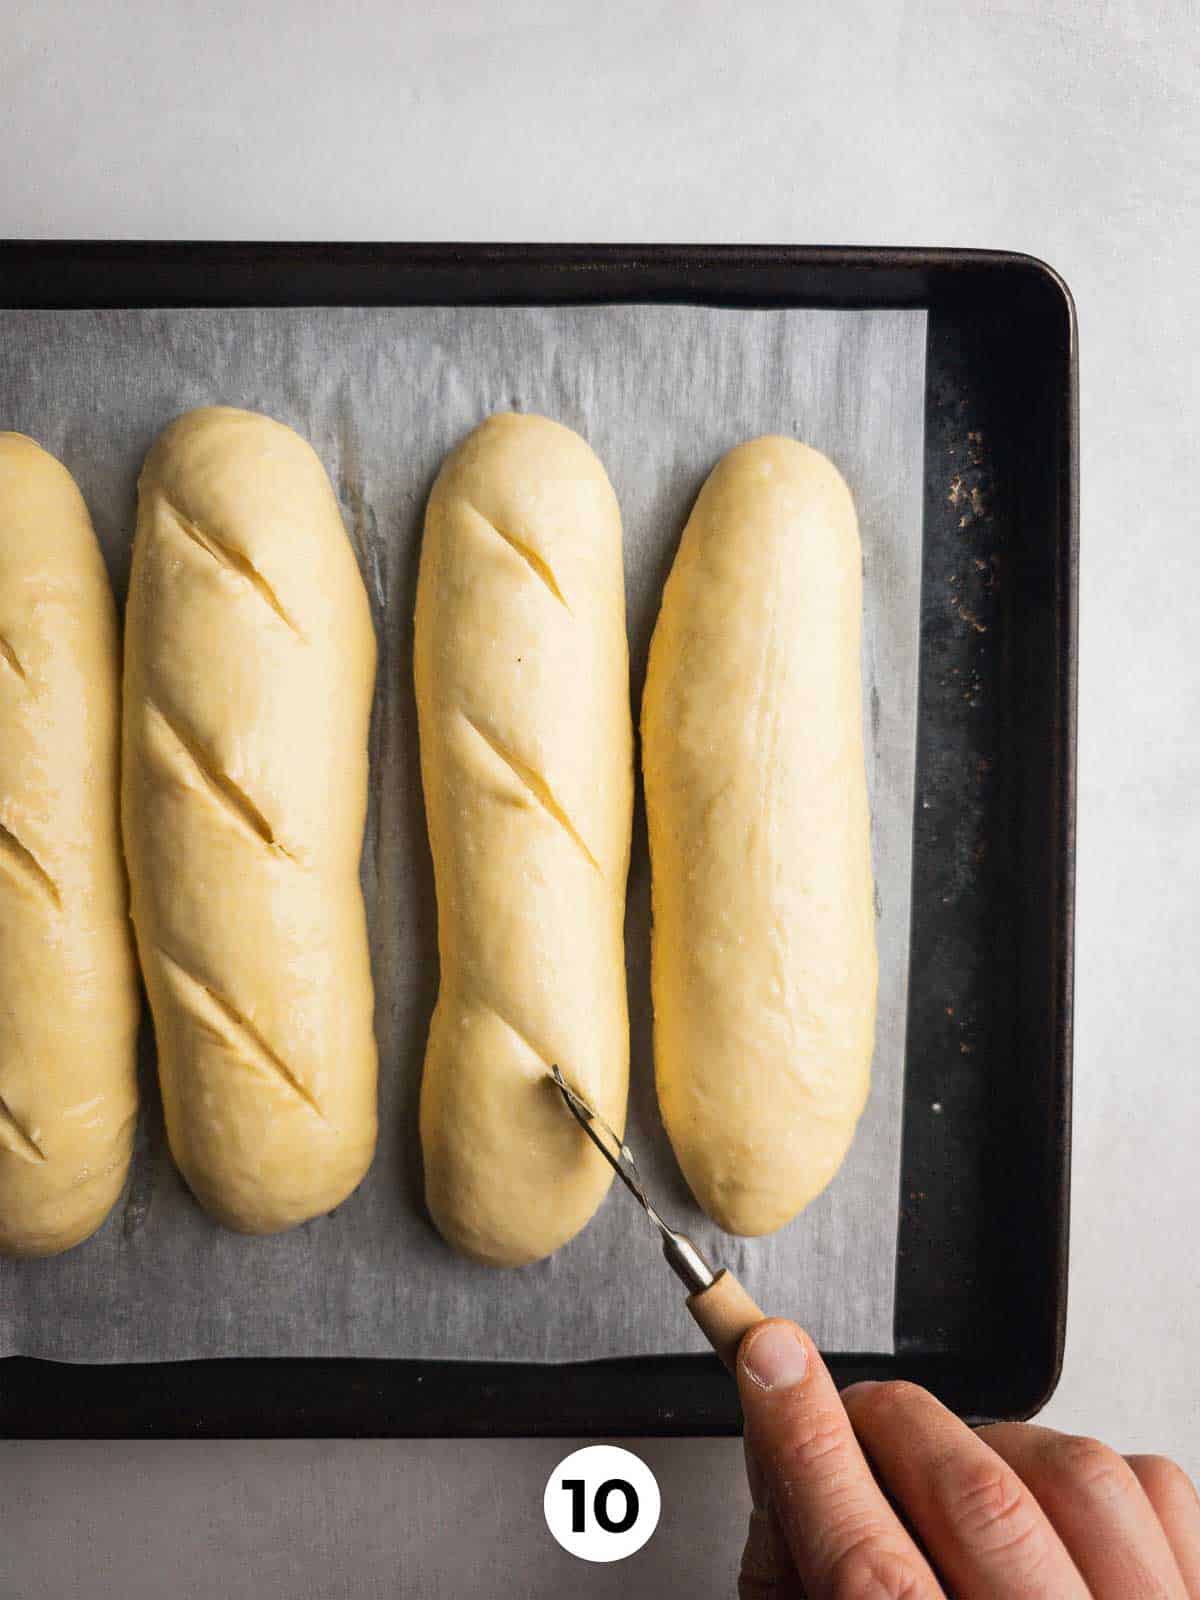
Step 10 - Egg Wash, Score & Bake: Brush with egg wash, score with quick, shallow slashes, and bake for 15 minutes at 400°F. (If needed, add 1-3 minutes until deep golden brown.)

Did you make this recipe for Handmade Sub Rolls?
Let me know in the comments below how yours turned out, and don't forget to leave a rating!
Recipe
Handmade Sub Rolls
Equipment
- Instant Read Digital Thermometer Optional
- Stand Mixer Optional
- Rolling Pin
- Parchment Paper
Ingredients
- 1 Cup Whole Milk 110-115℉
- 1 Tablespoon + 2 Teaspoons Sugar
- 2 ½ Teaspoons Active Dry Yeast
- 3 ¼ Cups Bread Flour
- 2 Teaspoons Fine Sea Salt
- 2 Eggs Beaten
- 3 Tablespoons Unsalted Butter Cold, Cubed
- 1 Egg White Beaten - For Egg Wash
- 1 Tablespoon Water For Egg Wash
Instructions
- In a medium sized bowl, add the warm milk, sugar, and yeast. Let bloom for 5 to 10-minutes until frothy.
- As the yeast mixture blooms, combine the bread flour and salt in the bowl of a stand mixer.
- Add the yeast mixture and beaten eggs to the flour and salt. Knead on low speed for 3 to 5-minutes until a shaggy dough forms, scraping down the sides of the bowl with a spatula as needed.
- Add in the cold, cubed butter, and knead for an additional 8-10 minutes until butter is fully incorporated and the dough is smooth. (The dough ball should weigh approximately 880g at this point).
- Turn the dough out onto a lightly floured work surface, and roll into a tight ball.
- Lightly grease a large bowl, turning the dough ball to coat and cover. Cover and let rest for 1-hour, or until doubled in size.
- Turn the dough out onto a lightly floured work surface, and punch the dough down. Divide into six equal pieces (approximately 140g each) and roll into individual dough balls.
- Using a rolling pin, roll each dough ball into a rectangle that is approximately 9 inches wide by 5inches tall. The dough should be between ¼ to ½-inch thick. Starting with the long side, tightly roll the dough into a log shape. Pinch the end seams together until they are smooth. Place seam side down on a baking sheet lined with parchment paper.
- Cover the rolls with a damp kitchen cloth, or a second baking sheet, and let rise for an additional 30 minutes.
- While the dough is proofing, preheat the oven to 400°F.
- Mix the egg white and water in a small bowl and gently brush over the rolls.
- Using a lame, razor blade, or sharp kitchen knife, score the dough ¼ deep in three spots.
- Bake for 15 minutes until golden brown, or they register 195 - 200°F internally on an instant-read thermometer. (Add 1 - 3 minutes if needed). Remove from oven and transfer to a wire rack. Allow them to cool completely before slicing.


Em says
I followed the recipe to the letter and they did not turn out correctly at all. They were way too small
Spencer Klickman says
Hi, Em! Sorry to hear these didn't turn out for you. Would love to know more details to help troubleshoot what went wrong. There are a few items that could be the culprit, but it's very difficult to pin that down without further info. Please let me know!
Sandy says
First time making these, will definitely make again. Easy to make. Look and taste great. Yes, the dough was sticky, but rolling on the flour dusted countertop made it work.
Spencer Klickman says
Thanks for the comment Sandy! Yes - the dough is fairly sticky, but I find it's usually pretty easy to work (especially after the first rise) by dusting a little flour on the counter. Glad you enjoyed them!