Cold Ferment Pizza Dough is one of the easiest ways to make better pizza at home. The slow rise in the fridge gives the dough deeper flavor, better browning, and that chewy, airy texture that same-day dough just can't match. Best of all, it's mostly hands-off, so you can prep ahead and let the dough do most of the work.

This is one of the most tested and tweaked recipes I've ever developed. Honestly, I've lost count of how many times I've made it to adjust the hydration, fine-tune the salt level for flavor and gluten development, and dial in the timing until it was exactly where I wanted it. As long as the dough is properly kneaded, cold fermented for at least 24 hours, and rested at room temperature for at least 1 hour before shaping, you'll be set up for great pizza.
This is my go-to pizza dough and the one I come back to most often. At 65% hydration with a touch of sugar for browning, it leans New York-ish in style, but it's really built to be a dependable, general-purpose dough that works great for most pizza nights at home.
Looking for more pizza ideas? Check out my Ultimate Homemade Pan Pizza for another cold-fermented dough recipe with crispy, cheesy edges and plenty of room for customization. For the sauce, my Homemade Pizza Sauce is an easy no-cook option that's thick, flavorful, and perfect for homemade pizza nights.
Quick Recipe Insights
- Prep Time: 25 minutes active
- Cold Ferment / Proofing: 24 hours minimum; 48 to 72 hours ideal
- Bake Time: About 5 to 6 minutes per pizza on a pizza steel
- Servings: Two 14-inch pizzas
- Flavor Profile: Deep flavor, great browning, chewy and airy texture
- Pizza Style: New York-ish
- Difficulty: Moderate
Jump to:
Why You'll Love This Recipe
- Cold ferment is worth the wait: You get deeper flavor, better browning, and a crust with real chew.
- The fridge does most of the work: Once the dough is mixed and kneaded, the rest is mostly hands-off.
- Easy to scale: The baker's percentages below make it simple to adjust for more or fewer pizzas.
- A true go-to dough: It's flexible, dependable, and well-suited to pizza nights at home.

Cold Ferment Pizza Dough Ingredients
This Cold Ferment Pizza Dough uses simple, easy-to-find ingredients, with a few small choices that make a big difference in flavor, browning, and texture.

- Bread flour: Bread flour is my first choice here because the higher protein helps build stronger gluten for better chew and structure. All-purpose flour can work, but the dough may bake up a little softer and a little less airy.
- Non-fat milk powder: This one is optional, but I like it for the extra browning and slight tenderness it adds to the crust. It is not pictured here, and the dough still works well without it.
- Active dry yeast vs. instant yeast: I use active dry yeast in this recipe, but instant yeast works too. If using instant yeast, you can mix it in the dry ingredients instead of blooming it first.
Refer to the recipe card below for the complete list of ingredients and quantities.
Baker's Percentages
The baker's percentages below are based on the full recipe, which makes two 14-inch pizzas. Each dough ball weighs about 370g before cold fermenting. In baker's percentages, flour is always 100%, and the remaining ingredients are measured in proportion to it.
If you enjoy working with dough formulas and baker's percentages, my Homemade Sub Rolls are another reader favorite recipe worth checking out next!
|
Ingredient |
Baker's % |
Weight (g) |
Volume (Approx.) |
|---|---|---|---|
|
Bread Flour |
100.0% |
430g |
3 ¼ cups |
|
Water |
65.0% |
280g |
1 ¼ cups |
|
Active Dry Yeast |
1.0% |
4g |
1 teaspoon |
|
Fine Sea Salt |
2.0% |
9g |
1 ¼ teaspoons |
|
Sugar |
2.0% |
9g |
1 ½ teaspoons |
|
Non-Fat Milk Powder (optional) |
2.5% |
11g |
1 tablespoon + 1 teaspoon |
|
Oil |
3.0% |
13g |
1 tablespoon |
Note: The gram weights have been rounded to practical kitchen measurements.
Recommended Equipment
Highly Recommended Tools
- Pizza steel or pizza stone: Critical for proper browning, heat retention, and better oven spring.
- Kitchen scale: Highly recommended for accurate dough measurements.
- Wooden pizza peel: Makes it easier to transfer the pizza in and out of the oven.
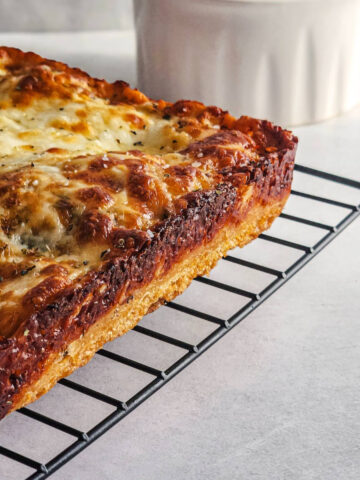
- Cooling racks: Allow the pizza to cool without trapping steam underneath that would cause the dough to get soggy.
Optional but Helpful
- Instant Read Digital Thermometer: Helpful for getting the water temperature dialed in, but not necessary.
- Stand mixer: Makes kneading easier and helps bring the dough together quickly.
- Bench scraper: Great for dividing and handling the dough.
Cheese and Sauce Guidance
For this dough, I usually keep the toppings fairly balanced so the crust can still bake up with good browning and structure. For one 14-inch pizza, my go-to amounts are:
- Sauce: 130 to 150g, or about ½ to ⅔ cup
- Cheese: 200g of a 50/50 blend of whole milk and part-skim low-moisture mozzarella, or about 1 ¾ to 2 cups shredded, plus a little fresh grated Romano or Parmesan for extra saltiness.
A slightly lighter hand with sauce and cheese will give you a crisper bake, while going much heavier can leave the center softer and heavier. Sauce thickness and shredded cheese volume can vary a bit, so like the dough itself, the gram measurements are still the most accurate.
My Go-To Homemade Pizza Sauce is a great match here if you want an easy, no-cook sauce with big pizza shop-style flavor.
How to Make Cold Ferment Pizza Dough
These simple step-by-step photos will walk you through mixing, proofing, shaping, and baking your Cold Ferment Pizza Dough from start to finish.
Recipe Note: This recipe was developed and tested using a pizza steel in a home oven that reaches 550°F. A pizza stone would be a comparable alternative. Outdoor pizza ovens run much hotter and may require different bake times.

Step 1 - Mix & Autolyse: Mix the warm water, yeast, and sugar with the dry ingredients and oil until no dry spots remain. Cover and let it rest (autolyse) for 10 minutes so the flour can fully hydrate and the dough can start building structure before kneading.

Step 2 - Knead Until Smooth: Knead the dough on medium-low speed for 8 to 10 minutes until smooth and slightly elastic. It should still feel soft and slightly tacky, but not sticky or lumpy.

Step 3 - Bulk Proof: Cover and let the dough rise at room temperature for 1 hour until it has doubled in size. This first rise helps build strength and gives the yeast time to get going before dividing and cold fermenting.

Step 4 - Divide, Shape & Cold Ferment: Divide the dough into equal portions, shape each into a smooth, tight dough ball, then cover and transfer to the fridge for the cold ferment. A minimum of 24 hours is recommended, with 48 to 72 hours being ideal for flavor and texture development.

Step 5 - Stretch: Remove the dough from the fridge and let it rest at room temperature for 1 to 3 hours, or until relaxed and easier to stretch. 1 hour before baking, preheat the oven and pizza steel on the second-highest rack to 550°F (or as hot as it will go). Turn the dough out onto a lightly floured counter and stretch it into a 14-inch round, leaving a slightly thicker edge for the crust.

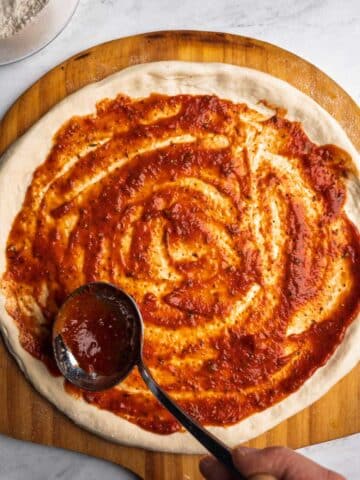
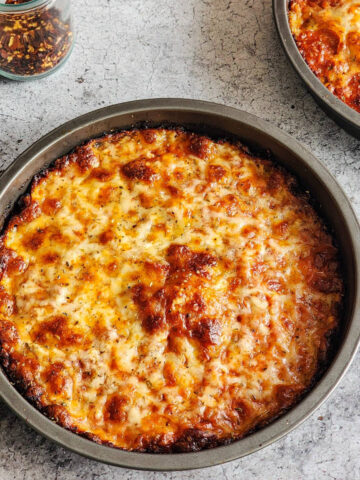
Step 6 - Top & Bake: Lightly dust a pizza peel with flour or semolina and transfer the stretched dough on top. Add sauce, cheese, and toppings, plus a small drizzle of oil on the crust. Bake on the hot pizza steel for 4 to 5 minutes, then turn on the broiler for 60 to 90 seconds, watching closely, until the crust is browned and the cheese is bubbling. Remove and cool on a wire rack.

Expert Pizza Dough Tips
- Weigh your ingredients for the best results: This dough is much more reliable when made by weight instead of volume.
- Do not rush the cold ferment: You can use the dough after 24 hours, but the flavor, texture, and handling all improve with more time in the fridge.
- Knead until the dough is smooth and cohesive: Proper kneading builds the gluten structure that helps the dough stretch well and bake up with better chew. If kneading by hand, the rule of thumb is to double the kneading time a mixer calls for.
- Let the dough rest before shaping: A full hour, or up to 3, at room temperature helps the gluten relax so the dough stretches more easily.
Troubleshooting Cold Ferment Pizza Dough
- Dough snapping back while stretching: Let it rest for 10 to 15 minutes, then try again. Dough that is still too cold or too tight usually just needs more time to relax. If it still snaps back after resting, it may have been over-kneaded, in which case a shorter knead next time can help.
- Pizza sticking to the peel or hard to launch: This is usually a dusting issue. Use just enough flour or semolina to keep the dough moving, and give the peel a quick shake as you build the pizza to make sure it is still loose. Try not to let the topped pizza sit on the peel too long before launching.
- Overly orange or excessive grease pooling in the center: This usually means the middle was stretched too thin, giving the fat from the cheese and liquid from the sauce a place to pool. If the broiler runs much past about 90 seconds, the cheese can overheat and release excess fat, which can turn the whole pizza orange.
- Bottom not browning enough: Too much flour or semolina under the dough can get in the way of browning, and so can an underheated pizza steel. Use a lighter dusting on the peel and make sure the steel is fully preheated before baking.
- Crust not browning enough: Brush the crust lightly with oil before baking, do not skip the sugar, and use the optional non-fat milk powder if you want even better browning in a home oven.
Frequently Asked Questions
Yes, you can, but bread flour is my first choice for this recipe. Its higher protein helps build stronger gluten, which gives the crust better chew, structure, and oven spring. All-purpose flour will still work, but the dough may bake up a little softer and less airy.
Yes. Instant yeast works well in this recipe. If using instant yeast, you can mix the same amount directly in with the dry ingredients instead of blooming it first.
Yes. The dough should stay covered during the cold ferment so it does not dry out in the fridge. A lidded container, plastic wrap, or another airtight cover all work well. I like to add a touch of oil to the container to ensure the dough doesn't dry out.
Yes, you can freeze it. In my testing, the frozen dough still turned out good, but the results were not quite as nice as dough baked fresh. Freeze the dough balls tightly wrapped after the cold ferment. Thaw them in the fridge overnight and then let them rest at room temperature for an hour or so before stretching.
No, but it helps a lot. A pizza steel gives better heat retention, browning, and oven spring in a home oven. A pizza stone can still work, but the bake may take a few more minutes.
Hungry for more pizza ideas?
Here are a few more pizza and pizza-adjacent recipes to check out next.

Did you make this Cold Ferment Pizza Dough recipe?
Let me know how yours turned out in the comments below, and don't forget to leave a rating!
Recipe

Cold Ferment Pizza Dough
Equipment
- Instant Read Digital Thermometer Optional
- Bench Scraper Optional
- Kitchen Scale Recommended
- Stand Mixer Optional
- Pizza Peel Recommended
- Pizza Steel Recommended - A pizza stone is the closest substitute
- Cooling Racks Recommended
Ingredients
- 280 g Warm Water 110-115℉
- 9 g Sugar
- 4 g Active Dry Yeast
- 430 g Bread Flour
- 9 g Fine Sea Salt
- 11 g Non-Fat Milk Powder Optional, But Highly Recommended
- 13 g Neutral Oil
Instructions
- Stir together the warm water, sugar, and active dry yeast in a small bowl. Let sit for about 5 minutes, until foamy. Add the yeast mixture to the bread flour, salt, non-fat milk powder (if using), and oil in the bowl of a stand mixer. Mix on low until no dry spots remain. Cover and let rest (autolyse) for 10 minutes.
- Knead on medium-low speed for 8 to 10 minutes, until the dough turns smooth and slightly elastic.
- Shape into a tight ball on a lightly floured counter, cover and let it bulk proof at room temperature for 1 hour or until doubled in size.
- Punch the dough down, divide into 2 equal pieces, and shape into smooth dough balls. Transfer to lightly oiled containers and cover and refrigerate for at least 24 hours and up to 72 hours. For best flavor and texture, 48 to 72 hours is ideal.
- Remove the dough from the fridge 1 to 3 hours before baking so it can come to room temperature and relax. 1 hour before baking, place a pizza steel on the second-highest oven rack and preheat the oven to 550°F, or as hot as it will go.
- Turn the dough onto a lightly floured counter. Working from the middle out, stretch the dough into a 14-inch circle, leaving a slightly thicker edge to form the crust. Transfer to a semolina (or flour)-dusted pizza peel and add sauce, cheese, and toppings. Add a light drizzle of oil to the crust.
- Transfer the prepared pizza to the preheated pizza steel and bake for 4 to 5 minutes, then broil on high for 60 to 90 seconds, watching closely, until the cheese is bubbly and the crust is browned. Transfer the pizza to a wire rack to allow to cool. Repeat the process with the second dough ball.
Notes
- For the best flavor and texture, cold ferment the dough for 48 to 72 hours, though it still works after 24 hours.
- Bread flour gives the dough better chew, structure, and oven spring, but all-purpose flour will still work for a slightly softer crust.
- Let the dough rest at room temperature for 1 to 3 hours before shaping. If it still snaps back, let it rest 10 to 15 minutes more and try again.
Comments
No Comments