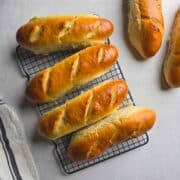
Handmade Sub Rolls
These Handmade Sub Rolls are soft inside, yet sturdy enough for saucy sandwiches. They really are the perfect sub bread for meatball subs and more.
Servings: 6 10-Inch Rolls
Calories: 363kcal
Equipment
- Instant Read Digital Thermometer Optional
- Stand Mixer Optional
- Rolling Pin
- Parchment Paper
Ingredients
- 1 Cup Whole Milk 110-115℉
- 1 Tablespoon + 2 Teaspoons Sugar
- 2 ½ Teaspoons Active Dry Yeast
- 3 ¼ Cups Bread Flour
- 2 Teaspoons Fine Sea Salt
- 2 Eggs Beaten
- 3 Tablespoons Unsalted Butter Cold, Cubed
- 1 Egg White Beaten - For Egg Wash
- 1 Tablespoon Water For Egg Wash
Instructions
- In a medium sized bowl, add the warm milk, sugar, and yeast. Let bloom for 5 to 10-minutes until frothy.
- As the yeast mixture blooms, combine the bread flour and salt in the bowl of a stand mixer.
- Add the yeast mixture and beaten eggs to the flour and salt. Knead on low speed for 3 to 5-minutes until a shaggy dough forms, scraping down the sides of the bowl with a spatula as needed.
- Add in the cold, cubed butter, and knead for an additional 8-10 minutes until butter is fully incorporated and the dough is smooth. (The dough ball should weigh approximately 880g at this point).
- Turn the dough out onto a lightly floured work surface, and roll into a tight ball.
- Lightly grease a large bowl, turning the dough ball to coat and cover. Cover and let rest for 1-hour, or until doubled in size.
- Turn the dough out onto a lightly floured work surface, and punch the dough down. Divide into six equal pieces (approximately 140g each) and roll into individual dough balls.
- Using a rolling pin, roll each dough ball into a rectangle that is approximately 9 inches wide by 5inches tall. The dough should be between ¼ to ½-inch thick. Starting with the long side, tightly roll the dough into a log shape. Pinch the end seams together until they are smooth. Place seam side down on a baking sheet lined with parchment paper.
- Cover the rolls with a damp kitchen cloth, or a second baking sheet, and let rise for an additional 30 minutes.
- While the dough is proofing, preheat the oven to 400°F.
- Mix the egg white and water in a small bowl and gently brush over the rolls.
- Using a lame, razor blade, or sharp kitchen knife, score the dough ¼ deep in three spots.
- Bake for 15 minutes until golden brown, or they register 195 - 200°F internally on an instant-read thermometer. (Add 1 - 3 minutes if needed). Remove from oven and transfer to a wire rack. Allow them to cool completely before slicing.
Notes
Update (01/29/2026): I’ve fine-tuned the volume measurements to better match the gram weights (my recommended way to bake). This dough is still on the sticky side at first—avoid adding lots of extra flour. It becomes easier to handle as gluten develops, and after the first rise/rest.
Nutrition
Calories: 363kcal | Carbohydrates: 56g | Protein: 12g | Fat: 10g | Saturated Fat: 5g | Polyunsaturated Fat: 1g | Monounsaturated Fat: 2g | Trans Fat: 0.2g | Cholesterol: 74mg | Sodium: 823mg | Potassium: 171mg | Fiber: 2g | Sugar: 6g | Vitamin A: 321IU | Vitamin C: 0.003mg | Calcium: 71mg | Iron: 1mg
