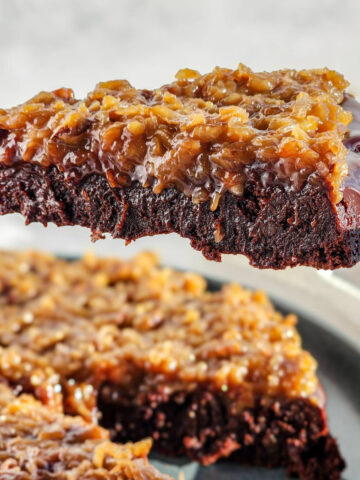
Welcome to chocolate nirvana with my recipe for Perfect Brownies from Scratch! These aren't much harder than boxed brownies, yet they are infinitely more delicious. This recipe checks all of the boxes for brownie perfection: the most decadent and fudgy centers [✓] , slightly chewy edges [✓] , and the perfect crinkly top [✓]. These things combined make these brownies borderline impossible to resist!

These are perfect around the holidays, but they're so good that they're a crow-pleaser just about any time of year!
Can't get enough chocolate? Take a look at my recipe for Flourless German Chocolate Cake, or my recipe for The Best Chocolate Chip Cookies!
Get all of my dessert recipes here!
Jump to:

Ingredients
Other than cocoa powder and chocolate chips, you likely already have all of the ingredients to make this recipe on hand. Using a mixture of semi-sweet chocolate chips and cocoa powder helps to ramp up the chocolate without making these brownies too dense or heavy.
A combination of granulated sugar and brown sugar also adds complexity to the party. Beating the sugar and eggs together properly is absolutely necessary to achieve the the perfect shiny, crinkly top we're after. More on that in the instructions below.
I like to add a bit of Fee Brother's Black Walnut Bitters, or Angostura Bitters with the vanilla extract for a touch of aromatic earthiness. This is totally optional, but I can say that once you try it, you'll be hard-pressed to leave it out!

- Unsalted Butter
- Unsweetened, Natural Cocoa Powder (see my note about Natural Cocoa Powder vs. Dutch Process Cocoa Powder below)
- Sugar
- Light Brown Sugar
- Eggs
- Vanilla Extract
- Fee Brother's Black Walnut Bitters or Angostura Bitters (optional but recommended - *also not pictured above*)
- All Purpose Flour
- Baking Soda (omit if using Dutch Process Cocoa Powder)
- Fine Sea Salt
- Semi-Sweet Chocolate Chips
Recommended Equipment
There are several pieces of equipment that are pretty important to achieving brownie nirvana. While not required, these pieces of equipment are strongly recommended to provide fantastic results and to make your life a little easier.
- Stand Mixer - This isn't required, but it helps to make sure everything is properly combined - especially when the recipe calls to whip the eggs and sugar together (which is one of the keys to achieving the crinkly, shiny top layer).
- 9x9-inch Aluminum Baking Pan - If there is one piece of equipment to NOT skimp on, it's a 9x9-inch metal baking pan for this recipe. Either aluminum (like this one from USA Pans), or any other non-stick version will work. Metal pans distribute heat through the batter quicker than glass or ceramic pans and they are absolutely critical for getting the texture and crinkly top of these brownies just right.
- Instant Read Digital Thermometer - An instant read digital thermometer is another important tool to have to ensure that these brownies are cooked all the way through, but not overly done. I love using my Thermopen One by Thermoworks for this job. If you don't have a thermometer, a toothpick inserted into the middle should come out mostly clean.
How to make the perfect brownies:
Success with this recipe lies more in the techniques uses than the ingredients themselves. The process outlined below is relatively quick and is guaranteed to give you the perfect brownie.

Step 1: Combine melted butter and cocoa powder and let it bloom while you prepare the other ingredients.

Step 2: Mix the eggs, vanilla extract, and bitters (if using).

Step 3: Combine the eggs, vanilla and bitters (if using) mixture with both sugars.

Step 4: Using a stand mixer or a handheld mixer, beat the eggs and sugars together on medium-high speed for 3 - 4 minutes until thoroughly combined and fluffy. This step is crucial to getting the shiny, crinkly top layer to these brownies.

Step 5: Gently whisk the butter and cocoa mixture with the egg and sugar mixture.

Step 6: Whisk together the flour, baking soda, and fine sea salt.

Step 7: Gently combine the dry ingredients with the wet ingredients.

Step 8: Add the chocolate chips and gently fold together.

Step 9: Pour the prepared brownie batter into a parchment paper-lined, 9x9-inch aluminum or other metal baking pan.

Step 10: Bake for 35 to 38 minutes at 350°F until the internal temperature reaches 200°F to 210°F on in instant read thermometer. A toothpick inserted in the middle should come out mostly clean.
Pro Tip: After much trial and error, I have discovered the key to getting the shiny, crinkly top layer I wanted. It comes from properly beating the sugars and eggs together really well. This takes about 3 to 4 minutes on medium-high speed in a stand mixer. You want to ensure that the mixture is thoroughly combined, has a fluffy texture, and takes on a light off-white color. The magic happens because of all the air that is incorporated in to the mixture in this critical step.

Substitutions
- Cocoa Powder - This recipe calls to use natural, unsweetened cocoa powder and baking soda. The baking soda is added to reduce the acidity in the natural cocoa powder. Dutch Process cocoa powder can be used, just be sure to omit the baking soda. Dutch process cocoa powder uses cocoa beans that have been processed with an alkali solution that removes the acidity and the baking soda is no longer needed.
- All Purpose Flour - Make these gluten-free by swapping out equal amounts of the all purpose flour for Bob's Red Mill - 1 to 1 Gluten Free Baking Flour or other gluten-free substitute.
How to get brownies with the perfect shiny, crinkly tops.
They key to getting that shiny, crinkly brownie top lies in the equipment and the techniques used. It is absolutely critical to make sure you have the following components:
- Whip the Eggs and Sugar - Properly whipping the eggs and sugar together until the mixture is off-white and fluffy is the best way to ensure that you will end up with the perfect crinkly, shiny top. Do this by mixing the eggs and sugar together over medium-high speed for 3 to 4 minutes until the proper texture is achieved. All the other ingredients get added to this mixture and it's also important to gently fold them in to keep as much air in the batter as possible.
- Aluminum Or Non-Stick Metal Pan - Glass or ceramic pans take too long to heat up, and will not transfer heat quick enough to cause the brownies to skin over properly. You will end up with tasty brownies, but the look and the texture won't be the same. They will be more cake-like due to the slower heat transfer.

Related Recipes
Looking for more dessert recipes? Take a look below!


Check out all my other dessert recipes here.
Did you make this recipe for the Perfect Brownies from Scratch?
Let me know how yours turned out in the comments below, and don't forget to leave a rating!
Recipe

Perfect Brownies from Scratch
Equipment
- Small Saucepan
- Parchment Paper
- 9x9-Inch Metal Baking Pan Required if you want shiny, crinkly tops. See recipe note below.
- Instant Read Digital Thermometer Optional but Recommended
Ingredients
- 224 g Sticks Unsalted Butter Melted
- 65 g Unsweetened Cocoa Powder Substitute Dutch Process Cocoa Powder - See Recipe Note Below
- 220 g Cane Sugar
- 110 g Light Brown Sugar
- 3 Large Eggs Beaten
- 2 Teaspoon Vanilla Extract
- ½ Teaspoons Fee Brother's Black Walnut Bitters or Angostura Aromatic Bitters (Optional)
- 70 g All-Purpose Flour (Spoon the flour into a measuring cup, and scrape off the excess if using volume measurements)
- ⅛ Teaspoon Baking Soda Omit if using Dutch Process Cocoa Powder
- ¾ Teaspoons Fine Sea Salt
- 125 g Semi-Sweet Chocolate Chips
Instructions
- Preheat oven to 350°F, and prepare a 9x9-inch metal baking pan by lining it with parchment paper.
- Melt butter over medium-high heat in a small saucepan. Mix in the coca powder and stir until well combined. Remove from heat and set aside.
- Add the cane sugar, light brown sugar, eggs, vanilla extract, and bitters (if using) to the bowl of a stand mixer. Beat on medium-high speed for 3 - 4 minutes until off-white in color, and light and fluffy in texture.
- In a medium bowl, combine the flour, baking soda, and fine sea salt together.
- Add the melted butter and cocoa mixture to the sugar and egg mixture, and fold together until just combined. Add the dry ingredients to the wet and fold together until just combined. Add the chocolate chips then pour into the prepared baking pan.
- Bake for 35-38 minutes until a toothpick comes out clean, or 200-210°F internal temperature as read on an instant read thermometer. The higher the temperature, the more cake-like your brownies will be. The lower the temperature, the more fudge-like they will be.
Notes
-
- Whip the Eggs and Sugar - Properly whipping the eggs and sugar together until the mixture is off-white and fluffy is the best way to ensure that you will end up with the perfect crinkly, shiny top. Do this by mixing the eggs and sugar together over medium-high speed for 3 to 4 minutes until the proper texture is achieved. All the other ingredients get added to this mixture and it's also important to gently fold them in to keep as much air in the batter as possible.
-
- Aluminum Or Non-Stick Metal Pan - Glass or ceramic pans take too long to heat up and will not transfer heat quick enough to cause the brownies to skin over properly. You will end up with tasty brownies, but the look and the texture won't be the same. They will be more cake-like due to the slower heat transfer.
-
- Cocoa Powder - This recipe calls to use natural, unsweetened cocoa powder and baking soda. The baking soda is added to reduce the acidity in the natural cocoa powder. Dutch Process cocoa powder can be used, just be sure to omit the baking soda. Dutch process cocoa powder uses cocoa beans that have been processed with an alkali solution that removes the acidity and the baking soda is no longer needed.
-
- All Purpose Flour - Make these gluten-free by swapping out equal amounts of the all purpose flour for Bob's Red Mill - 1 to 1 Gluten Free Baking Flour or other gluten-free substitute.
Sheila says
Best. Brownies. EVER!! I have been making brownies from scratch for 50+ years. I’m so excited to share these, they are THAT good. Every step as written, every ingredient…is worth taking your time & doing it right! Thank you for this tremendous recipe, I can’t wait to make them again for next church pot luck!
Spencer Klickman says
Thank you so much for the kind words, Sheila! I'm so excited to hear that you liked them so much. They certainly don't last very long in our house - especially with a scoop of vanilla ice cream on top!
Matt K says
Made these 1-1/2 weeks ago for a party; they came out great (crinkly top, not too cakey, not too fudgy, nice hits of chocolate morsels). The only thing I noted was that it took a little longer than stated to get up to the recommended internal temperature range; but, that's why an instant-read thermometer is our friend! That being said, I got multiple requests for the recipe. This is now our go-to recipe for brownies! Thanks for posting!!!
Spencer Klickman says
Thanks for the kind words, Matt! Glad you ended up with good results. I'll be sure to double check the cooking time the next time I make these and make any adjustments as needed!
Long live the instant-read thermometer!