This recipe for Teriyaki Chicken Thighs is super easy, and delicious! It's an extremely popular dish across the world and is a perfect option for a busy weeknight meal when you don't feel like spending a ton of time in the kitchen.

The term "Teriyaki" is derived from the Japanese root words "teri", which means "to shine," and "yaki", which means "to broil or grill". There's no hiding the fact that it's the perfect name for this dish! Basting the chicken thighs while they cook creates a wonderfully flavorful, sticky, salty-sweet sauce that makes this dish completely irresistible.
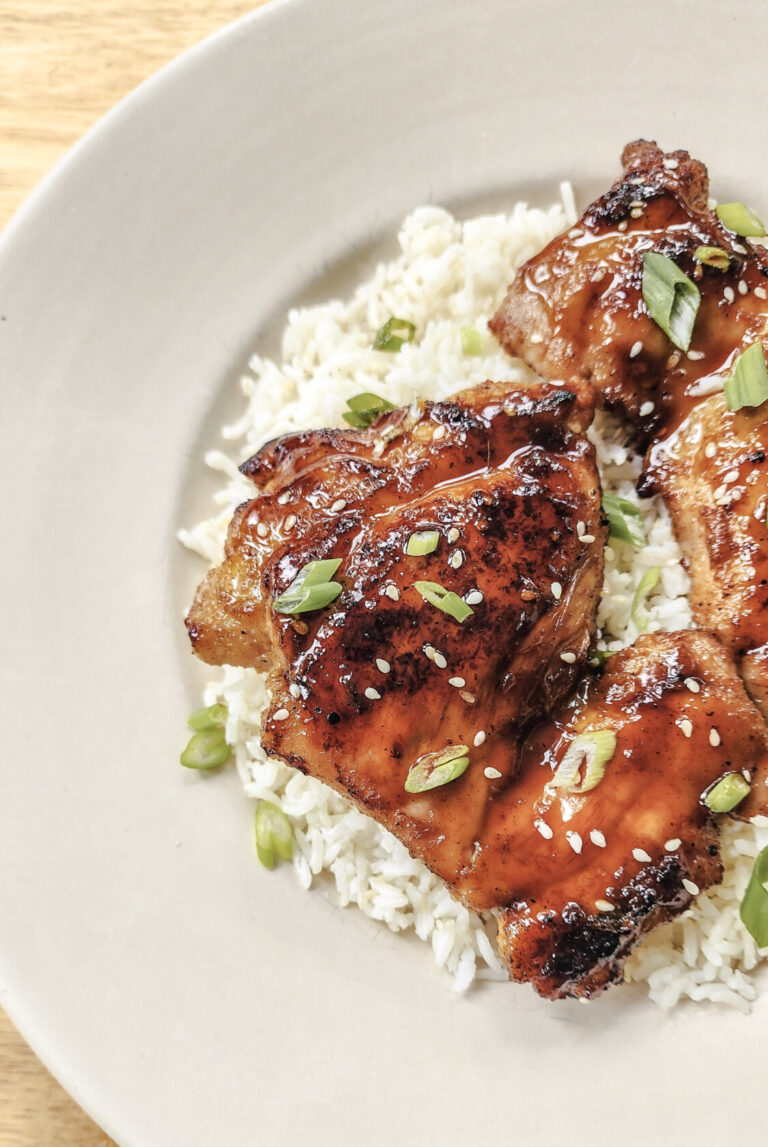
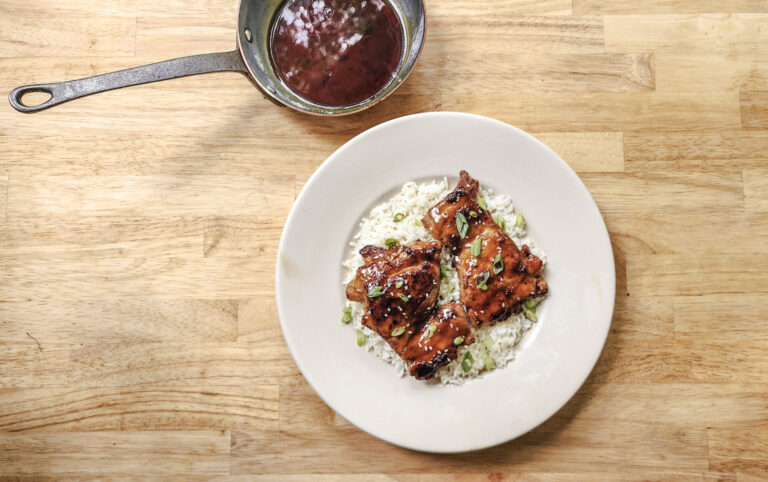
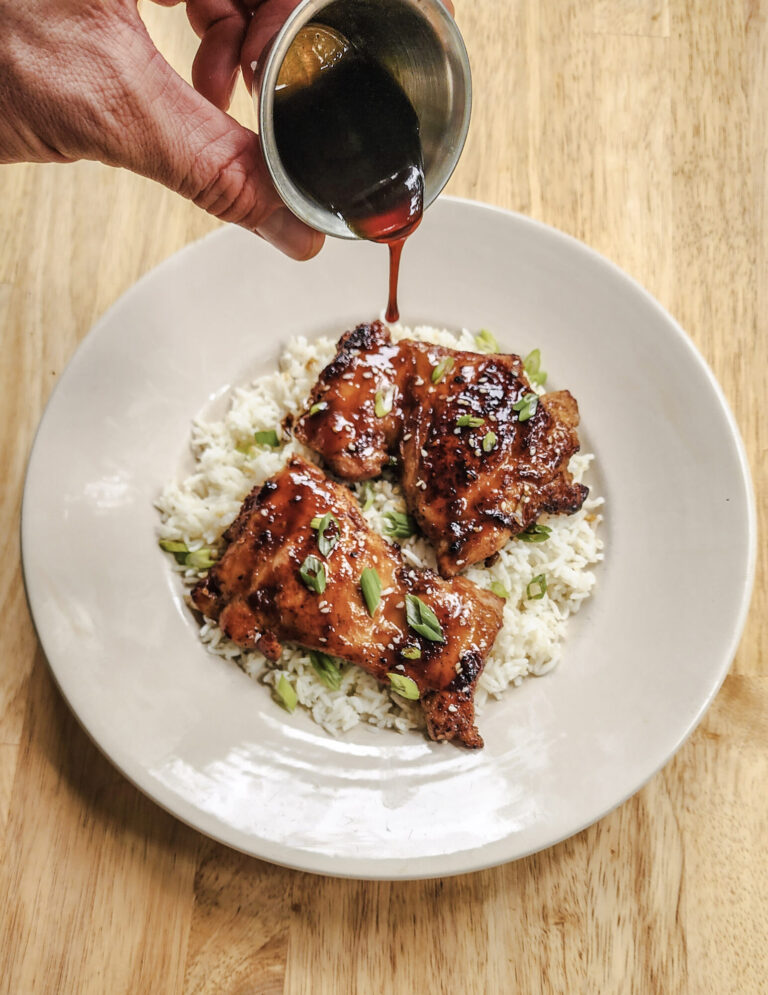
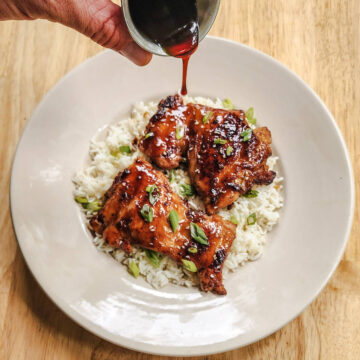
One of the best parts of this recipe is reserving half of the Teriyaki Glaze and cooking it down into a savory and sweet sauce that you spoon over the chicken right before serving. It's seriously amazing!
If you've got chicken thighs on deck, don't miss my weeknight-friendly Easy Butter Chicken with Chicken Thighs for a totally different flavor profile! Or use them to make my Chicken Thigh Enchiladas (with Homemade Sauce)!
Some of the techniques, ingredients, and methods used in my version may not be "traditional", but the results are no less delicious! The addition of a dry rub to the chicken is definitely not traditional, but the added flavor is totally worth the deviation, if you ask me.
Teriyaki Chicken Components and Ingredients
As mentioned previously, you may not find some of these ingredients in more traditional or classic Teriyaki recipes, but I find that the flavors are worth the changes.
The Dry Rub
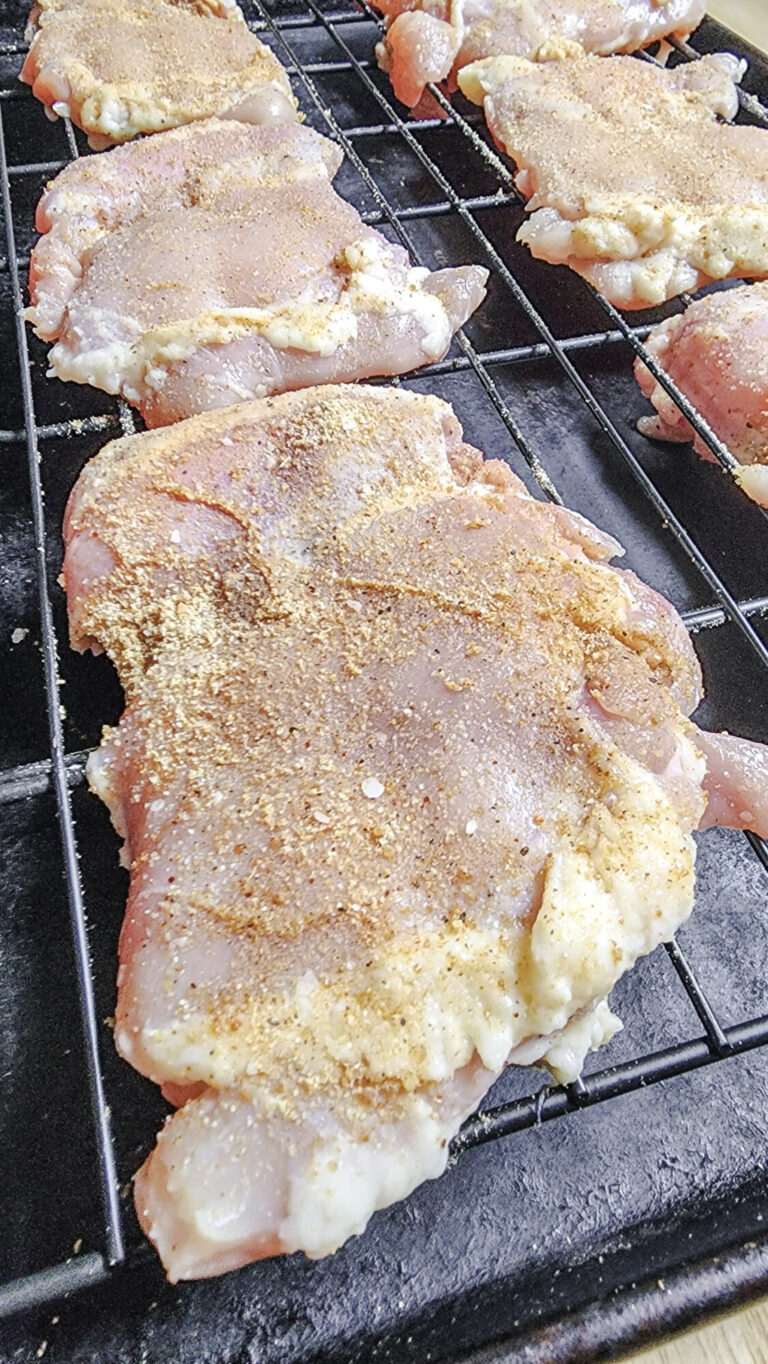
One of the main departures is the addition of a dry rub on the chicken. This is a simple dry rub that consists of the following ingredients:
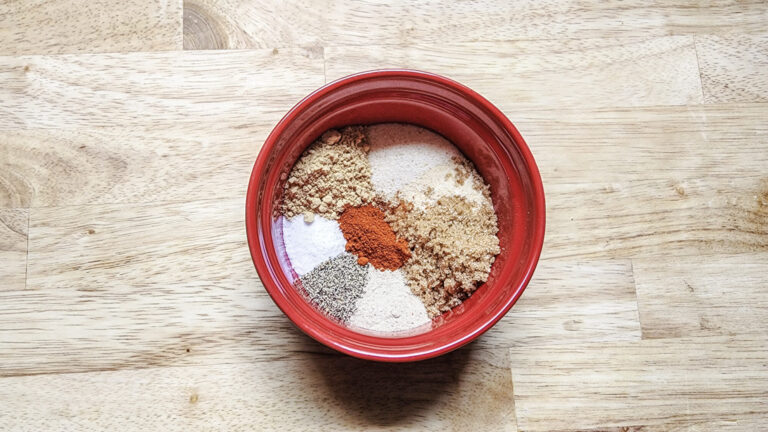
- Kosher Salt
- Black Pepper
- White Pepper
- Ground Ginger
- Granulated Garlic
- Onion Powder
- Cayenne Pepper
Mix all of these ingredients together, then rub it on both sides of your chicken thighs. Allow them to rest uncovered in the refrigerator for at least one hour, or up to overnight. Once you're ready to cook, lightly coat the chicken in a little bit of oil, and you're good to go!
Teriyaki Glaze and Sauce
This recipe refers to both a Teriyaki Glaze and a Teriyaki Sauce. This might be slightly confusing at first, but there is a reason for this:
- The "glaze" refers to the portion of the Teriyaki sauce that you baste on the chicken while it's on the grill. This cooks on the chicken and forms a sticky-sweet glaze.
- The "sauce" refers to part of the Teriyaki sauce that is reserved, thinned with a touch of water, then simmered down into an ultra-savory and sweet sauce that is spooned over the top of the chicken after it's cooked.
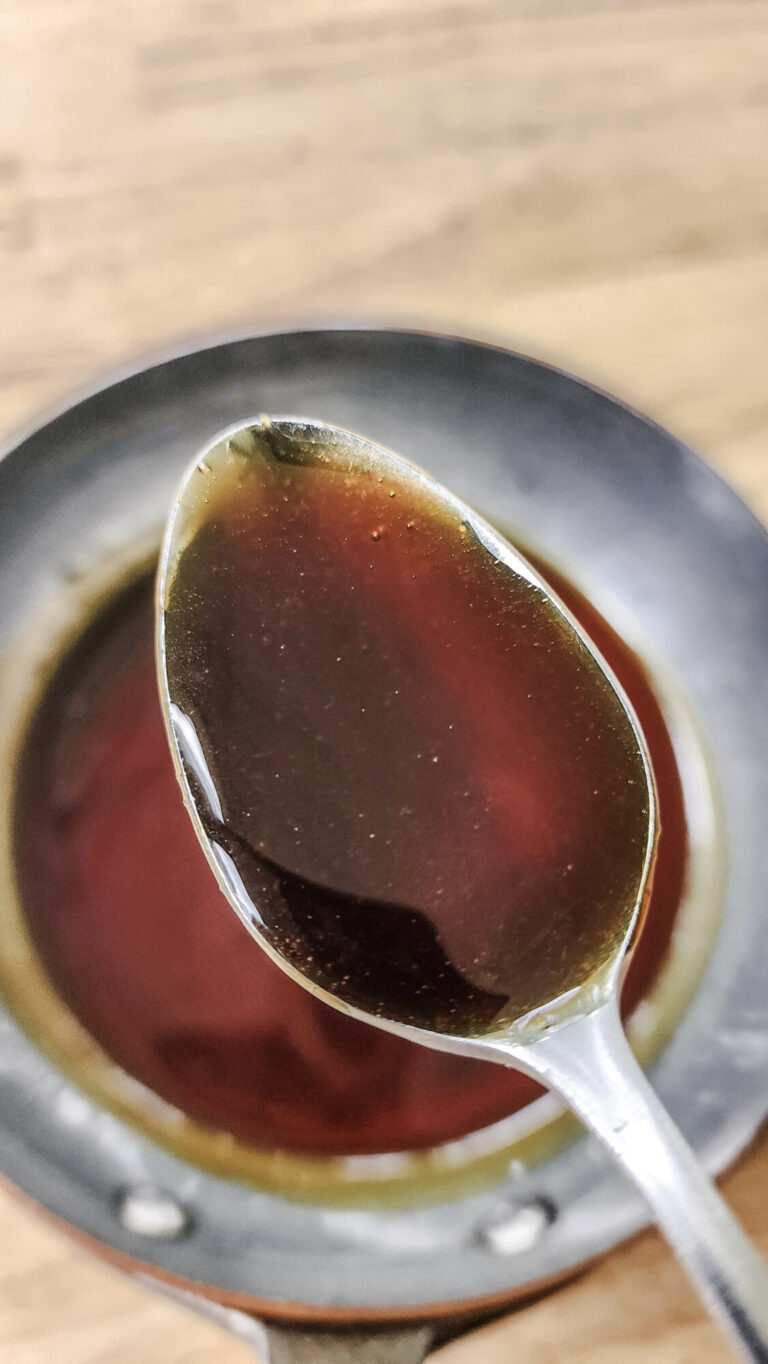
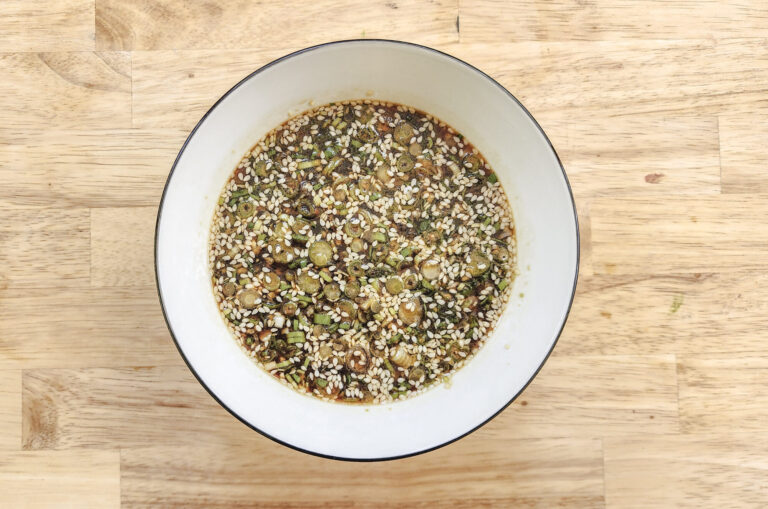
Both the glaze and the sauce are made from the same teriyaki "base". Combine all of the ingredients together in a bowl, then strain half of the "base" into a small sauce pan (this becomes your sauce), reserving the other half for the glaze. Dilute the teriyaki base that is in the pan with some water and bring it to a boil, then simmer until you have a nice, thick, and sticky sauce. The other half is used for the basting liquid that becomes the glaze on the chicken while it's cooking.
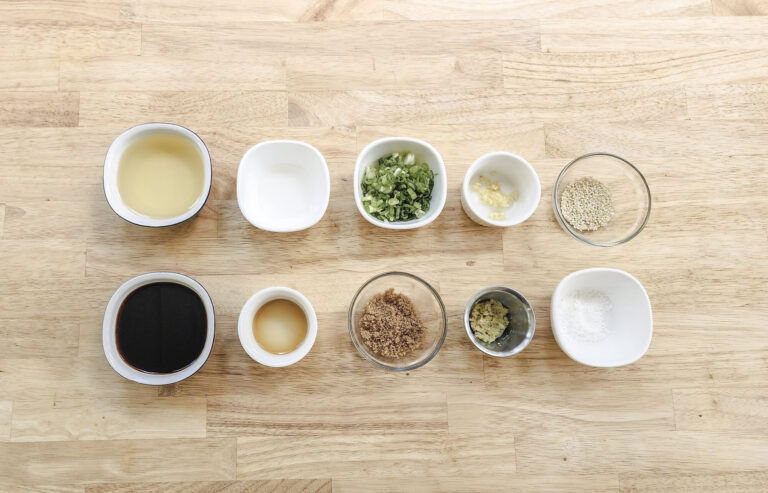
The teriyaki sauce ingredients are as follows:
- Soy sauce
- Mirin
- Sesame Oil
- White Wine Vinegar
- Minced Garlic Cloves
- Grated Ginger
- Cornstarch
- Scallions
- Sesame Seeds
Teriyaki Chicken Cooking Methods
As the name mentions, I prefer to sear these in a pan or on my Blackstone Griddle. You need to take care with this cooking method to ensure that the sugar-forward sauce doesn't end up burning.

I prefer to sear the chicken without any Teriyaki Glaze on it for the majority of the time that they are on the griddle. In the last several minutes, begin basting and flipping the chicken with multiple coats of the Teriyaki Glaze in order to coat the chicken. You end up with some nicely charred spots, yet nothing is burned. These charred spots add a ton of flavor and are my favorite parts of this dish! Cooking the chicken with the sauce on it the entire time results in chicken coated in a burnt sauce and a big, sticky mess to clean up. (Definitely, totally, NOT speaking from experience here....)
Gas or charcoal grilling is a great choice for this dish as well. The cooking instructions are basically the same as the pan/griddle method above. The only difference is that you can begin applying the glaze a little earlier. since the extra glaze liquid drips off the chicken and doesn't collect and burn like when you use a griddle or skillet (or any other flat cooking surface).
Serving Suggestions
The perfect pairing for this dish is my recipe for Miso Glazed Green Beans. The key to these is to make sure your pan is as hot as possible in order to achieve the perfect sear! Tossing in a homemade miso sauce for the last minute of cooking takes them to the next level!
Start things off with my recipe for Sparkling Honey Pear and Ginger Cocktail too! This is a super light and refreshing way to kick off a meal! The ginger is a really great addition that pairs well with this recipe too.
Did you make this recipe for Teriyaki Chicken Thighs?
Let me know in the comments below how yours turned out, and don't forget to leave a rating!
Recipe
Teriyaki Chicken Thighs
Equipment
- Small Mixing Bowl
- Medium Mixing Bowl
- Basting Brush
- Griddle, Grill, or Large Heavy Bottom Skillet
Ingredients
Chicken
- 2 lbs. Boneless Skinless Chicken Thighs About 6 Thighs
- Scallions/Green Onions Thinly Sliced - For Garnish
- Sesame Seeds For Garnish
Dry Rub
- ¼ Teaspoons Kosher Salt Per Pound of Meat
- ¼ Teaspoons Black Pepper
- ¼ Teaspoons White Pepper
- 1 Teaspoon Ground Ginger
- 1 Teaspoon Granulated Garlic
- 1 Teaspoon Onion Powder
- Pinch Cayenne
Teriyaki Glaze & Sauce
- ½ Cup Soy Sauce Substitute an equal amount of Coconut Aminos if avoiding soy.
- ½ Cup Mirin
- ½ Teaspoons Sesame Oil
- 1 Teaspoon White Wine Vinegar
- 3 Cloves Garlic Minced
- 2-inch Piece Ginger Grated
- ½ Teaspoons Cornstarch
- ½ Teaspoons Sesame Seeds
- 2 Scallions/Green Onions Thinly Sliced
- ¼ Cup Water For Teriyaki Sauce
Instructions
Dry Rub
- Combine all of the dry rub ingredients in a small mixing bowl.
- At least one hour (or up to overnight) before cooking the chicken, apply the dry rub to the chicken and allow to rest uncovered in the refrigerator until ready to cook. When ready to cook, apply a small amount of oil to the chicken and coat evenly.
Teriyaki Glaze and Sauce
- While the chicken is resting, combine all of the Teriyaki base ingredients in a medium mixing bowl. Split the Teriyaki base in half - half for basting on the grill (glaze), and half to make the teriyaki sauce.
- While your chicken is resting, add half of your Teriyaki base to a small sauce pan, and add ¼ cup of water. Bring to a boil, reduce heat to medium and simmer for 10 - 12 minutes, stirring frequently until thickened and coats the back of a spoon. Reduce heat to low and keep warm until ready to serve.
Teriyaki Chicken Cooking
- Heat your grill, griddle, or pan over high heat until very hot - approximately 450℉. Add several tablespoons of oil (if grilling, use tongs to rub your grill grates with a wad of oiled paper towel). Add your chicken and cook for 3 - 4 minutes per side, flipping frequently until beginning to brown. Apply your reserved Teriyaki Glaze to both sides of the chicken and cook for an additional two to 3-minutes. Flip frequently until well browned, the glaze begins to lightly char, and the internal temperature reaches 165℉ on an instant read thermometer.
- Plate over rice, apply a teaspoon or two of the reserved Teriyaki Sauce, and garnish with a sprinkle of sesame seeds and sliced scallions.


Lorie says
These look delicious! Will try them soon.
Spencer Klickman says
They're so good! Let me know how they turn out when you make them!