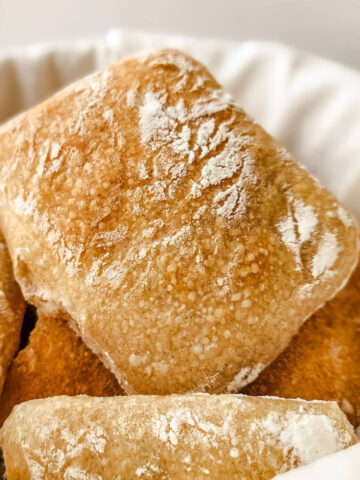
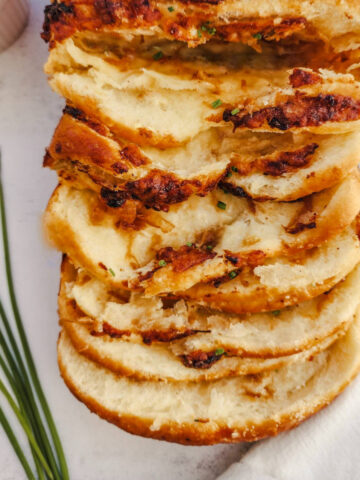
This Italian Herb and Cheese Bread is a Subway-style twist on my fan-favorite Handmade Sub Rolls-same soft, pillowy crumb, finished with a savory herb-and-cheese topping that's perfect for deli sandwiches, meatball subs, and more.

Over dozens of batches of these rolls-both for my own Baked Meatball Sub Sandwiches and for readers who've made them again and again-I've dialed in a method that delivers a reliably soft crumb, a strong rise, and rolls that hold up to heavy fillings without turning tough.
For this version, I kept the dough the same and fine-tuned the herb-and-cheese topping so it bakes up golden-brown, and makes every hoagie, grinder, or sub taste like it came straight from your favorite deli.
Quick Recipe Insights: Italian Herb and Cheese Bread
- Hands-On Time: ~25 minutes
- Rising Time: 1 hr 30 min (total proofing)
- Bake Time: 20 min (plus 1-2 minutes if needed)
- Total Time: ~2 hrs 15 min
- Yield: Six 10-inch rolls
- Difficulty: Easy-Moderate
- Flavor Profile: Rich, buttery, lightly sweet; aromatic herbs; crispy cheese crust; classic deli-style sandwich roll flavor.
Jump to:
- Quick Recipe Insights: Italian Herb and Cheese Bread
- Ingredients for Italian Herb and Cheese Bread
- How to Make Italian Herb and Cheese Bread
- Troubleshooting Tips for Herb and Cheese Sub Rolls
- Storing and Freezing Instructions
- Italian Herb and Cheese Bread FAQs
- Other Great Bread and Baking Recipes You'll Love
- Recipe
- Comments
Ingredients for Italian Herb and Cheese Bread
The ingredients are split into two key parts: my soft, bakery-style sub-roll dough and a savory herb-and-cheese topping that crisps up beautifully in the oven. More details are below.
Dough Ingredients

- Bread flour: Higher protein = stronger gluten, better rise, and rolls that don't collapse under heavy fillings. Can substitute all-purpose flour in equal parts.
- Whole milk: Adds richness and tenderness for a soft, sandwich-shop crumb.
- Cold unsalted butter: Cold butter takes longer to fully incorporate. This purposefully extends the kneading time, which helps properly develop gluten.
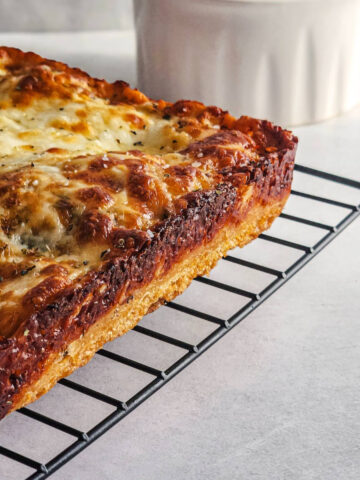
Italian Herb and Cheese Topping

- Low-Moisture Mozzarella: Whole-milk or part-skim both work-low-moisture is the key, so it melts (then crisps) without steaming the crust. Don't use fresh mozzarella.
- Italian Herb Blend: Fast and consistent deli-style flavor. Typically includes oregano, basil, thyme, and rosemary.
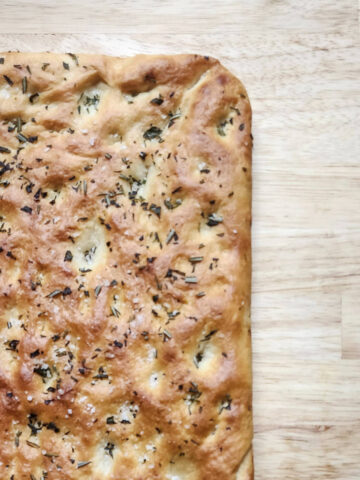
For more herby-bready goodness, check out my Herbed Focaccia recipe-it's loaded with fresh herbs, a crisp crust, and makes the perfect base for my Focaccia Muffuletta.
Refer to the recipe card below for the complete list of ingredients and quantities.
How to Make Italian Herb and Cheese Bread
This dough goes through two rises: a 1-hour bulk rise, then a 30-minute final proof once the rolls are shaped. The step-by-step overview is below-see the full recipe card for exact times and detailed instructions.

Steps 1-4 - Mixing & Dough Development: Bloom the yeast → mix the dough → add cold butter → knead until smooth.

Steps 5-8 - Bulk Rise, Dividing, & Shaping: Let the dough rise 1 hour → portion into 6 pieces (about 140g each) → roll into rectangles → roll up tightly & pinch seams.

Steps 9-12 - Second Proof, Topping & Baking: Proof the shaped rolls (seam-side down) for 30 min → brush with egg wash → sprinkle with herbs → lightly score → top with cheeses and bake 20 min at 400°F (add 1-2 min if needed).

Troubleshooting Tips for Herb and Cheese Sub Rolls
- Dough feels too sticky
This is normal for this enriched dough. Don't rush to add flour. After the 1-hour bulk rise, gluten development tightens the dough and it becomes much easier to shape. If needed, use a light dusting of flour on your hands/bench-not a heavy knead-in. - Dough isn't rising much
Give it more time and warmth. This dough responds best to a slightly warm proofing spot. Also, double-check yeast freshness and that your milk wasn't too hot (it should feel warm, not hot-a thermometer takes out all of the guesswork). - Rolls spread wide instead of rising tall
That's usually a shaping/seam issue. Roll the dough up tightly, pinch the seam firmly, and proof seam-side down so the roll holds tension. - Herbs/cheese not sticking
Brush rolls with egg wash, sprinkle on the herbs, then score, and add the cheese right after. Working quickly ensures the toppings stick.
Storing and Freezing Instructions
- Short-term: Cool completely, then store airtight at room temperature for 1-2 days. If you bag them too warm, trapped steam softens the crust and can make the tops and bottoms gummy.
- Long-term: Freeze fully cooled rolls in an airtight bag or container for up to ~3 months (wrap individually in parchment if you want to grab one at a time). Thaw at room temp, then warm in a 300-325°F oven for a few minutes to refresh.
Italian Herb and Cheese Bread FAQs
Bread flour is recommended for the best rise and structure (higher protein = stronger gluten development). You can substitute all-purpose flour 1:1; the rolls will just be a little softer and less sturdy.
Yes. Instant yeast can be mixed directly into the dry ingredients, so blooming is optional. Rise times are very similar, but go by dough volume, not the clock.
Yes. Refrigerate the dough after kneading, then the next day let it warm until relaxed and slightly puffy (often 2-3 hours, depending on room temp) before shaping, proofing, topping, and baking; cold dough will need extra time to rise.
A combination of low-moisture mozzarella (whole-milk or part-skim) and parmesan gives the best melt-then-crisp top and sharp flavor. Asiago, Romano, or Monterey Jack also work; just avoid fresh mozzarella, and use freshly grated when you can.
Other Great Bread and Baking Recipes You'll Love
If you liked these Italian Herb and Cheese rolls, here are a few more of my favorite bread and baking recipes-tested, dependable, and perfect for leveling up your sandwich game and beyond!
Did you make this recipe for Italian Herb and Cheese Bread?
Let me know how yours turned out in the comments below, and don't forget to leave a rating!
Recipe

Italian Herb and Cheese Bread (Subway-Style Rolls)
Equipment
- Instant Read Digital Thermometer Optional
- Stand Mixer Optional
- Rolling Pin
- Parchment Paper
Ingredients
- 1 Cup Whole Milk (245g) 110-115℉
- 1 Tablespoon + 2 Teaspoons Sugar (30g)
- 2 ½ Teaspoons Active Dry Yeast (11g)
- 3 ¼ Cups Bread Flour (450g)
- 2 Teaspoons Fine Sea Salt (12g)
- 2 Eggs Beaten
- 3 Tablespoons Unsalted Butter (41g) Cold, Cubed
- 1 Egg White Beaten - For Egg Wash
- 1 Tablespoon Water For Egg Wash
- ½ Tablespoon Italian Seasoning Herb Blend
- ¾ Cup Low-Moisture Mozzarella Whole Milk or Part Skim, Grated
- 2 Tablespoons Parmesan Grated - Substitute Romano
Instructions
- In a medium-sized bowl, add the warm milk, sugar, and yeast. Let it bloom for 3 to 5 minutes until frothy.
- While the yeast is blooming, combine the bread flour and salt in the bowl of a stand mixer. Add the yeast mixture and the beaten eggs to the flour mixture, and knead on low speed for 3 to 5 minutes until a shaggy dough forms, scraping down the sides of the bowl with a spatula as needed.
- Add in the cold, cubed butter, and knead for an additional 12-15 minutes until the butter is fully incorporated and the dough is smooth. (The dough ball should weigh approximately 880g at this point).
- Turn the dough out onto a lightly floured work surface, and roll into a tight ball. Lightly grease a large bowl with oil, turning the dough ball to evenly coat. Cover and proof for 1 hour, or until doubled in size.
- Turn the dough out onto a lightly floured work surface, and punch the dough down. Divide into six equal pieces (approximately 140g each) and roll into individual dough balls.
- Using a rolling pin, roll each dough ball into a rectangle that is approximately 9 inches wide by 5 inches tall. The dough should be between ¼ to ½-inch thick. Starting with the long side, tightly roll the dough into a log shape. Pinch the end seams together until they are smooth. Place seam side down on a baking sheet lined with parchment paper.
- Cover the rolls with a damp kitchen cloth and let rise for an additional 30 minutes. While the dough is proofing, preheat the oven to 400°F.
- Mix the egg white and water in a small bowl and gently brush over the rolls. Sprinkle the rolls with the Italian seasoning blend, then use a lame, razor blade, or sharp kitchen knife to score the dough ¼ deep in three spots. Top with the grated cheese mixture.
- Bake for 20 minutes until golden brown, or they register 195-200°F internally on an instant-read thermometer. (Add 1 - 2 minutes additional time if needed). Remove from oven and transfer to a wire rack. Allow them to cool completely.
Notes
- Short-term: Cool completely, then store airtight at room temp 1-2 days. Don't bag warm rolls (steam = gummy crust).
- Long-term: Freeze fully cooled rolls airtight for ~3 months (wrap individually if desired). Thaw at room temp, then warm at 300-325°F for a few minutes to refresh.
- Sticky dough: This is normal before the first rise-don't add lots of flour. After the 1-hour bulk rise, it tightens up and shapes more easily; use only a light dusting if needed.
- Dough not rising enough: Give it more time/warmth; use fresh yeast and make sure milk is warm, not hot.
- Rolls spreading out, not up: Shape with tight tension, pinch seams firmly, and proof seam-side down.Disclaimer: I am not affiliated with Subway in any way.

S says
Are you able to put this recipe in a bread maker and then take the dough and finish in the oven?
Spencer Klickman says
Hi! Yes - you can absolutely use a bread maker! While I don't have any personal experience using a bread maker, other readers have made my Handmade Sub Roll recipe (that this recipe is based off of) exactly like this. I believe you can use the machine to mix and bulk proof the dough, and then just follow the rest of the recipe as written.
Unfortunately, I can't provide any guidance on kneading or proofing times since machines can vary. The easiest thing would be to just cross-reference the process pictures have in the blog post above to make sure you're on track.
Please let me know how these turn out if you decide to make them! I'd love to hear your results!
Benjamin says
This is THE best sub roll recipe for Italian sandwitchs that I have found. The bread came out fluffy and soft yet sturdy enough to pile on the meat, cheese and toppings. The added flavor from the Italian herb and cheese is strong enough to taste, but not overpowering, delicious! Will be saving this one to make on repeat.
Spencer Klickman says
Thanks for the kind words, Benjamin! Glad you enjoyed this recipe!